2 Easy Ways to Take a Screenshot on iPhone 8/8 Plus/X/XS/XR
Applies To: iPhone XS/XS Max/XR, iPhone X, iPhone 8/8 Plus
Taking a screenshot on your iPhone 8/8 Plus, iPhone X, or iPhone XS/XS Max/XR is a common task that allows you to share important information or save a moment. This article provides two ways to take a screenshot on your iPhone, and also covers how to view, edit, and share the screenshot on your device.
You may also need the solutions to the common problem "touch screen not working" on your iPhone/iPad. Follow the detailed fixes to fix the issue if you are troubled by it.
Part 1: How to take a screenshot on iPhone 8/iPhone 8 Plus
You can take a screenshot on your iPhone by pressing the Sleep/Wake button and the Home button at the same time. Alternatively, if your iPhone has a Home button, you can also use the Assistive Touch feature, which allows you to take a screenshot by tapping the Assistive Touch icon on the screen, then tapping the Screenshot option.
Tip 1: Screenshot iPhone 8/8 Plus using iPhone buttons
Step 1: To capture the screen on an iPhone, start by going to the screen you want to capture. This can be any screen, such as a web page, a game, or an app.
Step 2: To take a screenshot on an iPhone 8/8 Plus, quickly press and release both the Sleep/Wake button and the Home button simultaneously.
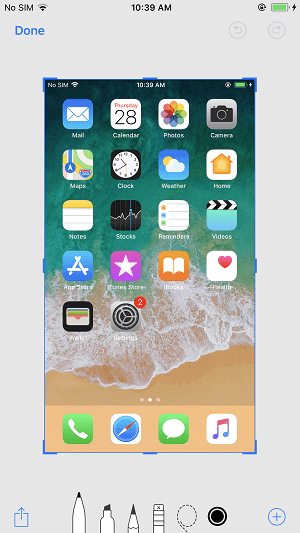
Step 3: To edit a screenshot on your iPhone, tap on the preview of the screenshot on the lower left of the screen, then crop/markup the image, add texts/signature/magnifier, and click "Done" > "Save to Photos" to keep it or click the Share Button to share it via Message, Mail, or other methods. Alternatively, swipe left across the preview to save it directly to your iPhone, and check it later in Photos > Albums > Screenshots.
Tip 2: Take a screenshot on iPhone 8/8 Plus using AssistiveTouch
To take a screenshot using AssistiveTouch, you can follow these steps: Go to Settings > Accessibility > Touch > AssistiveTouch, and turn on the switch next to AssistiveTouch. Then, a small icon will appear on your screen. Tap on this icon and select "Take Screenshot" from the menu.
Step 1: To adjust the settings on your iPhone, go to Settings > General > Accessibility. In Accessibility, you can also invert the colors on your iPhone 8 or 8 Plus to make the screen more eye-friendly. This will change the colors on your screen to make them more visible to your eyes. You can also find other accessibility features in this menu, such as zooming in on the screen and using text-to-speech.
Step 2: Scroll down to click AssistiveTouch and turn it on.
Step 3: To add a new icon to the top level menu, go to Customize Top Level Menu and tap on the Plus sign to add a new icon.
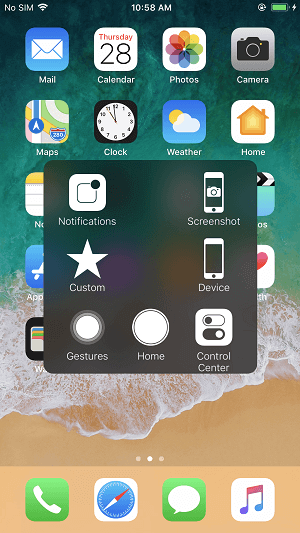
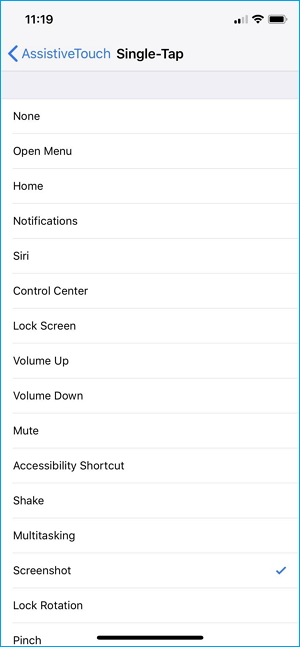
Step 4: To add a Screenshot feature to the AssistiveTouch menu, tap on the AssistiveTouch icon, then tap on the "Custom Items" option and add a new icon. Tap on the newly added icon, choose "Screenshot" and click "Done". The Screenshot option will now be available in the AssistiveTouch menu.
Step 5: To take a screenshot on your iPhone 8/8 Plus, go to the screen you want to capture and click the AssistiveTouch button on your screen, then select Screenshot.
Part 2: How to screenshot on iPhone X
To take a screenshot on iPhone X, press and hold the Sleep/Wake button on the top right side of the phone and the Volume Down button on the left side at the same time, then release them both. The screenshot will be saved to your Photos app.
Step 1: Navigate to the screen you want to capture on your device.
Step 2:To take a screenshot on your iPhone X, press and hold both the Side button and the Volume Up button simultaneously.
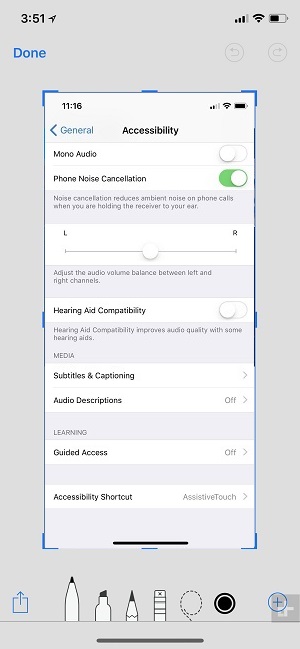
Step 3: To edit or save a screenshot, click the thumbnail in the bottom-left corner of your iPhone X after taking the screenshot. You can access your screenshots in the Photos app by going to Albums, then either Camera Roll/Screenshots in iOS 11 or Media Types > Screenshots in iOS 12.
Note: To screenshot your iPhone X, you can also use the Assistive Touch feature. With Assistive Touch enabled, you can quickly take a screenshot by tapping the Assistive Touch icon on the screen, then selecting the "Screenshot" option from the menu that appears.
Part 3: How to screenshot iPhone XS/XS Max/XR
To take a screenshot on an iPhone XS/XS Max or iPhone XR, press the Side button and the Volume Up button at the same time. You can also use Assistive Touch by triple-clicking the Home button and selecting Screenshot from the menu.
You may also need:
- How to transfer contacts from iPhone to iPhone XS/XS Max/XR
- How to transfer files from PC to new iPhone
- How to put music to iPhone XS/XS Max/XR
Tip 1: Screenshot on iPhone XS/XS Max/XR with buttons
Step 1: Go to the screen you want to capture.
Step 2: To take a screenshot on your iPhone XS/XS Max/XR, press and hold the Side button on the right side of your phone, then quickly click the Volume Up button. This will capture a screenshot of your iPhone's current screen.
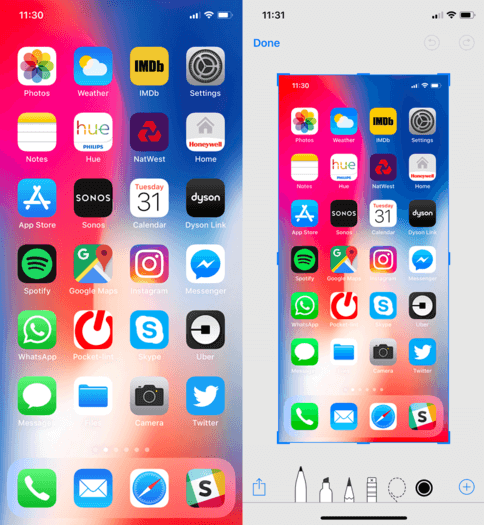
Step 3: After taking a screenshot on your iPhone, you will see a thumbnail of the screenshot appear on your screen. You can tap the thumbnail to edit the photo or press and hold it to share it via various apps, such as AirDrop, Messages, or Mail.
Tip 2: Take a screenshot on iPhone XS/XS Max/XR via Assistive Touch
To take a screenshot on your iPhone XS/XS Max/XR without pressing the buttons, you can enable Assistive Touch and add Screenshot control to the menu, allowing you to screenshot with ease.
Step 1: Go toSettings>General>Accessibilityon your iPhone XS/XS Max or iPhone XR.
Step 2: Scroll down to clickAssistiveTouchand turn it on.
Step 3: To add a new icon to the top level menu, click on the "Customize Top Level Menu" option and then tap on the "+" sign to add a new icon.
Step 4: Tap on the newly added icon, chooseScreenshotand clickDone.
Step 5: To take a screenshot on your iPhone XS, XS Max, or XR, go to the screen you want to capture, click the AssistiveTouch button, and select Screenshot from the menu. This will take a screenshot of the current screen.
Part 4: How to transfer screenshots from iPhone to computer (or another iDevice)
If you're looking for a totally free iOS data transfer tool that can help you copy screenshots on your iPhone to your computer or other iDevices, Qiling MobiMover Free is a good choice. This tool supports iOS 8 or later and Windows 7 or later, or OS X 10.7 or later, allowing you to transfer various files, including photos, videos, audios, contacts, messages, notes, and more, from your iPhone/iPad to your computer, or from one iPhone/iPad to another, to free up space, keep data synced, or enrich your iPhone/iPad contents.
MobiMover can also be taken as a file manager and a video downloader, with which you can easily delete iPhone photos from PC or download videos from websites to your computer or iPhone/iPad.
Step 1. Connect your iPhone to a computer running Windows 7 or later, or Mac OS X 10.7 or later. Launch Qiling MobiMover, choose "Phone to PC" on the main screen, and click the "Next" button to proceed.
Step 2. Select the "Pictures" category as you want to copy from your iPhone to your computer, which allows you to transfer other supported file types together with photos for a backup.
Step 3. To transfer photos from your iPhone to your computer, click the "Transfer" button. The time it takes to import pictures will depend on the size of the files, so be patient and wait for the process to finish. Once complete, check the items in the selected folder to confirm the photos have been successfully transferred.
Related Articles
- How to Reset iPhone 8/iPhone X to Factory Settings in 2 Ways
- How to Delete An Instagram Account on iPhone
- How to Refresh Windows 11 without Losing Programs (3 Ways)
To refresh Windows 11 without losing programs, you can learn 3 easy ways from this article and the best way to prevent data loss. Please read on. - How to Reset Windows 11 without Losing Data and Apps
You may want to fix some system problems by resetting Windows 11, so how can you do it, is there a way to reset Windows 11 without losing data or apps?