How to Transfer Ringtone from iPhone 6/6s/7/8/X/XR/11/12 to Computer or iTunes
Quick Navigation:
- Part 1. How to Transfer Ringtones from iPhone to Computer without iTunes
- Part 2. How to Add Ringtone from iPhone to iTunes Library
To transfer and back up iPhone ringtones, you can use a third-party tool called Qiling MobiMover. This tool allows you to transfer ringtones from iPhone to PC, and also enables you to back up and restore iPhone ringtones. The process is straightforward and user-friendly, making it easy to manage your iPhone ringtones.
To transfer ringtones from your iPhone to your PC, you can use iTunes to backup your iPhone's ringtones to your current computer, without deleting the imported ringtones from your old PC. Simply connect your iPhone to your current computer, open iTunes, and select "Backup up to this computer" instead of syncing. This will create a backup of your iPhone's ringtones on your current computer, without affecting your old PC's iTunes purchases. You can then access and use these ringtones on your iPhone. Alternatively, you can use a third-party app or service to transfer ringtones from your iPhone to your PC, but using iTunes is a safe and straightforward method.
-by an iPhone user from Apple Community
Transferring purchased ringtone from iPhone/iPad to iTunes library is a common way to back up iPhone ringtone, but syncing from iTunes to iPhone may erase other ringtones. A better approach is to transfer ringtones from iPhone to computer, which can be done without using iTunes. This article will cover both methods: transferring iPhone ringtones to PC without iTunes and transferring them to the iTunes library.
Part 1. How to Transfer Ringtones from iPhone to Computer without iTunes
If you want to transfer ringtones from your iPhone to your computer directly without using iTunes, you'll need a third-party iPhone transfer software. Qiling MobiMover is a great option that can help you export your iPhone ringtone to your computer. With it, you can connect your iPhone to your PC via a USB cable and export a wide range of data, including ringtones, songs, voicemails, videos, photos, contacts, messages, notes, and books, to your computer.
Step 1. Connect your iPhone to the computer and run Qiling MobiMover.
Allow Qiling MobiMover to access your iPhone by clicking "Allow" on the software and tapping "Trust" on your iPhone.
To continue, click on the "Audio" and "Ringtones" options within the Content Management section.
Step 2. To transfer ringtones from your phone to your PC, select the ringtones on your phone and choose a secure location on your PC to save them. This could be the desktop or a designated folder.
To select saved ringtones on your iPhone for transferring, click on the "Ringtones" tab.
By clicking on the "Settings" option at the top right corner of your PC, you can redirect the saved ringtones to a secure location on your computer.
Step 3. Click "Transfer to PC" to start the transferring.
Wait for the process to complete and Qiling MobiMover will immediately transfer selected ringtones to your computer.
You can export all ringtones from your iPhone to your computer for backup purposes, and if you want to transfer ringtones to another iPhone, you can refer to an article about sending ringtones to iPhone.
To keep a backup of your videos on PC, you can import them from your iPhone to your computer. For this, you can also read on how to import videos from iPhone to computer.
Part 2. How to Add Ringtone from iPhone to iTunes Library
If you still want to add ringtones to iTunes, you can follow the guide below for a step-by-step process.
You can only transfer purchased ringtones from iPhone to iTunes by exporting them in this method.
Step 1. To sync your iPhone with your computer, start by installing the latest version of iTunes on your computer. Then, connect your iPhone to the PC using a USB cable. This will allow you to access your iPhone's data and perform various sync operations.
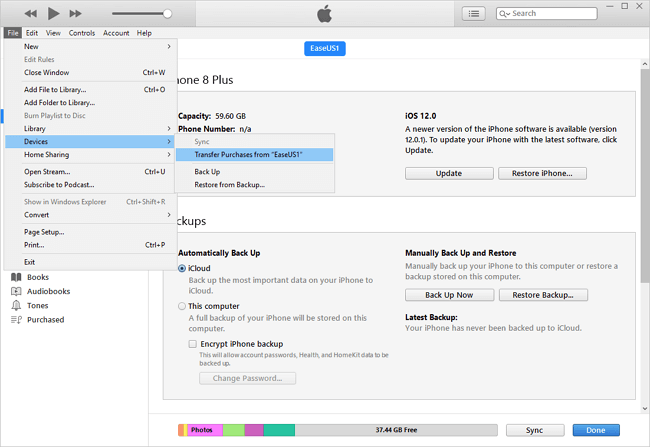
Step 2. To add purchased ringtones to iTunes Library, open iTunes on your computer, click "File", then select "Device", and finally choose "Transfer Purchases from [XXXX]" from the menu.
Transferring iPhone ringtones to PC and sharing them with another iPhone can be done using Qiling MobiMover, which allows for easy backup and sharing of important data.
Related Articles
- How to Rip Audio from MP4 in Simple Clicks
- Transfer Notes from iPad to Computer with 4 Easy Methods
- How to Back Up WhatsApp Chat to PC from iPhone
- Backup and Restore Windows 11 Image to New Hard Drive Easily (3 Ways)
Backups are very important to protect your system and data just in case you need to restore Windows 11 image to new hard drive for a quick disaster recovery.