3 Methods to Transfer Data from iPhone 7 to iPhone 8
Transferring data from an old iPhone to a new one, whether it's a brand new iPhone or a second-hand device, is a necessary process. Here, we'll show you three simple and quick methods to transfer data from an iPhone 7 to an iPhone 8, using tools such as Qiling MobiMover, iCloud, and iTunes.
This guide provides a step-by-step process to transfer videos from an iPhone 8 to a Windows PC. It also includes a bonus tip to transfer videos from a Windows PC to an iPhone 8. Additionally, if you have any further questions, you can refer to the FAQ section.
Method 1. How to Transfer Data from iPhone 7 to iPhone 8 with Qiling MobiMover [Easy & Quick]
To transfer data between iOS devices and a computer, we recommend using Qiling MobiMover, a reliable iPhone data transfer software that supports transferring various iOS data, including contacts, messages, videos, music, and more, from iPhone/iPad to computer, from PC to iPhone/iPad, and between two different iOS devices.
If you're looking to transfer data from one iPhone to another, Qiling MobiMover is a must-get tool.
To transfer data from iPhone to iPhone:
Step 1. Connect two iPhones to your computer with compatible USB cables, then tap "Trust This Computer" on the devices. Run Qiling MobiMover, navigate to "Phone to Phone", determine the direction from source to destination iPhone, and click "Next" to continue.
Step 2. With MobiMover, you can sync various files from one iPhone to another without using iCloud, including data such as photos, videos, music, and more, but some types like Contacts, Notes, and Messages may require you to turn off iCloud service for those apps first.
Step 3. Wait patiently for the syncing process to finish. Then, check the content in the related applications.
Method 2. How to Transfer Everything from iPhone 7 to 8/8 Plus via iCloud
To transfer data from your old iPhone 7 to your new iPhone 8, you can use iCloud, which provides 5GB of storage for backing up your device. If you have an iCloud account and have enabled iCloud sync on your iPhone 7, simply log in to the same account on your new iPhone 8 to access your backed-up data. This method allows you to transfer your data without needing a physical connection between the two devices.
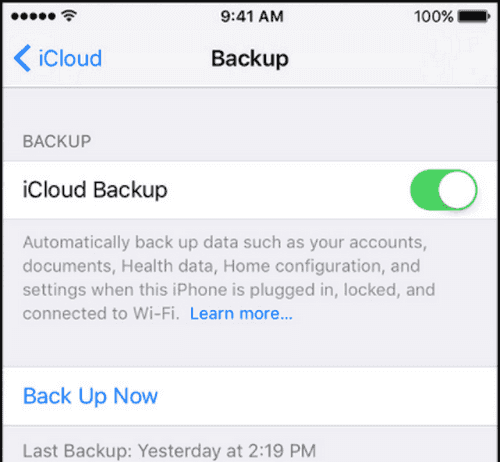
Step 1. Connect your old iPhone to Wi-Fi, then go to Settings > [your name] > "iCloud."
Step 2. To back up your iPhone, go to Settings > [your name] > iCloud > iCloud Backup, and tap "Back Up Now." Ensure your iPhone remains connected to WiFi until the backup process is complete.
Step 3. When setting up your new iPhone, follow the onscreen setup steps until you reach the "App & Data" screen, then tap "Restore from iCloud Backup" to restore your data from your previous iPhone.
Note: To activate your new iPhone 8/8 Plus, simply turn it on, follow the on-screen instructions, and enter your Apple ID and password to restore your device from an iCloud backup. If you don't have an iCloud backup, you can restore from an iTunes backup or set up your device as new. If you want to erase all content and settings, go to Settings > General > Reset > Erase All Content and Settings, and then restore from an iCloud backup. This will erase everything from your device. If you don't want to erase everything, consider other methods in this guide.
Method 3. Transfer data from iPhone 7 to iPhone 8 using iTunes
The third method recommended is transferring data from iPhone 7 to iPhone 8 with iTunes. This involves creating a local backup for your iPhone 7 on your PC and then restoring it to your new iPhone 8, effectively syncing all data from iPhone 7 to iPhone 8 with iTunes, which will erase your current content and replace it with what's in the iTunes backup.
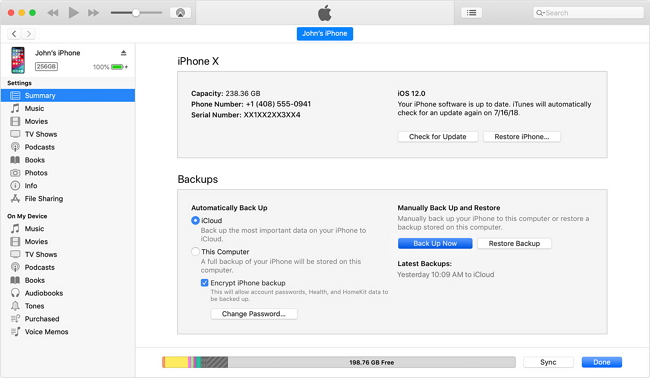
Step 1. Install the latest version of iTunes on your computer, then connect your old iPhone to your system using a USB cable and launch iTunes.
Step 2. Click the iPhone icon on the menu bar, then select "Back Up Now" from the drop-down menu.
Step 3. iTunes will back up your iPhone. Once the process is complete, you can safely disconnect your device.
Step 4. To restore your iPhone, connect it to your computer, click on your device icon, and from the right-hand panel, select the "Restore iPhone" option.
Bonus Tip: How to Transfer Videos from a Windows PC to an iPhone 8
If you want to send specific videos from your Windows PC to an iPhone 8 or 8 Plus, you have five options: using Qiling MobiMover, iCloud, iTunes, the VLC app, or third-party cloud services like Dropbox. For more details, you can refer to our previous guide on transferring videos from PC to iPhone with or without iTunes.
In Conclusion
With the three methods introduced in this guide, you can easily migrate everything from your iPhone 7 to your iPhone 8, including setting up your device for the first time with iCloud or iTunes, or transferring data between two iOS devices with Qiling MobiMover. This allows you to transfer videos, contacts, photos, and more data quickly and easily.
FAQs
1. Why does my Windows 7 PC not connect to my iPhone 8 and transfer new pictures and files?
Your Windows 7 PC may not connect to your iPhone 8 due to various factors, including but not limited to, issues with the iPhone's USB driver, problems with the iTunes installation, incorrect iPhone settings, or conflicts with other devices or software on your PC.
- Your iPhone doesn't have enough battery.
- You haven't Trusted your computer yet.
- Your cable is damaged.
- You haven't installed iTunes on your computer.
2. How to transfer photos from iPhone 8 to Windows PC?
Transferring photos from an iPhone 8 to a Windows PC can be done through various methods, including File Explorer, the Photos app, Qiling MobiMover, and iCloud. Each option has its own advantages and disadvantages, allowing users to choose the best approach based on their specific needs.
3. What is the fastest way to transfer data from old iPhone to new iPhone?
Transferring data from an old iPhone to a new one is a breeze with Apple's Quick Start feature. This direct method allows you to transfer your data while setting up your new device, making it the fastest way to get your new iPhone up and running with your existing content. The process is straightforward and easy to follow, ensuring a seamless transition to your new device.
Related Articles
- How to Sync iPhone to a New Computer Without Erasing
- How to Delete Files on iPhone/iPad in 3 Ways
- Contacts Didn't Transfer to New iPhone? Fixes Here!
- How to Move Photos from Mac to iPhone