How to Move Photos from Mac to iPhone
Five easy ways to move photos from Mac to iPhone.
Data transfer between an iPhone, iPad, or iPod and a computer is a common occurrence, often for data backup or file sharing. Among the various types of files, photos are the ones that are moved most frequently between these devices.
To import photos from Mac to iPhone, you can use the Photos app on your Mac and the Photos app on your iPhone. First, ensure that both devices are connected to the same Wi-Fi network. Next, on your Mac, select the photos you want to transfer and click on the "Share" button.
Method 1. How to Transfer Photos from Mac to iPhone Without iTunes
You can sync photos from your Mac to your iPhone using iTunes, but this will replace the existing media files on your device with the newly synced ones, which may not be ideal. If you prefer to transfer photos without overwriting the existing ones, you may want to consider an alternative method.
To avoid data loss, you can use Qiling MobiMover, an iPhone transfer software that effectively transfers photos, videos, music, ringtones, contacts, books, and more between an iPhone/iPad/iPod and a computer or between two iOS devices.
To transfer photos from iPhone to Mac or from Mac to iPhone, you can use the Photos app on your Mac or the Photos app on your iPhone. Simply connect your device to your Mac using a USB cable, and the Photos app will automatically detect the device and allow you to transfer your photos.
To move photos from Mac to iPhone without iTunes:
Step 1. Launch Qiling MobiMover on your computer, connect your iPhone to your Mac, select the "Mac to Phone" option, and click "Select Files" to proceed.
Step 2. With MobiMover, you can transfer photos and other popular files from your Mac to your iPhone and iPad, then click "Open" to load the files.
Step 3. MobiMover will display the files you've chosen on the screen. If you've missed an item, click "Add Contents" to import more files. Then, click the "Transfer" button to initiate the transfer process.
Method 2. How to Get Photos from Mac to iPhone Using AirDrop
To transfer photos from a Mac to an iPhone using AirDrop, ensure both devices are within Bluetooth and Wi-Fi range, as AirDrop relies on these technologies to function. This allows for seamless photo import from your Mac to your iPhone.
To send photos from Mac to iPhone via AirDrop:
Step 1. Turn on AirDrop on iPhone and Mac.
Step 2. On your Mac, make sure the recipient is shown in the AirDrop window.
Step 3. Select the photos you want to share and drag them to the recipient's contact.
Step 4. On the target iOS device, click "Accept" to receive the photos sent from your Mac.

Method 3. How to Move Photos from Mac to iPhone Using iCloud
iCloud allows you to share files, including photos, videos, and contacts, between devices using the same Apple ID account, making it easy to transfer photos between your Mac and iPhone. To use iCloud photos, ensure you have sufficient free iCloud space to save the pictures you want to transfer, and that your devices have stable and reliable network connections.
To sync photos from Mac to iPhone using iCloud:
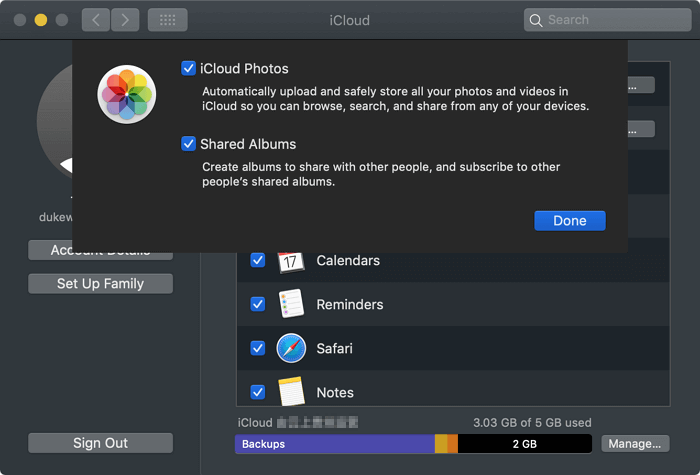
Step 1. Enable "iCloud Photos" on your iOS device via Settings.
Step 2. To access System Preferences on your Mac, simply go to the Apple menu and choose "System Preferences".
Step 3. To access your iPhone contacts on a Mac, choose "iCloud" and sign in with the Apple ID you use on your iPhone. This will sync your iPhone contacts with your Mac, allowing you to view and manage them on your computer.
Step 4. To enable iCloud Photos, go to Settings, then click on your name at the top, followed by "Photos". Click on the toggle next to "iCloud Photos" to turn it on, and then click "Done" to save the changes.
Step 5. After syncing, check the Photos app on your iPhone to view the images.
If you're experiencing the issue of iCloud photos not syncing, you can either follow the related guide to fix the problem or try alternative ways to move photos from Mac to your iPhone.
Method 4. How to Import Photos from Mac to iPhone via Google Photos
You can transfer photos from your Mac to your iPhone wirelessly using cloud-based services like Google Photos, in addition to AirDrop and iCloud. To do this, ensure you have enough storage and are using the same account on your Apple devices. Then, follow the steps to transfer files from your Mac to your iPhone.
To transfer photos from Mac to iPhone wirelessly:
Step 1. Go to Google Photos on your Mac and sign in.
Step 2. Click the "Upload" option to upload photos from your Mac to iCloud.
Step 3. On your iPhone, download and install the Google Photos app from the App Store, then sign in with the account you use on your Mac.
Step 4. Once the syncing process is complete, you can view the photos from your Mac on your iPhone and download them to your device.

Method 5. How to Transfer Photos from Mac to iPhone with iTunes (or Finder)
If you don't mind the data loss or there is no important data on your iPhone, you can copy photos from your Mac to your iPhone using iTunes (on macOS Mojave and earlier) or Finder (on macOS Catalina and later).
To get pictures from Mac to iPhone using iTunes:
Step 1. Connect your iPhone to the computer and wait for iTunes to launch automatically.
Step 2. To connect your iPhone to your Mac, ensure that your iPhone is recognized by the Mac. This can be done by clicking the "Device" button in the iTunes window.
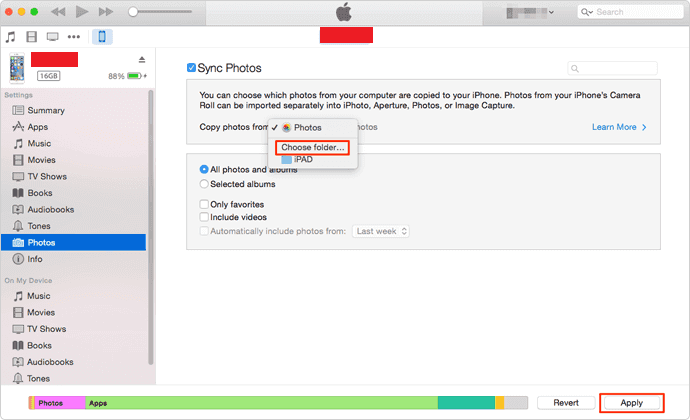
Step 3. To transfer photos, go to the "Photos" app and ensure that "Sync Photos" is enabled. Then, select the desired photos to transfer.
Step 4. To transfer photos from your Mac to your iPhone, click "Apply" to initiate the transfer process.
To move photos from Mac to iPhone using Finder:
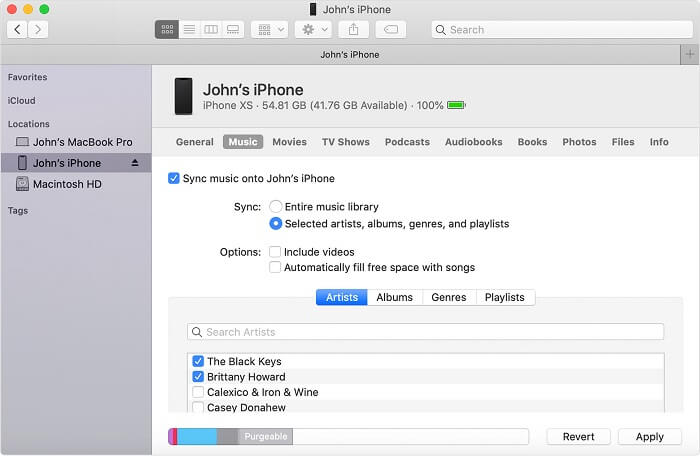
Step 1. Open Finder and connect your iPhone to your computer.
Step 2. To view your iPhone's photos in the Finder on your Mac, select your iPhone in the Finder window. Then, click on the "Photos" tab at the top of the window.
Step 3. To sync a category, check the box next to "Sync [category]" and select the items you want to transfer.
Step 4. Click "Apply" to start importing photos from your Mac to your iPhone.
The Bottom Line
Transferring photos between Mac and iPhone is easy with the right tips. Besides using iTunes and Finder, other methods are also applicable for transferring photos from iPhone to Mac. Simply choose the method that suits your needs to transfer photos from Mac to iPhone or vice versa within minutes.
Related Articles
- How to Transfer Contacts from Android to iPhone 13/12/11
- 3 Ways to Download a YouTube Video to MP3
- How to Back Up iPhone to External Hard Drive on Windows 11
- How to Recover Latest Windows Update Deleted Files (21H2/2004)
Windows updates do not intentionally delete files from your hard drive, SD card, or SSD. However, users often experience missing files after updating to Windows 10 or 11. Professional solutions are available to help restore lost documents and missing files.