Tips | How Can You Transfer photos from iPhone to Mac in 5 Different Ways
A software update for iOS 11.2.
If you've captured amazing photos with your iPhone and want to save a copy on your Mac or free up space by copying photos from iPhone to Mac, there are five free methods to help you achieve this. You can use free software to transfer photos from iPhone to Mac, or take advantage of the built-in features on your devices to import photos wirelessly, regardless of whether you have a MacBook or iMac.
Before you choose the method you prefer, you may need a general comparison between these methods.
- Part1: Transfer photos from iPhone to Mac with software
- Method 1: Use the freeware for data transfer--Qiling MobiMover
- Method 2: Use the Photos App
- Part 2: Copy photos from iPhone to Mac wirelessly
- Method 1: Use AirDrop
- Method 2: Turn on iCloud Photo Stream/iCloud Photo Library
- Method 3: Sent photos via Email/iMessage
Part 1: How to transfer photos from iPhone to Mac with freeware
Qiling MobiMover
A Brief Introduction to MobiMover
 A Tool forData Transfer
Qiling MobiMover Free is a reliable iOS data transfer tool that allows you to share data between your iOS devices (iPhone/iPad in iOS 8 and later) or between an iOS device and a computer. With MobiMover installed on your computer running macOS or Windows, you can transfer various file types, including photos, videos, music, ringtones, voice memos, contacts, messages, and more. This means you can also use MobiMover to transfer photos from your Mac to your iPhone if needed.
 A File Manager
MobiMover provides a convenient way to manage iPhone or iPad content from a computer, allowing users to delete, edit, or add items.

AVideo Downloader
MobiMover is surprising because it can also serve as a free video downloader, allowing you to download videos from various sites like YouTube, Vimeo, Instagram, Twitter, Facebook, and MySpace to your computer or iPhone/iPad.
Perfect tool, right? Now, it's time for you to try MobiMover to transfer your iPhone photos to Mac. You can follow a similar process to transfer your iPhone photos to Mac using MobiMover.copy videos from your iPhone to Mac
Step 1. Connect your iPhone to your Mac and launch Qiling MobiMover. Then, select "Phone to Mac" and click "Next" to proceed with the data transfer.
Step 2. To transfer photos from your iPhone to Mac, select the "Pictures" category, which includes photos and other supported files for export. Then, customize the storage path for your exported photos, or export them to your desktop if you prefer.
Step 3. To transfer photos from your iPhone to your Mac, click the "Transfer" button, which will initiate the process quickly. Once the transfer is complete, you can verify the photos on your Mac.
Photos App
On Macs running OS X Yosemite v10.10.3 or later, you can use the Photos app to import photos from your iPhone, replacing the need for iPhoto and Aperture in earlier versions. To get started, ensure your Mac has the latest version of iTunes installed.
Step 1: To connect your iPhone to your Mac, start by opening the Finder on your Mac and selecting your iPhone from the left-hand menu. If prompted, enter the passcode on your iPhone and click "Trust" on the prompt that appears on your iPhone, asking you to trust the computer. This will establish a connection between your iPhone and Mac, allowing you to access your iPhone's contents and use features like AirDrop.
Step 2: Run Photos if it doesn't open automatically.
Step 3: To ensure the Photos App shows the Import screen, where you can see all the photos and videos on your iPhone, make sure the app is open and that you're on the correct tab. The Import screen should be visible when you're in the "Import" tab, where you can select the photos and videos you want to transfer to your computer.
Step 4: Select the desired pictures and click "Import Selected" or tap "Import All New Photos" to transfer the images from your iPhone to your Mac.

Part 2: How to copy photos from iPhone to Mac wirelessly
AirDrop
You can transfer photos from iPhone to Mac wirelessly using AirDrop, a built-in feature on Mac, iPhone, iPad, and iPod Touch that allows you to send files like photos, contacts, and websites from one device to another. This means you can also send contacts from iPhone to iPhone, making it a convenient option for transferring photos from iPhone to Mac.
Step 1: Turn on AirDrop on your Mac.
- To enable AirDrop on your Mac, go to Finder, then click on Go, and select AirDrop. Also, make sure that Bluetooth and WiFi are turned on, as this is required for AirDrop to function.
- Set the option "Allow to be discovered by" as "Everyone" or "Contacts Only".
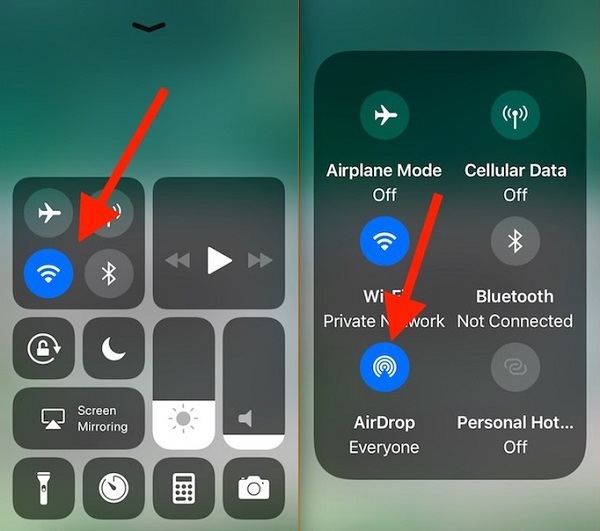
Step 2: Turn on AirDrop on iPhone.
- To access the iPhone's Control Center, swipe up from the bottom of your screen. This will open a panel with various settings and controls, such as brightness, volume, and Wi-Fi toggles.
- Press deeply on the module where Airplane Mode is located, tap on AirDrop, and set your iPhone to be discovered by Contacts Only or Everyone.
Step 3: Once the Mac and the iPhone are connected, you can start transferring photos from iPhone to Mac as desired.
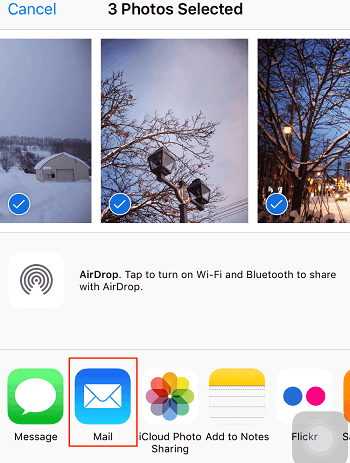
- Go to Photos App on your iPhone.
- To share photos from your iPhone to your Mac, select the desired photos and click the "Share" button.
- Choose AirDrop and select your Mac.
iCloud Photo Stream/iCloud Photo Library
When you turn on iCloud Photo Stream or iCloud Photo Library on your iPhone, your photos will be automatically synced to other Apple devices using the same Apple ID when connected to Wi-Fi. The main difference between the two is that iCloud Photo Stream only keeps photos on your Mac for 30 days and has a 1,000 photo limit, so you'll need to download them to your Mac using the Photos App within that timeframe.
How to turn on iCloud Photo Stream/iCloud Photo Library:
- On your iPhone: To enable iCloud Photos Library or My Photo Stream, go to Settings, select your name, then choose iCloud and Photos, and toggle the switch on for either iCloud Photos Library or My Photo Stream.
- On your Mac: To enable iCloud Photo Library and My Photo Stream, go to System Preferences > iCloud, click on the Options next to Photos, and select iCloud Photo Library. Alternatively, open Photos, click on Photos > Preferences > iCloud, select My Photo Stream, and turn it on.
Email/Message
If you just want to import several pictures from your iPhone to Mac, you can also use Email or iMessage to transfer photos between the two devices. To do this, you need to attach the photos you want to transfer from your iPhone to an email or iMessage, and then send it to your Mac's email address. Once the email or message is received on your Mac, you can download the attached photos to your computer.
Step 1: Open the origin Album in PhotosApp.
Step 2: Click on Selectand pick up the photos you want to transfer.
Step 3: Tap the Upload icon and Choose Mail/Message.
Step 4: Type in the information needed to send an Email/iMessage.
Step 5: Check the email or iMessage on your Mac, download the photos, and save them to your Mac's storage.
With Email, You can upload photos from your iPhone to your Mac by attaching them to an email and sending it to yourself, allowing you to easily transfer and access the photos on your Mac.
Bottom Line:
A General Comparison between These Tips
Qiling MobiMover: This tool is ideal for transferring multiple items and categories quickly. It offers features for data transfer, file management, and video download, making it a convenient option for various tasks.
Photos: No need to install any software, you can simply copy photos from your iPhone Camera Roll directly to your Mac.
AirDrop: It's convenient to use, but may be slow for transferring multiple photos. The supported file types are also somewhat limited.
iCloud Photo Stream/iCloud Photo Library: It's either space-limited or quantity-limited.
Email/iMessage: It's not suitable for multiple transfer.
Related Articles
- 7 Ways to Transfer MP3 to iPhone from PC or Mac
- 5 Easy Tips to Import VCF to iPhone
- How to Transfer Music from iPad to iPhone/iPhone to iPad
- How to Download Metacafe Videos to iPhone or PC/Mac