[FREE] How to Transfer Photos from Mac to iPad in 4 Ways
You'll learn the proven tips to transfer photos from Mac to iPad, either with or without iTunes, and also how to transfer photos from iPad to Mac, so you can easily share photos between your devices.
- How to Transfer Photos from Mac to iPad
- How to Transfer Photos from iPad to Mac
Part 1. How to Transfer Photos from Mac to iPad in 4 Ways
Transferring photos from a Mac to an iPad is easier than importing photos from a PC to an iPad, since both devices are Apple products. This can be done wirelessly using AirDrop or iCloud, or through a third-party iOS content manager, or by using iTunes (or Finder in macOS Catalina and later).
Let's delve into the details.
Method 1. Transfer Photos from Mac to iPad with a Reliable iOS Content Manager
You can transfer photos from your Mac to your iPad without using iTunes by using the Photos app on your Mac and the Photos app on your iPad. Simply select the photos you want to transfer on your Mac, go to File > Export Selected, choose the destination as your iPad, and select the format as "Optimized" or "Original". The photos will then be transferred to your iPad, where you can view them in the Photos app.
If you want to import photos from your Mac to your iPad without using iTunes, a reliable solution is to use an iOS data transfer tool like Qiling MobiMover Free. This tool allows you to transfer photos and other data from your Mac to your iPad, and it also functions as a video downloader. With Qiling MobiMover, you can easily transfer photos and other content from your Mac to your iPad, making it a convenient alternative to iTunes.
- Transfer files from computer (Mac/PC) to iPhone/iPad
- Import files from iPhone/iPad to computer
- Copy data from one iPhone/iPad to another
- Download videos from YouTube, Facebook, Twitter, and more to your computer or iPhone/iPad with a video downloader.
With Qiling MobiMover, you can easily transfer photos from your Mac to your iPad, and also transfer photos from your iPhone to your iPad if needed.
To import photos from your Mac to your iPad, follow these steps. First, make sure your Mac and iPad are connected to the same Wi-Fi network.
Step 1. To transfer files from your Mac to your iPad, start by connecting your iPad to your Mac with a USB cable. Open Qiling MobiMover and select the "Mac to Phone" option from the main interface, then choose "Select Files" to continue.
Step 2. With MobiMover, you can easily transfer photos and other data types from your Mac to your iPad by selecting the files and clicking "Open" to load them.
Step 3. MobiMover will show all selected data on the screen. If an item is missed, click "Add Contents" to import more files. Then, click the "Transfer" button to initiate the transfer process.
This tool supports various types of content on your iPhone or iPad, including photos, videos, music, ringtones, contacts, messages, and books, in addition to other types of content.
Method 2. Import Photos from Mac to iPad with iTunes/Finder
To move photos from a Mac to an iPad using a USB cable, you can use either iTunes (if you're on a macOS version prior to Catalina) or the Finder (if you're on macOS Catalina or later).
To sync photos from your iPad to your computer without causing data loss, you can use the Photos app on your iPad to export the photos to your computer, or use a third-party app like AnyTrans or PhoneTrans to transfer the photos without replacing the existing media files on your iPad. This way, you can keep the photos on your iPad and also have a copy on your computer.
To sync photos from your Mac to your iPad using iTunes in macOS Mojave and earlier, you can follow these steps: Connect your iPad to your Mac using a USB cable. Open iTunes on your Mac and select your iPad from the top left dropdown menu.
Step 1. To ensure a smooth transfer process, update your iTunes to the latest version by going to "iTunes" > "Check for Updates" in iTunes on your Mac.
Step 2. Connect your iPad to your Mac and open iTunes, which should launch automatically, to begin the process.
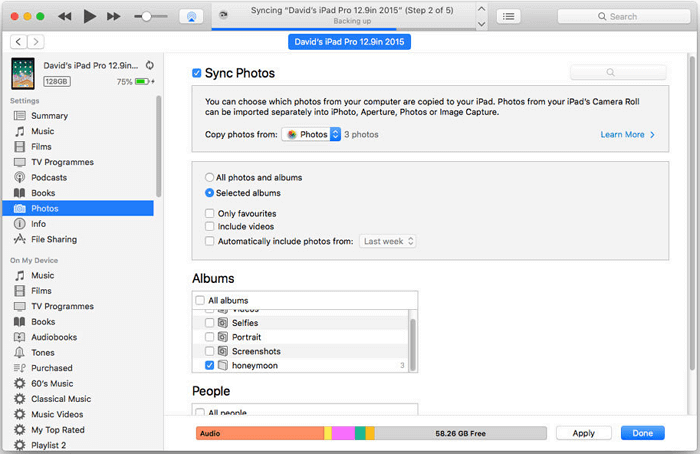
Step 3. Tap on the device icon and choose "Photos".
Step 4. To transfer photos from a specific album or folder, check the box next to "Sync Photos from" and then select the desired album or folder.
Step 5. Export all or some of your photos and click "Apply" to choose the export option.
To copy photos from your Mac to your iPad via Finder, you can follow these steps. First, make sure your Mac and iPad are connected to the same Wi-Fi network.
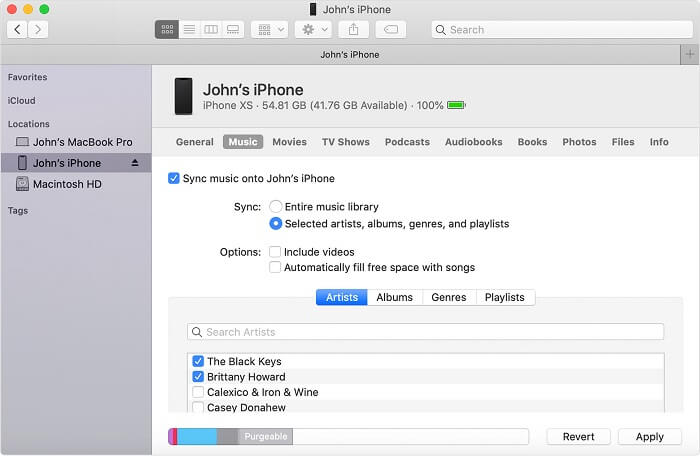
Step 1. Connect your iPad to the computer using a USB cable, then open Finder on your computer.
Step 2. Unlock your iDevice and trust the computer. If asked, enter your iPad passcode to continue.
Step 3. To share content from your iPad, open Finder and select your iPad from the left-hand menu. Then, choose the category you'd like to share, such as Photos, Music, Movies, or TV shows, and follow the prompts to share it with others.
Step 4. To transfer files, check the "Sync" option and select the files you want to transfer.
Step 5. To transfer files from a Mac to an iOS device, start by clicking the "Apply" button on the screen. This will initiate the file transfer process.
Method 3. Transfer Photos from Mac to iPad Wirelessly with iCloud
To copy photos from Mac to your mobile device, you can use a USB cable or send them wirelessly using iCloud. If you prefer the latter, make sure you're using the same Apple ID on both devices and have enough space in iCloud to store the pictures. This will sync all the pictures in your photo library across your devices over Wi-Fi, allowing you to access them on your iPad.
To get photos from Mac to iPad with iCloud:
Step 1. To turn on iCloud Photos on the iPad, go to Settings, tap on your name, then tap on iCloud, and finally tap on Photos, turning the switch next to iCloud Photos to the On position.
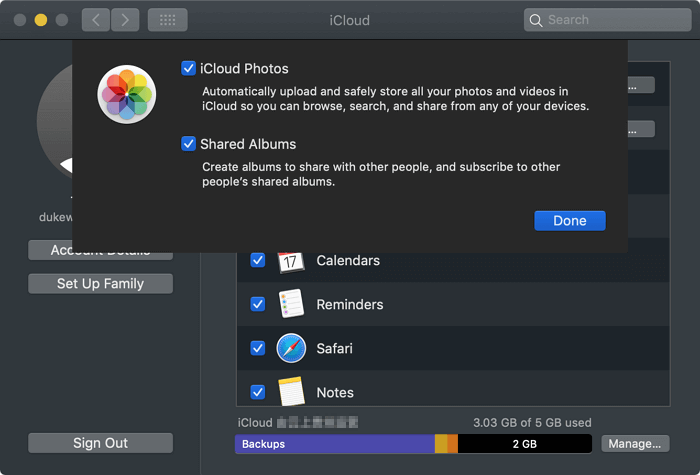
Step 2. On your Mac, click the Apple menu and choose "System Preferences".
Step 3. Go to "iCloud" and sign in.
Step 4. To sync photos from your Mac to your iPad, click the "Options" dropdown next to "Photos" and select "iCloud Photos". This will upload all photos in the Photos app on your Mac to iCloud, making them accessible from the Photos app on your iPad after syncing.
iCloud Drive, which is document-oriented, allows you to share files like Word, Excel, PPT, or PDF between your devices, including iPhone, iPad, Mac, and even PC. This means you can easily share documents from your Mac to your iPad, among other uses.
Method 4. AirDrop Photos from Mac to iPad
You can transfer photos from Mac to iPad wirelessly using AirDrop, a file-sharing utility available on Mac, iPhone, iPad, and iPod Touch. With AirDrop enabled, you can share photos, videos, contacts, locations, websites, and more between devices, providing an alternative to using iCloud.
To AirDrop photos from Mac to iPad:
Step 1. To enable AirDrop on a Mac, go to the "Finder" and select "AirDrop", then set the option "Allow me to be discovered by" to either "Contacts Only" or "Everyone".
Step 2. Turn on AirDrop on your iPad from the Control Center.
Step 3. Transfer photos from Mac to iPad.
- You can drag the photos to the image of the recipient in the AirDrop window and click "Send".
- To share a photo, go to the photo you want to share, click the "Share" option, choose "AirDrop", select the name of your iPad, and click "Done".

These are the ways to copy photos from Mac to your iPad. Data transfer between a Mac and an iOS device is needed frequently. It's also necessary for you to know how to import photos from iPad to Mac.
Part 2. How to Transfer Photos from iPad to Mac
Among the four ways to transfer photos from iPad to Mac, all can also be used to send photos from iPad to Mac, except using iTunes. An additional method for transferring iPad photos to Mac is to use the Photos app on Mac.
To copy photos from iPad to Mac:
Step 1. Connect your iPad to your Mac.
Step 2. Unlock your iPad and trust the computer. If asked, enter your iPad passcode.
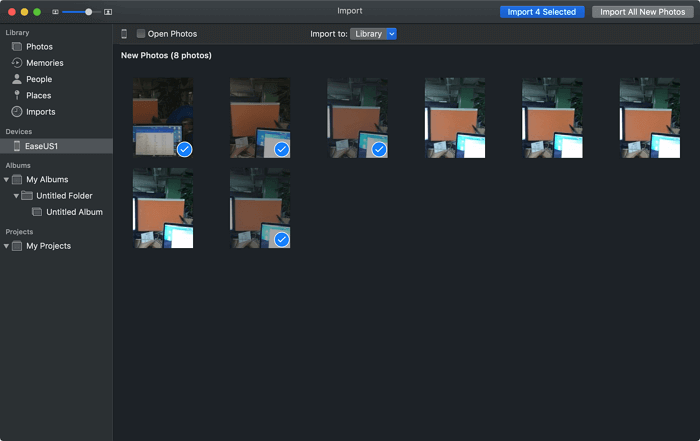
Step 3. To open the Photos app on your Mac, click the Launchpad icon in the Dock, type "Photos" in the search field, and click the Photos icon. Once the Photos app is open, click on your device from the sidebar on the left side of the screen.
Step 4. You can either import all new photos and videos at once or choose to import them selectively.
The Bottom Line
The best way to share photos depends on the number of photos and the tools you have. Choose the method that best fits your specific needs to apply.
Related Articles
- How to Download Any Videos from Any Site on PC & Mac
- Deep Data Recovery Stuck Or You Recieve Error Messages? Fixes Here!
To resolve Deep Data Recovery issues with Qiling, such as a deep scan getting stuck, taking too long to scan a disk, or getting stuck building a new directory, try restarting the application, checking for disk space and ensuring the disk is not full, or running the scan on a different disk. - How to Recover Deleted Photos from SD Card on Android Phone
You can learn effective ways here to recover deleted photos from SD card on Android phone with SD card recovery software. Besides, you can also leran how to recover deleted photos from SD card on Android phone without computer by using Android data recovery app. - How to Recover Data from Hard Disk Which Is Not Detecting Easily
If your hard disk or external hard disk is not detecting, don't worry! Qiling hard drive data recovery software can help you easily recover data from a hard disk or external hard disk that is not detected, recognized, or won't read.