How to Transfer Photos from Windows 10 to iPad
Photo transfer is a common occurrence that happens daily, whether it's between two iPhones or between an iPhone/iPad and a computer, often for the purpose of backing up photos or sharing files. As a result, it's essential to know how to transfer photos.
Given that many of you need to transfer photos from Windows 10 to iPad, here I will show you how to put pictures from PC to iPad in different ways. Read on to check the details and choose the method you like to apply.
Method 1. How to Transfer Photos from Windows 10 to iPad with iPhone Transfer Software
Also supports: Videos, music, ringtones, contacts, books, and more
Whether you want to transfer photos from iPad to PC in Windows 10 or transfer photos from Windows 10 to iPad, Qiling MobiMover, an iPhone transfer software, can assist with the process.
As an iOS data transfer tool, it enables transferring files between an iPhone/iPad/iPod and a PC/Mac or between two iDevices, allowing you to transfer files, photos, videos, and more.
- Transfer photos from iPhone to iPad
- Add music to iPhone from computer
- Back up iPhone messages to PC
Besides serving as a video downloader, this tool also allows you to save videos from video sites or social networking sites to your computer or iDevice, enabling offline viewing. If you're interested in this feature, you can refer to the guide on how to download YouTube videos to PC for a detailed explanation.
To transfer photos from your PC to your iPad, follow these steps: Open the Photos app on your iPad and select the "Albums" tab. Tap the "Add" button in the top right corner and select "Import from PC".
Step 1. Connect your iPad to your PC, click "Trust" in the pop-up on your iPhone, then launch Qiling MobiMover and select "PC to Phone" to proceed with the transfer.
Step 2. To start the process, click the "Select Files" button and navigate to the desired folders or files on your computer. From there, select the folders or files that contain the images you want to copy.
Step 3. MobiMover will display the files you've chosen. You can add more photos by either dragging and dropping them or clicking "Add Contents". If the selected folders/files include other file types, you can transfer them to your iPad along with photos.
Method 2. How to Transfer Pictures from PC to iPad Using iTunes
Transferring photos from a Windows PC to an iPad using iTunes can cause data loss on the iDevice, as iTunes syncs files by replacing existing ones on the iPad, including music, movies, TV shows, books, and more.
If you have important media files on your tablet that you don't want to lose, consider one of the alternative methods to transfer photos from Windows 10 to iPad.
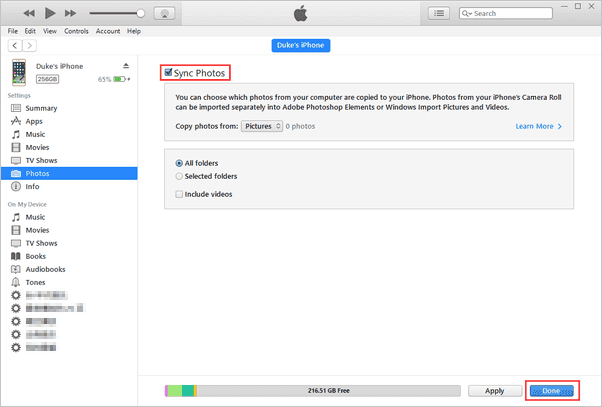
To sync photos to iPad:
Step 1. Connect your iPad to your PC with a USB cable and wait for iTunes to launch automatically.
Step 2. Click the "Device" button in iTunes and choose "Photos".
Step 3. Select the "Sync Photos" option and choose the photos you want to copy.
Step 5. To sync photos from your PC to your iPad, click the "Apply" button to initiate the process.
Method 3. How to Add Photos to iPad from PC via iCloud
Transferring photos from a Windows 10 PC to an iPad using iCloud is also a viable option. Unlike iTunes, which uses a USB cable, iCloud shares photos wirelessly via Wi-Fi. To successfully move pictures, ensure a stable and reliable network connection on both devices. Additionally, sufficient iCloud storage is necessary to complete the transfer.
To transfer photos and videos from Windows 10 to iPad using iCloud, follow these steps: Open the Photos app on your Windows 10 computer, select the photos and videos you want to transfer, and click on the "Share" button. Select "iCloud" from the share options, and enter your Apple ID and password to sign in to your iCloud account.
Step 1. On your Windows 10 PC, open a browser and visit iCloud.com.
Step 2. To access your photos on an iPad using the Photos app, sign in with the Apple ID you use on the iPad, then select the "Photos" option.
Step 3. To upload new photos and videos from your PC to iCloud, click the "Upload" button.
Step 4. To enable iCloud Photos on your iPad, go to Settings, tap your name, select iCloud, and then toggle on iCloud Photos or iCloud Photo Library.
Step 5. To transfer photos from Windows 10 to your iPad, wait for the photos to be synced to your iPad. This allows for easy transfer of photos from your Windows 10 device to your iPad.

Method 4. How to Transfer Photos from Laptop to iPad with Cloud Storage Services
Besides the three methods mentioned earlier, using cloud storage services like Dropbox, OneDrive, Google Photos, and others can also be helpful in transferring pictures from computer to iPad. To use this method, ensure you're using the same account on both devices and have a stable Wi-Fi connection. This approach allows for seamless sharing of files across devices, making it a convenient option for users.
Let's take Google Photos as an example:
Step 1. To transfer photos from your computer to Google Photos, go to Google Photos on your PC, sign in with your Google account, and click "Upload" > "Computer" to upload the desired photos.
Step 2. On your iPad, download and install the Google Photos app, then sign in with the same Google account you use on your PC.
Step 3. Select the photos you want to transfer and download them to your iPad.

The Bottom Line
Transferring photos from an iPad to a PC is also possible using all four methods. The easiest solution is to use a tool like Qiling MobiMover, which can add photos to your iPhone, iPad, or iPod with ease. This tool can be a helpful resource whenever you need to transfer files to or from your iOS device.
Related Articles
- How to Restore WhatsApp Messages on a New Android and iPhone
- How to Transfer Files from PC to iPad Pro/Air/Mini with 5 Ways
- [Full Guidance] How to Recover Data from HDD
Having no idea on how to recover data from HDD? In this post, we will explore the steps you can take to retrieve your precious files/data from a malfunctioning HDD. - The Best Data Recovery Software to Recover Deleted File
It's common to accidentally delete some important files on Windows computer. In such a case, you may want to find the professional data recovery software to recover deleted file. Here you will get a best file recovery tool and learn how to use it.