WhatsApp Transfer, Backup & Restore on iPhone and Android
WhatsApp, the most popular messaging app, stores messages, images, audio, and videos sent or received. To prevent data loss, it's essential to perform WhatsApp transfer, backup, and restore. Fortunately, WhatsApp's built-in service or third-party companies make it easy to transfer WhatsApp between devices, back up WhatsApp, and restore it from a backup.
Part 1. How to Perform WhatsApp Transfer, Backup & Restore on iPhone
As an iPhone user, you can follow these tips to learn how to transfer WhatsApp chats and back up & restore WhatsApp in different ways, such as using iCloud, Google Drive, or a third-party app, to ensure your WhatsApp data is safe and accessible.
WhatsApp Transfer
To transfer WhatsApp messages from an iPhone to an Android device, you can use the Google Drive backup feature. First, go to Settings on your iPhone, select Chats, and then choose Chat Backup. Turn on the toggle switch to enable the feature.
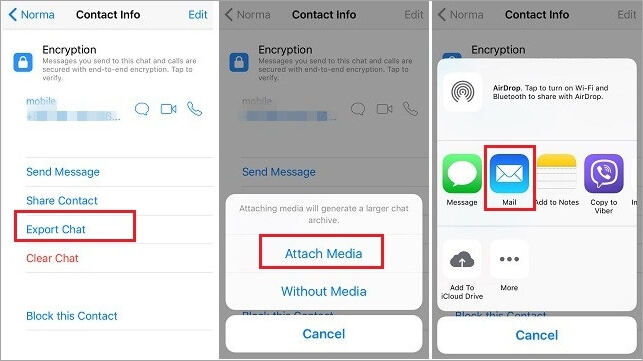
Step 1. Open WhatsApp and find the conversation you want to transfer.
Step 2. Swipe right to left over the conversation and choose "More".
Step 3. Tap "Export Chat" and whether to attach media or not.
Step 4. Choose to transfer the WhatsApp chat via mail.
Step 5. Check your email on your Android device and download the WhatsApp chats to your device.
WhatsApp Backup & Restore
When it comes to WhatsApp backup and restore, you can either use iCloud or third-party services.
How to Back Up and Restore WhatsApp Messages using iCloud
iCloud allows you to back up and restore WhatsApp data wirelessly, as long as you use the same account on both devices and have enough iCloud storage, making it easy to transfer your chat history.
To perform WhatsApp backup & restore via iCloud:
Step 1. To enable iCloud Drive on the source iPhone, go to Settings, then tap on your name at the top, followed by "iCloud" and toggle the switch next to "iCloud Drive" to the "on" position.
Step 2. Open WhatsApp and go to "Settings" > "Chats".
Step 3. To manually back up your WhatsApp data, tap on "Chat Backup" and then select "Back Up Now".
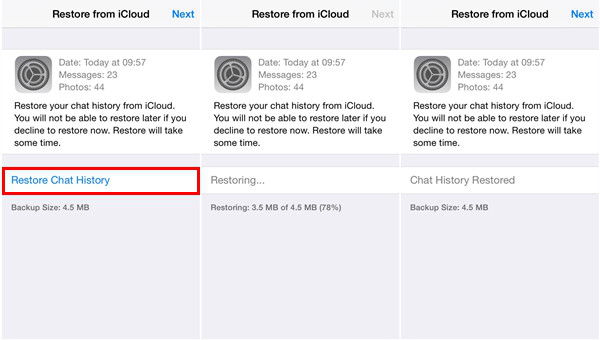
Step 4. To restore WhatsApp backups on a new device, reinstall WhatsApp on the target device, then set it up using the same phone number and iCloud account used on the original device where the backup was created.
Step 5. When the "Restore from iCloud" page appears on the device, choose "Restore Chat History" to start the process of restoring WhatsApp chat history to the iPhone.
How to Back Up & Restore WhatsApp Messages with Third-Party Tool
A third-party WhatsApp transfer tool is a program that helps you transfer WhatsApp data between iOS and Android devices. With this tool, you can easily transfer WhatsApp data from one device to another, regardless of whether you're using an iPhone or an Android device, and it works with either Windows or Mac computers.
- Transfer WhatsApp messages from one iPhone to another
- Back up WhatsApp from iPhone to PC
- Recover WhatsApp chat from the backup
- Print WhatsApp media from computer
Download and install the software on your computer, then apply it to back up WhatsApp messages to PC and restore them to the target device from the backup.
To back up WhatsApp to PC:
Step 1. To back up WhatsApp data, connect your iPhone to your computer, launch Qiling MobiMover, and go to "WhatsApp" > "Backup" from the options.
Step 2. Select the location you want to back up WhatsApp data to and click "Back up" to start the process.
Step 3. Wait for the backup process to complete, then view the saved messages as an HTML file on your Mac using a browser.
Step 4. After the backup process is complete, you can view the WhatsApp messages and attachments by going to "WhatsApp" > "Backup History".
To restore WhatsApp from the backup:
Step 1. Connect your iPhone to your computer using a USB cable, then launch Qiling MobiMover, select "WhatsApp" and choose "Restore" from the options.
Step 2. To restore WhatsApp, select the backup you want to restore from, check the target device, and click "Restore". This will prompt a message warning that WhatsApp data will be erased after restore, so click "Restore" in the window to continue.
Step 3. Wait for the restore process to complete, which may take a few minutes to several hours depending on the size of the backup.
Step 4. After the backup process is complete, you can check the WhatsApp messages and attachments in the backup by going to "WhatsApp" > "Backup History".
Part 2. How to Perform WhatsApp Transfer, Backup & Restore on Android
As an Android user, transferring WhatsApp messages, backing up WhatsApp data, and restoring WhatsApp from a backup are slightly different from the process for iOS users.
WhatsApp Transfer
Whether you're transferring WhatsApp messages from Android to iPhone or from Android to Android, this guide on how to transfer WhatsApp messages provides the necessary steps to do so.
WhatsApp Backup & Restore
The default way to back up and restore WhatsApp chat history and media varies depending on the phone type, with iPhone users relying on iCloud and Android users on Google Drive.
To back up and restore WhatsApp chats using Google Drive:
Step 1. Open WhatsApp on the source device.
Step 2. Tap "More (the three dots)" > "Settings" > "Chats".
Step 3. Choose "Chat backup" > "BACK UP".
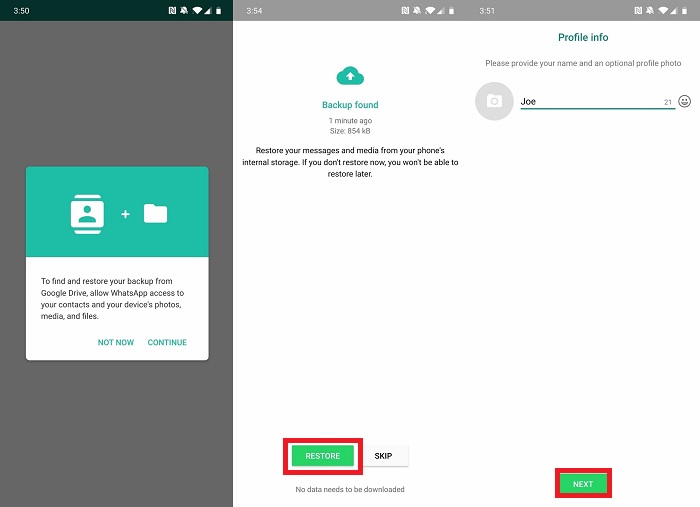
Step 4. To restore WhatsApp from the backup, first, reinstall WhatsApp on your Android device.
Step 5. Set up WhatsApp using the phone number you use on the source device.
Step 6. When the app tells you a backup is found, click "Restore" to restore WhatsApp backup from Google Drive.
The Bottom Line
There are third-party tools available that allow you to back up and restore WhatsApp on Android, which can be found through an internet search.
Transferring, backing up, and restoring WhatsApp messages between two devices running the same operating system is a relatively straightforward process. If the official backup and restore solution doesn't meet your needs, you can also rely on third-party software to help you get things done.
Related Articles
- How to Transfer PDF from iPad to Computer
- Top 6 YouTube Audio Rippers to Extract Audio from YouTube - Review
- How to Transfer Videos from Mac to iPhone/iPad in 3 Ways
- Best Forensic Data Recovery Software Tool to Download for 2023
Forensic data recovery software is a must to recover files from computers and phones. A free trial version of the software can be downloaded.