How to Install M.2 SSD [Beginner's Guide⭐]
In today's fast-paced digital world, computers need to be quick and efficient, with fast data retrieval, seamless multitasking, and speedy application launches. To keep up with these demands, installing a reliable SSD, such as an M.2 SSD, can be a game-changer for Windows users, significantly enhancing their system's performance, and this guide will provide a detailed explanation and tutorial on how to do so.
Want to take your computer's performance to the next level? Installing an M.2 SSD is a simple and effective way to do so!
How to Install M.2 SSD: Step-by-step Tutorial
Before buying an M.2 SSD, ensure your motherboard supports it, as most recent motherboards do, but older PCs might need traditional SSDs. Check your motherboard's manual or online to confirm compatibility.
To install an M.2 SSD in Windows 7 without formatting your C drive, look for an M.2 slot on your PC or laptop, which is a small raised connector resembling a skinny cable port. Once confirmed, install the M.2 SSD, and follow the steps to prepare in advance, which include creating a new partition on the M.2 SSD and setting it as the default boot device. This will allow you to use the M.2 SSD as a secondary drive without affecting your existing C drive.
Preparation for Installing M.2 SSD
Before you start the installation process, prepare the following items:
- Your Windows computer.
- The screwdriver is set to unscrew.
- The M.2 SSD that you want to install.
- To create a successful business plan, start by researching your target market and identifying your unique value proposition. Define your business model, including revenue streams and cost structure, and develop a comprehensive marketing strategy.
- Qiling Disk Master is a powerful and user-friendly partitioning tool that simplifies the process of managing disk partitions.
Phase 1. Install the M.2 SSD
To install an SSD on your PC, you'll need to physically insert your M.2 SSD into your computer or laptop. Once you have all the necessary tools and resources, you can proceed with the installation process. This involves inserting the SSD into a compatible slot on your device, following the manufacturer's instructions for securing it in place.
Follow the steps:
Step 1. To access the motherboard, you'll need to disconnect your PC from the power source and open the case. This involves unscrewing the side panel of your case, which provides you access to the internal components, including the motherboard.
Step 2. Locate the M.2 slot, which might be situated behind the graphics card (GPU) on your motherboard, such as the Z490 Unify.
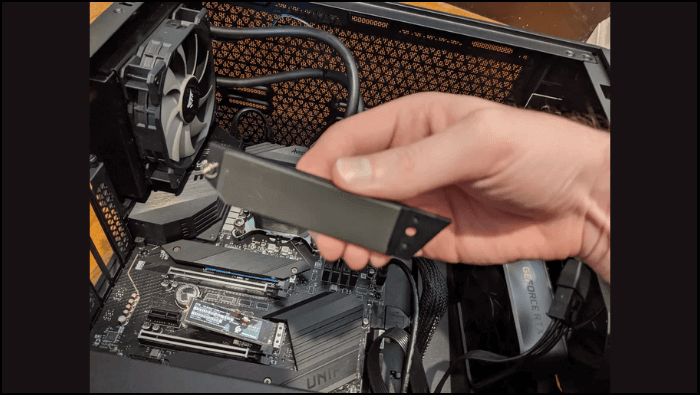
Step 3. Before installing an M.2 SSD, remove one of the motherboard's integrated heatsinks if it has them. Unscrew it and set it aside temporarily.
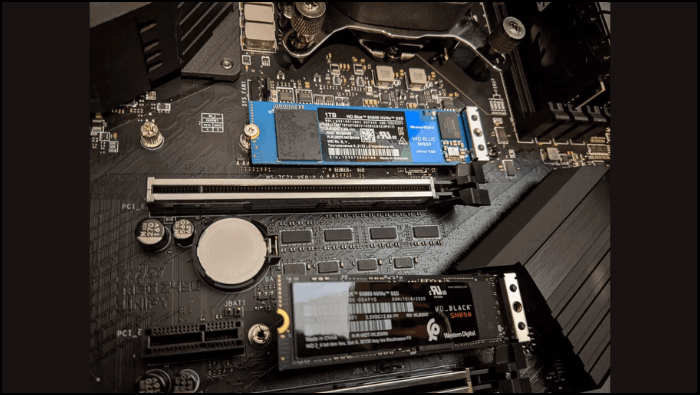
Step 4. To install your M.2 SSD, first locate the M.2 slot on your motherboard.
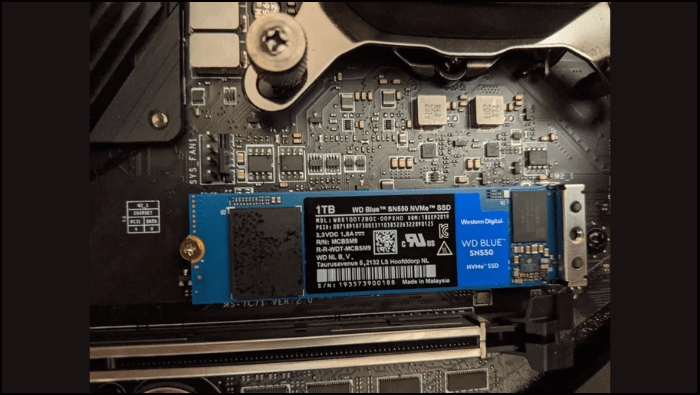
Step 5. Screw the M.2 SSD into place using the provided screw, making sure it's securely fastened to the motherboard.
Step 6. Once physical installation is done, reassemble hardware parts.
Phase 2. Initialize the M.2 SSD
To ensure proper functionality of your M.2 SSD drive, it's essential to initialize it. We recommend using Qiling Disk Master Pro, a software that simplifies the initialization process and offers various functions to enhance your overall SSD management experience.
Advantages of Qiling Disk Master:
Compared to other methods, Qiling Disk Master offers several advantages:
- User-friendly interface
- Safe and risk-free
- Time-saving operation
- Comprehensive features
Qiling Disk Master can be used to initialize your M.2 SSD, allowing for efficient and effective use of the drive. This process typically involves running the Qiling Disk Master software, which will guide you through the steps to prepare the SSD for use.
Follow the steps:
Step 1. Open Qiling Disk Master and got to Partition Manager.
Step 2. To prepare the target disk for installation, right-click it and select either "Initialize to MBR" or "Initialize to GPT" depending on the disk type, whether it's a Hard Disk Drive (HDD) or Solid-State Drive (SSD).
Features of Qiling Disk Master:
- Resize/Move partitions without data loss.
- Clone your OS and migrate to another drive or PC.
- Format the disk to another file system like NTFS.
- Merge partitions into one.
- Wipe data on your hard drives.
Download this all-featured tool and make your disk management more effective:
Bonus Tip: How to Partition a New M.2 SSD?
Initializing the SSD prepares the drive for use, while partitioning divides the drive into separate sections, each with its own file system, allowing for better organization and management of data.
For initializing and managing your M.2 SSD, you can also use Qiling Disk Master, which is particularly effective in SSD initialization and provides a user-friendly interface for creating, resizing, and managing partitions on your new M.2 SSD.
Follow the steps:
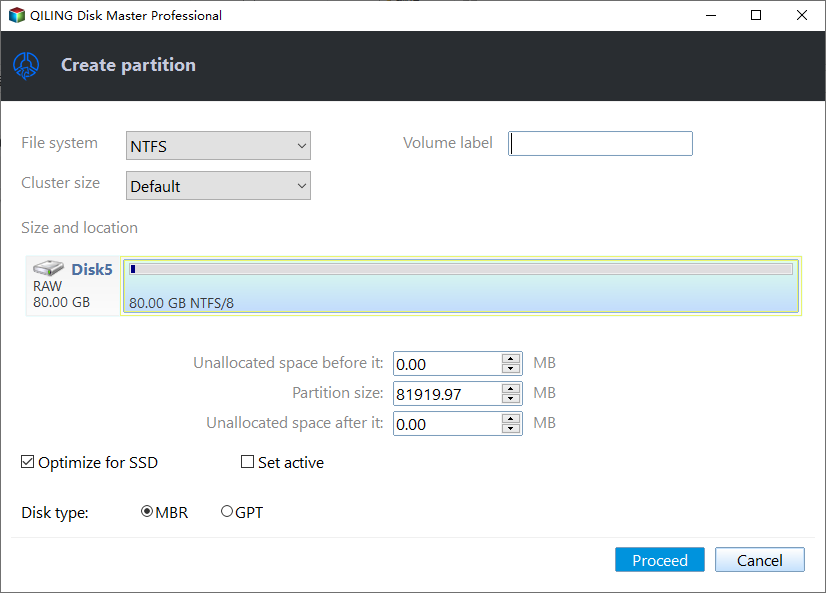
Step 1. To create a new partition on an empty disk using Open Qiling Disk Master, go to the Partition Manager, right-click on the empty disk, and select the "Create" menu.

Step 2. Set the number of partitions you need to create, and set the partition style to your disk - MBR or GPT, in one paragraph.
Once you've completed the above steps, click "Proceed" to finalize the changes. The default setting offered by Qiling Disk Master is also an option if you're not comfortable with manual adjustments. This will ensure that your system is properly configured for the best performance.
Step 3. Waiting to finalize partitioning the new HDD/SSD or external disk.
If your computer has issues starting up after installing an M.2 SSD, you can try the following steps to resolve the problem:

How to Fix PC Won't Boot After Installing M2 SSD
The PC won't boot after installing the M.2 SSD, which can be frustrating. To resolve this issue, ensure the M.
Benefits of Installing a M.2 SSD
Installing an M.2 SSD is a desirable option for many users, offering ample storage capacity and faster speed than traditional hard drives, making it a suitable choice for those seeking reliable and efficient storage solutions.
Let's explore the significant benefits of an M.2 SSD:
📟Larger Storage: The device offers ample storage capacity, making it suitable for storing large multimedia files, heavy data, and applications.
💎Enhanced Performance: It offers faster read and write speeds, making applications load quickly and allowing your PC or laptop to work fast.
🧲Faster Speed: M.2 SSDs offer incredibly fast data transfer speeds, resulting in significantly faster load times for software, quicker boot times, and an overall improved computing experience.
🎗️Competitive Price: M.2 SSDs offer impressive performance while being competitively priced and affordable.
M.2 SSDs offer improved performance, lower power consumption, and compact size, making them an attractive option for those seeking to enhance their system's capabilities.
Conclusion
Upgrading to an M.2 SSD can significantly boost your computing performance, offering improved speed, efficiency, and storage capacity. To make this process seamless, we recommend using Qiling Disk Master, a software that simplifies installation and provides efficient SSD management capabilities.
Upgrade your laptop/computer with an M.2 SSD and experience the transformative power of improved computing performance. With Qiling Disk Master, this transition has never been more accessible and rewarding, allowing you to elevate your computing capabilities and unlock new possibilities.
FAQs About How to Install M.2 SSD
If you have more queries about how to install M.2 SSD, figure out the desired answer from the FAQs below.
1. Why does the BIOS not recognize my M.2 SSD?
Here are a few reasons why your BIOS may not be recognizing your M.2 SSD:
- The M.2 SSD is incompatible with your motherboard
- The M.2 SSD is not installed correctly
- The BIOS is not configured correctly
2. How to Fix M.2 SSD not showing up?
If your M.2 SSD is not showing up in your BIOS, you can try the following fixes: Check if the M.2 slot is enabled in the BIOS settings, ensure the M.
- Ensure that the M.2 SSD is installed correctly.
- Enable M.2 support in the BIOS.
- Update your BIOS.
- Check the compatibility of your M.2 SSD with your motherboard.
Click the following article to learn more details about the instructions:
3. How can I enable M.2 SSD in BIOS?
To enable M.2 support in your BIOS, follow these steps:
Step 1. Restart your PC/laptop and enter the BIOS.
Step 2. Use the BIOS navigation keys to locate the "SATA Configuration" or "Storage" menu to access and configure the SATA ports on your system.
Step 3. Find the setting for M.2 support and enable it.
Step 4. Save your changes and exit the BIOS.
Related Articles
- MBR2GPT Conversion Failed? What if MBR2GPT Validation Failed?
- Slow Boot Time! SSD Taking Long Time to Boot in Windows 11/10
- 4TB Hard Drive Only Shows 2TB Windows 11/10, Restore to the Full Capacity
- Has Someone Used Reliable Windows 10 Software That Can Extend the System Partition to Unallocated Space?
Are you looking for reliable Windows 10 software that can extend the system partition to unallocated space? This page contains trustworthy software that can extend the system to unallocated space. - The Beginner's Guide on How to Remove Write Protection
Write protection is a security feature that prevents data from being written to a device, such as a USB drive or SD card. It can be enabled by default on some devices or by user intention. To remove write protection, the steps may vary depending on the device and operating system. - How to Run CHKDSK Without Admin Rights
Do you need admin to run chkdsk commands in Windows 10 Command Prompt? Is there any way for you to run chkdsk without admin rights? Read the article and get the answers.