Troubleshooting: M.2 SSD Not Showing Up in Windows 11
| Workable Solutions | Step-by-step Troubleshooting |
|---|---|
| FIX 1. Qiling Partition Master | Step 1. Right-click the target partition that has a problem; Step 2. Choose "Advanced" > "Check File System"...Full steps |
| FIX 2. Windows and Hardware Troubleshooter | Step 1: Windows PowerShell can be accessed by right-clicking the Start button and selecting it (Admin)...Full steps |
| FIX 3. Disk Management | Step 1: To access Disk Management, connect the SSD to the computer and click on the Disk Management...Full steps |
| FIX 4. Update Storage Controller Drivers | Step 1: Device Manager can be accessed by right-clicking the Start menu and selecting it; Step 2: Locate the Storage...Full steps |
| FIX 5. Examine Cables and Connections | To rule out a cable problem, you can connect the SSD through a separate connection. Some SSDs do not need...Full steps |
| FIX 6. Format the Disk to NTFS | Step 1: cmd should be typed into the search box, then right-clicked and selected Run as administrator...Full steps |
Introduction
PC and laptop users often experience frustration when an M.2 SSD fails to be recognized, particularly with NVMe SSDs, although it can also occur with M.2 SATA drives, sometimes being visible to the BIOS but not to Windows.
Frequently, compatibility and configuration concerns are to blame for the issue of an M.2 SSD not showing up in Disk Management on Windows 11. The problem can be caused by driver, operating system, or even a faulty solid-state drive issues. If you're experiencing this issue, we have a list of potential reasons and solutions below to help you fix the problem.
Guide to Diagnose M.2 SS Problems on Windows 11 Quickly
When you encounter the issue of an M.2 disk not showing on Windows 11, you'll likely want to resolve it quickly. To do so, it's essential to understand the root cause of the problem, as this will guide the most effective fix. By identifying the underlying issue, you can take targeted steps to resolve the problem and get your M.
- Virus or Malware infects SSD - Try anti-virus software if this is the difficulty you're having.
- SATA Storage Controller Mode/Protocol is WrongTo resolve the issue, you may need to update or remove the motherboard storage controller and IDE ATA controller drivers. This could potentially resolve the problem.
- SSD is Facing Driver IssuesA driver issue is a possible cause of an SSD not showing up in Windows 11, and the operating system's built-in troubleshooters, such as the "Hardware and Device Troubleshooter" and Device Manager, can be used to resolve the issue.
- SSD Has Hidden PartitionsIf you can't view your SSD disk partitions, they're likely hidden. To make them visible again, you'll need to unhide them. This can usually be done by going into your computer's disk management or partition manager, where you can select the hidden partition and choose to make it visible.
- The Drive Letter of SSD Partition is Missing or ConflictedIn Windows 11, if a drive letter is lost, you can choose a new one in the operating system. The issue is that Windows File Explorer might not show the SSD, but Device Manager or Disk Management can. This discrepancy makes it difficult to locate the drive.
- The File System of SSD Drive Cannot Be RecognizedTo run Windows 11 on your machine, you should format the drive to NTFS or FAT32 to avoid the issue.
- SSD Partitions Are Lost and Become Unallocated Space - Your disk can be labeled as either Not Initialized or Online. The first thing you need to do if you lose a Windows 11 is to recover it.
- New SSD is not InitializedIf you have a fresh SSD drive that hasn't been partitioned yet, it won't appear in Windows 11. To start using it, you can use the built-in Disk Management in Windows. Simply open the command prompt, type "diskpart > list disk > choose disk n (n is the drive number of the new SSD) > attributes read-only > online disk > convert MBR" (or convert gpt), and press Enter to initiate the process.
It may be the time for you to do a thorough hard disk health check for your computer.
Troubleshooting M.2 SSD Not Showing Up in Windows 11 [Fixes]
Now that we've covered the causes, let's move on to the potential fixes to help you diagnose the issue of M.2 not showing up in Windows 11. The first fix is to start by checking the BIOS settings to ensure the M.2 drive is enabled and configured correctly.
FIX 1. Troubleshoot M.2 Not Showing Up Using Qiling Partition Master - The Best in the Business!
Third-Qiling Partition Master, a top-rated Windows disk management tool, offers an alternative solution to the limitations of Disk Management, allowing users to resolve common hard disk issues, edit, add, or assign drive letters to local disks or external hard drives, providing a reliable fix when Disk Management encounters problems.
Qiling free partition manager allows for the modification of drive letters and routes, similar to Windows Disk Management. It enables the change and addition of a new drive letter to an SSD, initializes a new SSD, and creates a partition for the new SSD to appear on the computer's hard drive, making it a useful tool for managing hard drives and external hard disks.
Step 1. click the target partition that has a problem.
Step 2. Choose "Advanced" > "Check File System".
Step 3. In the Check File System window, select the "Fix the error on the disk" checkbox.
Step 4. Click "Proceed" to check errors on your partition.
Main Features
- To resolve the low disk space error, extend the C: drive (or the relevant drive letter) on all disks to increase available storage space. This can be done by right-clicking on the C: drive in File Explorer, selecting "Properties," and then clicking on the "Extend" button.
- You can reformat windows 10 with a single click.
- Migrate Windows 11 to a new SSD easily.
- Convert the MBR to the GPT format for Windows 11.
FIX 2. Run Windows and Hardware Troubleshooter
To fix an M.2 disk not showing up in Windows, you can run the Windows and hardware troubleshooter, which will identify and resolve the root problem, making the M.2 disk visible again.
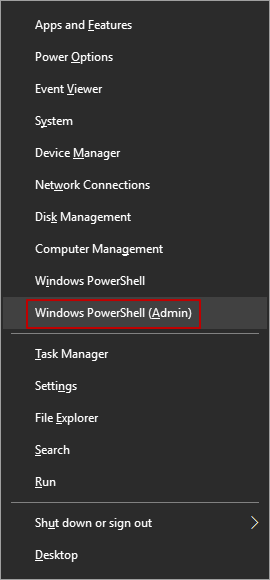
Step 1: To access Windows PowerShell, right-click the Start button and select "Windows PowerShell (Admin)". This will run Windows PowerShell with administrator privileges.
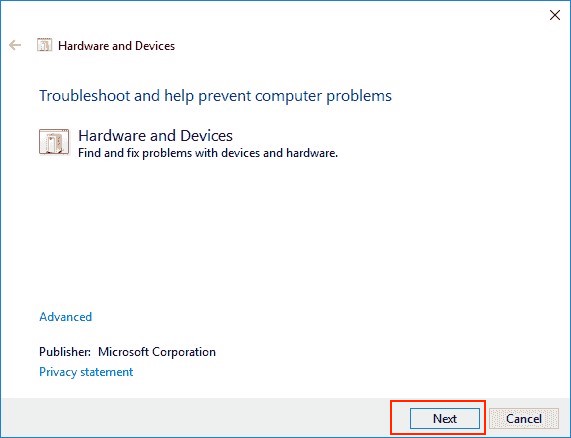
Step 2: Run the command "msdt.exe -id DeviceDiagnostic" in the command line to open the Hardware and Device troubleshooter.
Step 3: Click the Next button on the wizard to finish the scanning and repairing process.
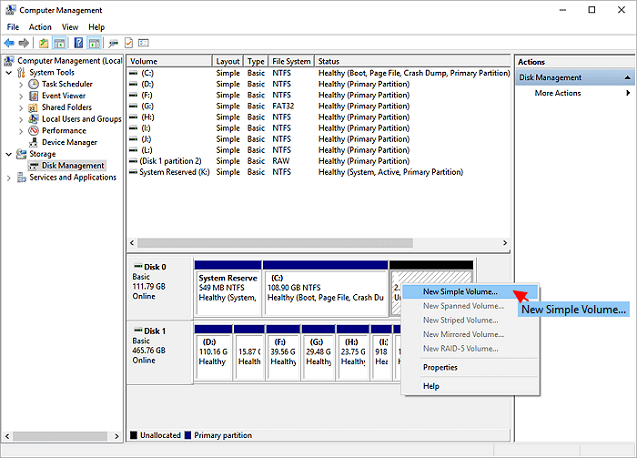
FIX 3. Initialize SSD in Disk Management
One of the reasons behind the problem was that you could not initialize your SSD in the system. Here's how you can do that:
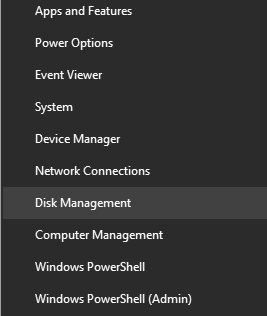
Step 1: Connect the SSD to the computer and click on the Disk Management icon, which can be accessed by selecting "Disk Management" from the Start menu with a right-click mouse button.
Step 2: If you haven't initialized the SSD, it will show as "Not Initialized" and you can right-click on it to select the "Initialize Disk" option from the menu.
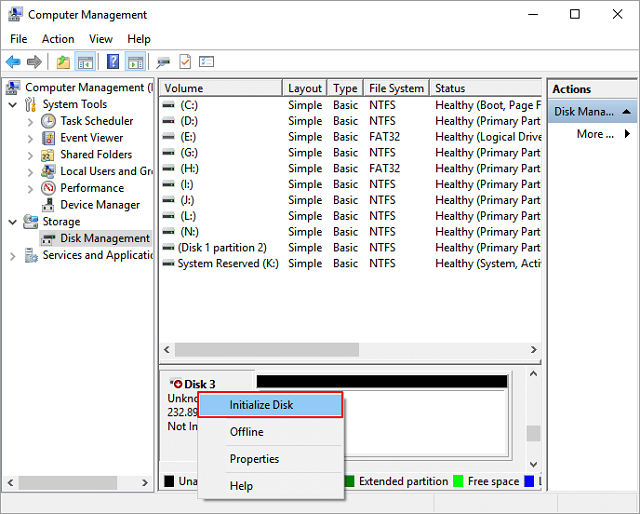
Step 3: Select a partition that is compatible with both MBR (Master Boot Record) and GPT (GUID Partition Table) and press the "OK" button.
Step 4: Select New Simple Volume from the context menu of the SSD. A wizard will guide you through creating a partition and assigning a drive letter to your SSD.
Note: In rare cases, an SSD may become inaccessible. To make it reactive again, right-click on the SSD and select 'Online' from the context menu.
FIX 4. Update Your Storage Controller Drivers
To update outdated storage controllers and resolve the issue of your M.2 not showing up in Windows, follow these steps:
Step 1: To access Device Manager, right-click the Start menu and select Device Manager.
Step 2: To update the storage controllers in Device Manager, locate them once they appear, then select the driver from the context menu to update it.
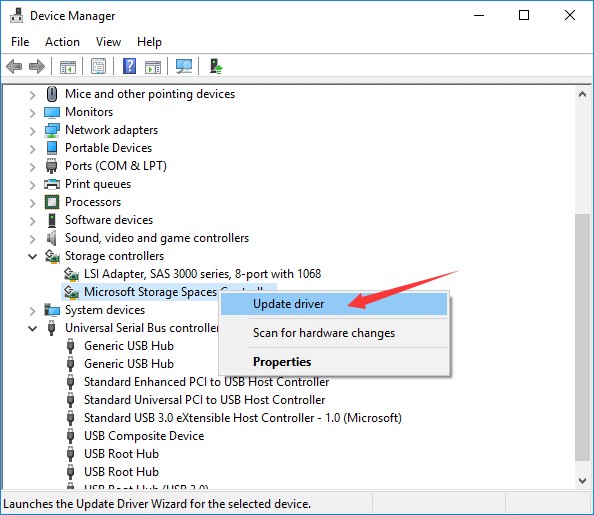
Step 3: With the option to search automatically for updated driver software selected, Windows will search your computer and the Internet for the most recent drivers available.
Step 4: After installing the new drivers, the computer should be restarted to ensure they are properly integrated and functioning correctly.
FIX 5. Examine Cables and Connections of Your System
In most cases, SSDs are linked to motherboards by SATA cables, and if the connections are damaged, the SSD will not be identified by the computer or even by the BIOS.
To rule out a cable problem, you can connect the SSD through a separate connection, such as an M.2 SSD placed directly into a slot on the motherboard, which doesn't require a cable. This can help determine if the issue lies with the cable or the SSD itself.
To determine if the issue is with the SSD or the computer, you can try installing the SSD on a separate computer to see if it is detected there. This will help you isolate the problem and potentially identify the root cause.
FIX 6. Format the Disk to NTFS
If the file system is causing issues, try formatting the disk to NTFS using Diskpart or a third-party program to see if it resolves the problem. You can use DiskPart.exe to reformat the disk to a file system compatible with your operating system.
Step 1: Type "cmd" into the search box, right-click on the result and select "Run as administrator".
Step 2: In the command prompt, type diskpart and press the Enter key.
Step 3: Enter the following instructions into the text box and Enter.
- list disk
- select disk n (n refers to the number of the disk containing unsupported or corrupted file system)
- clean
- create partition primary
- Format fs=ntfs
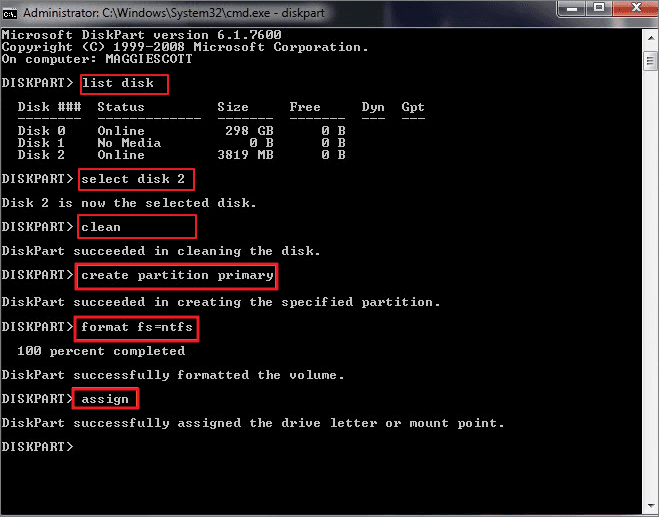
Step 4: To quit Diskpart, type "exit" and verify if it was successful.
Conclusion
SSDs not showing up on Windows 11 can be caused by various factors, but with this article, you'll understand the probable reasons and remedies. To troubleshoot, you can test each possible option one at a time, starting with the simplest solutions.
If you don't want to lose your data, please attempt to format the disk at the very end. Qiling Partition Master is highly recommended for creating new partitions and labeling partitions with various letters, among other things.
Related Articles
- SSD Health Check Software Free Download in 2022
- How to Find Hidden Partition or Hide Partition in Windows 10/8/7
- How to Force Delete A File on Windows 11/10/8/7? [Can't Delete File Solutions]
- [Fixed] Windows Media Creation Tool Can't Find USB Error: We Can't Find a USB Flash Drive
- How Do I Format Disk to exFAT in Command Prompt
Want to format your disk to exFAT easily? Discover how to do it using CMD or the user-friendly Qiling Disk Master and select the method that suits your requirements. - How to Format EFI Partition in Windows 11/10? [Your Guide Here 2024]
Formatting the EFI partition in Windows can lead to system crashes and difficulties with booting. It's not recommended to format the EFI partition unless absolutely necessary, such as when reinstalling Windows.