Mark Partition as Active in 4 Ways [Step-by-Step Guide]🔥
The active partition contains the operating system's boot files, which enable the computer to start up. When the system boots, the active partition's operating system loads a drive image that assigns drive letters to primary and logical partitions.

The active partition, typically the system partition of the OS, must also be the boot partition, containing essential boot files like BCD and BOOTMGR. In Windows systems, partition C is usually the default active partition, and it can also exist as a separate System Reserves partition.
The article from Qiling explains the process of marking a partition as active, including preparation, methods, and reasons. To mark a partition as active, one must first prepare the necessary tools and environment, followed by the specific methods to be used, which may vary depending on the system and requirements.
Tips Before You Mark Partition as Active
Before starting, it's essential to be aware of a few key points to ensure a smooth process.
- The operating system should be installed in the proper location on the hard drive. This typically means installing it on a primary partition that is at least 16 GB in size.
- The operating system must have created a boot sector on the active partition.
- The bootloader and OS files should be stored in the active partition, and the OS's physical hard drive location should be identifiable.
- Only primary partitions can be set as active.
- On a computer, only one active partition can exist on each physical hard disk. This means that you can't have multiple active partitions on the same physical hard drive.
- Multiple active partitions can exist on different physical hard disks, but only the active partition on the first hard disk detected by the BIOS will boot the computer.
How to Mark Partition as Active
Now that you have learned the things that you should pay attention to, refer to the 4 methods listed below to mark the partition as active.
1. Use Qiling Disk Master
The easiest and safest way to set a partition as active is by using third-party software, such as Qiling Disk Master, which is a powerful tool that allows you to manage your partitions in Windows 11/10/8/7, and can be used to set a partition as active for free.
Follow the guide below to set the partition to active.
Step 1. Run Qiling partition manager software, right-click the target partition on the disk map and choose "Advanced" from the context menu.
Step 2. Then, select "Set Active" from the drop-down menu.
Qiling Disk Master offers a range of features beyond just cloning, including resizing partitions, cloning hard drives, migrating Windows OS to another drive, and converting partition styles, among others.
Share this post with your friends if it's useful.
2. Use Disk Management (only 32-bit)
A built-in tool provided by Microsoft called Disk Management contains a series of features for you to manage the disks and partitions. Marking a partition as active is one of them. Check the steps below to learn how.
Step 1. Open Disk Management.
Step 2. Right-click the partition you want to set active, and select "Mark Partition as Active".
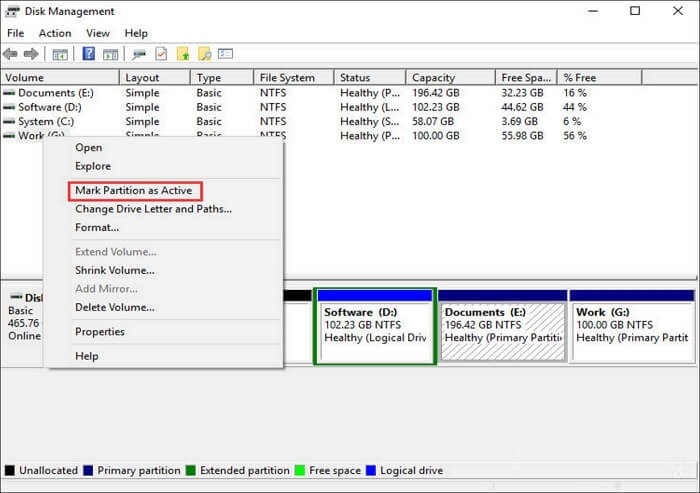
If the "Mark Partition as Active" option is greyed out, check if the partition is a primary partition or if another partition is already marked as active, as only the primary partition can be set as active in Windows.
3. Use MSCONFIG
MSCONFIG is used to configure various settings, but it can only set the active partition on the same hard drive where Windows is installed, and it can't identify partitions on other hard drives. It's specifically for the primary partition where Windows is installed.
Step 1. To access the System Configuration utility, open the Start Menu and type "msconfig" in the search box, then click and run it.
Step 2. In the Boot tab, you will see a list of your current existing operating systems, with the active partition labeled as "Current OS; Default OS" after its name.
Step 3. Choose the other OS and hit "Set as default".
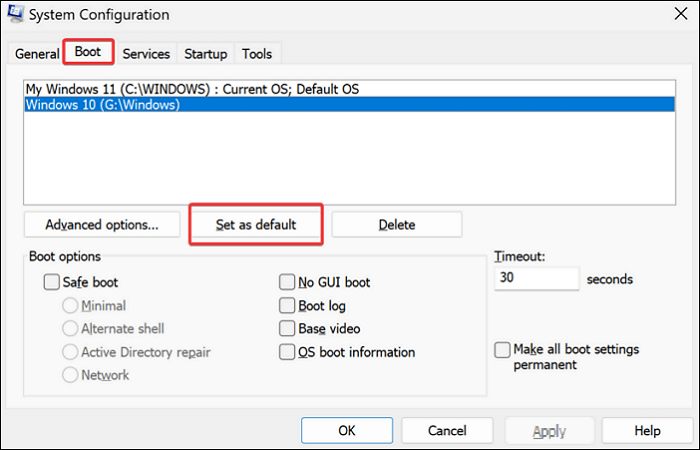
Step 4. Click "Apply" to confirm the changes. Then, restart your computer.
4. Use Diskpart in Command Prompt
When you have multiple operating systems on the same drive, this approach is often used to make one partition active and bootable while marking another partition inactive.
Step 1. To open the Command Prompt, open the start menu, search for "cmd", and run the Command Prompt.
Step 2. Type in diskpart and hit "Enter".
Step 3. Type in list disk and hit "Enter".
Step 4. Type select disk 0 and hit "Enter".
Step 5. Type list partition and hit "Enter".
Step 6. Type select partition 3 and hit "Enter".
Step 7. To mark a partition as active, type the command `mkfs.ext4 /dev/sdaX` (replace `X` with the actual partition number), followed by `e2fsck -y /dev/sdaX` to check and fix any file system errors, and finally, `mkswap /dev/sdaX` to create a swap partition.
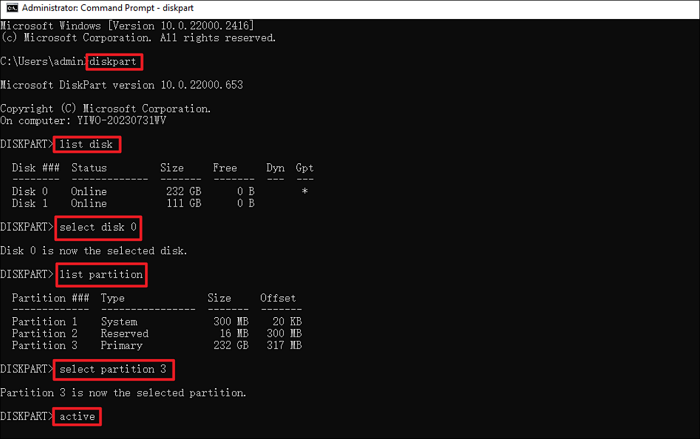
("0" and "3" mentioned above are examples; replace them with the appropriate disk and partition number according to your own situation.)
If you mark the wrong partition as active, check this article below to find out the solution.
If you've accidentally marked your drive C active, you should immediately boot from a Windows installation media (such as a USB drive or CD/DVD) and access the Recovery Environment. From there, you can open the Command Prompt and run the command "bcdboot C:\ /s C:" to set the correct boot device.
If your PC can't boot after accidentally marking drive C active, you can try booting from a USB drive or CD/DVD with an operating system, then mark the correct system partition active from there. Alternatively, you can use a live Linux CD/DVD to access your files and mark the correct partition active. If you're unable to boot from a USB drive or CD/DVD, you may need to use a Windows installation media to access the Disk Management tool and mark the correct partition active.
Why Do You Need to Mark Partition as Active
The active partition is the one from which the computer boots. It's where the boot sector starts the boot loader, which finds the operating system's boot files, allowing the correct OS to load when the PC boots. To load the correct OS, you must mark the partition as active in Windows.
If the partition that keeps Windows boot files isn't active, or if you mark the incorrect partition as active, your computer won't boot successfully and will show an error message like "Operating System not found" or "Missing operating system".
Don't forget to share the article on your social media!
Conclusion
This post provides 4 methods to set a partition as active in Windows 11/10, with Qiling Disk Master offering the easiest and fastest option. The methods can also be used to remove the active flag from a partition, as Diskpart has the ability to do so.
FAQs on Mark Partition as Active
1. What does it mean to mark a partition as active?
The active partition is the one from which the computer's BIOS or UEFI will boot the operating system, containing the OS's boot files and bootloader.
2. Can I format an active partition?
To format a disk or partition, it must be inactive, meaning the operating system (such as Windows) cannot be using it. The option for a quick format creates a new file table but does not completely overwrite the drive, it simply creates a new file system.
3. How do I unmark an active partition?
- Open the start menu, search for "cmd" and run the Command Prompt.
- Type diskpart and hit "Enter".
- Type list disk and hit "Enter". You will see the disk list.
- To select the correct disk, type `select disk [disk number]` (replace `[disk number]` with the actual number of the disk you want to work with) and press the "Enter" key. For example, if you want to work with the disk that is currently set as disk 0, you would type `select disk 0` and press Enter.
- Type list partition and hit "Enter".
- To select a specific partition, open the terminal and type the command `select partition 1` (replace "1" with the actual partition number you wish to select). Press the "Enter" key to execute the command. This will select the specified partition as the active one, allowing you to perform operations on it.
- To unmark the active partition, type "inactive" and press Enter. This will remove the active flag from the selected partition.
Related Articles
- Create D Drive from C Drive in 2 Simple Ways
- Format External Hard Drive with Multiple Partitions & How to Merge Partition in External Hard Disk
- How to Check Seagate SSD Temperature on Windows 10/11
- How to Unlock ASUS Laptop Without Password - Tutorial
- How to Partition C Drive without Formatting in Windows 10/8/7?
Learn how to partition C drive in Windows 11/10/8/7 using Windows snap-in Disk Management and Qiling Disk Master without formatting C drive and losing data. - How to Remove Bad Sectors from Hard Disk Permanently
Don't know how to remove bad sector from hard disk permanently? Refer to this article to get the best solution of this problem on Windows 11, 10, 8, 7.