BSOD Repair Tool for Windows 11/10
A blue screen can be caused by drivers, RAM, storage errors, Windows updates, antivirus conflicts, or damaged system files.
A repair tool is useful, but the first priority is protecting data before deeper repair.
PAGE CONTENT
- What This Problem Means
- Before You Start
- Use Windows Built-in Tools First
- Use the Qiling Product Workflow
- Check the Result
- FAQs
What This Problem Means
A BSOD is Windows stopping to prevent further damage. Repeated crashes can also corrupt files.
- Driver and Windows updates are common causes.
- Disk errors can trigger boot loops.
- Memory problems may cause random stop codes.
- Back up while Windows can still boot.
- 顦?/i> Important
- Back up important files before uninstalling drivers, rolling back updates, or resetting Windows.
Before You Start
Record the stop code, disconnect unnecessary USB devices, and check what changed recently.
- Confirm the exact disk, partition, USB drive, SD card, or Windows installation you are changing.
- Copy irreplaceable files to another drive if the device is still readable.
- Check whether BitLocker, Secure Boot, UEFI/Legacy mode, or a vendor recovery partition is involved.
- Avoid formatting, deleting, wiping, or running DiskPart clean until you know whether data must be recovered first.
Use Windows Built-in Tools First
Windows includes several BSOD repair tools.
Step 1. Boot into Safe Mode if normal startup crashes.
Step 2. Open Reliability Monitor and Event Viewer.
Step 3. Run sfc /scannow and DISM /Online /Cleanup-Image /RestoreHealth.
Step 4. Run Windows Memory Diagnostic if stop codes change randomly.
Step 5. Use System Restore or uninstall the latest update if the BSOD began after an update.
Detailed Qiling Backup Workflow
Use Qiling Backup before repair, reset, cleanup, partition changes, or repeated file synchronization. A separate backup keeps the original data safe if Windows tools fail or the wrong folder is changed.
Step 1. Connect a USB drive, external hard drive, or network location with enough free space. Do not store the backup on the same partition you are protecting.
Step 2. Open Qiling Backup. Choose File Backup for documents, photos, game saves, and project folders. Choose System Backup before Windows repair or recovery work.
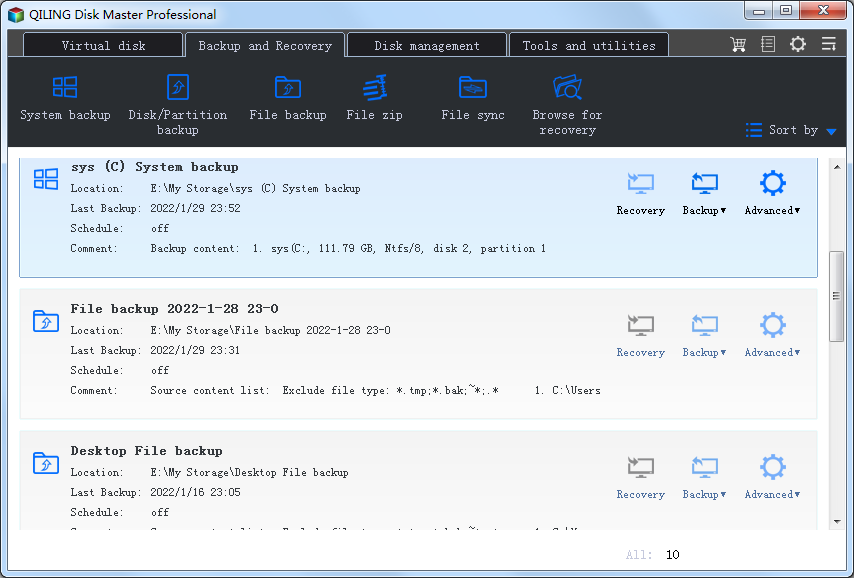
Step 3. Add the source folders or system partitions. Include hidden app data folders when the article topic involves games, user profiles, or application settings.
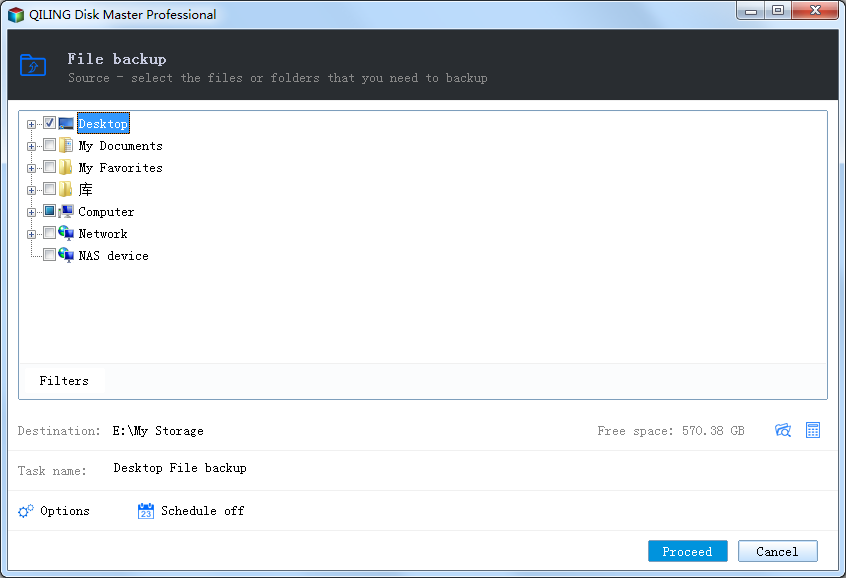
Step 4. Choose the destination. If it is a USB drive, keep it connected until the task completes. If it is a network path, test access first.
Step 5. Set a schedule only when this will be a repeat backup or sync task. For one-time repair preparation, run it manually.
Step 6. Click Proceed. When the task finishes, open several files from the destination to confirm the backup is usable.
Check the Result
Update chipset, storage, graphics, and network drivers from official sources, then monitor several restarts.
- Restart Windows and confirm the drive, partition, backup task, or cloned disk appears as expected.
- Open several files instead of only checking that a drive letter exists.
- Keep one recent backup on an external drive before making another high-risk change.
- If the same error returns, check hardware health, cable quality, firmware, and Event Viewer before repeating the same operation.
FAQs
What is the best BSOD repair tool?
Start with Safe Mode, SFC, DISM, memory diagnostics, disk checks, and backup.
Can BSOD repair delete files?
Normal repair commands should not, but reset, reinstall, or disk repair can put data at risk.
Should I back up first?
Yes, repeated crashes may indicate storage or system corruption.
Conclusion
A safe BSOD workflow protects files first, then isolates drivers, updates, memory, and disk errors. Qiling Backup helps secure the system before deeper repair.
Related Articles
- Best Free Partition Manager Software of 2026
- How to Clone HDD to SSD in Windows 10/11/7
- Windows System Backup and Restore Tutorials
- Windows Data Recovery Tutorials
Products
Articles & Tutorials
- Data Recovery
- Data Backup
- File Recovery
- File Backup
- System Backup and Restore
- Disk and Partition Clone
- Technical articles
- Mobile articles
- Disk Master Help
- Windows Data Recovery Tutorials
- Windows Secure Delete Tutorials
- Windows Partition Management Tutorials
- Windows File Backup and Restore Tutorials
- Windows System Backup and Restore Tutorials
- Windows Disk Backup and Restore Tutorials
- Windows Clone Tutorials