Add Unallocated Space to a Partition Without Converting to Dynamic Disk
You normally do not need a dynamic disk to enlarge a basic-disk partition. The deciding factors are where the unallocated space sits, which file system the target uses, and whether another partition lies between them.
Identify the Layout Before Changing Anything
Open Disk Management from the Start menu and look at one disk's partition map from left to right. For example, if you want to enlarge C:, choose the case that matches what you see: C: | Unallocated (Situation 1), C: | D: | Unallocated (Situation 2), or, for a data volume, Unallocated | D: (Situation 3). The drive letters are examples; use the actual disk number and letters on your PC.
Before changing anything, write down the disk number, partition order, sizes, and file systems. Back up every partition that will be moved or enlarged. If C: is involved, make a restorable system image and save the BitLocker recovery key if encryption is enabled. Do not delete or move an EFI, Recovery, or OEM partition as though it were the ordinary data partition in Situation 2.
Situation 1: Unallocated Space Is Immediately to the Right
Example layout: C: | Unallocated, with both blocks on the same basic disk. For an NTFS volume, Windows can use the space directly; no partition needs to be moved.
Step 1. In Disk Management, find the target volume by its drive letter and size. Confirm that the black Unallocated block touches its right edge on the same disk. If another partition appears between them, use Situation 2 instead.
Step 2. Right-click the target volume, not the unallocated block, and select Extend Volume. Click Next in the wizard.
Step 3. Check that the wizard lists only the same disk. Enter the number of MB to add, up to the available amount, then click Next. Read the summary to confirm the new size and click Finish.
Step 4. Wait for the disk map to refresh. Verify that the target volume is larger and that its files open. If Extend Volume is greyed out, stop and check the partition order and file system; do not convert the disk to dynamic to make this wizard available.
Situation 2: Another Data Partition Lies Between
Example starting layout: C: | D: | Unallocated. D: blocks the free space. The two tasks below are separate: move D: right to create C: | Unallocated | D:, then enlarge C: into that gap. Use this only when D: is an ordinary data partition on the same disk, not EFI, Recovery, or OEM.
First, move the intervening data partition
Step 1. Back up C: and D:. Open Qiling Disk Master, select Disk management, and compare the displayed disk number, drive letters, and sizes with Disk Management. Click D:, the partition directly between C: and the unallocated space, then choose Move/Resize.
Step 2. In the lower preview, put the pointer over the middle of D: and drag the whole block right into the free space. Do not drag D:'s left or right edge: that would change its size instead of only its position.
Step 3. Before clicking Proceed, check two values in the dialog: Partition size for D: must stay the same, while Unallocated space before it must increase. The free space should now appear between C: and D:. The screenshot illustrates these controls with sample volumes; use your own layout and values.
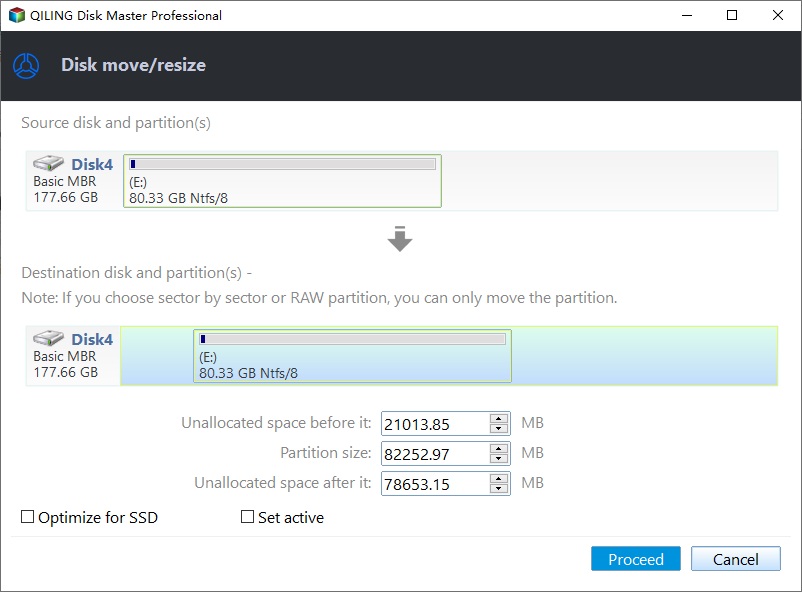
Step 4. Click Proceed to move D:. Leave the PC powered on and wait for completion; accept a restart if requested. When the disk map returns, confirm the order is C: | Unallocated | D:. If the gap is still to the right of D:, stop here.
Then, extend the target partition
Step 5. Select C: in Qiling Disk Master and click Move/Resize. Drag C:'s right edge right across the adjacent unallocated space. Do not move the middle of C: or drag D: again.
Step 6. Check that C:'s Partition size has increased, the gap after C: has decreased, and D:'s position is unchanged. Click Proceed and wait for completion or a requested restart.
Step 7. Open Disk Management to verify C:'s new size and the final partition order. Open important files on both C: and D:. If either volume is missing or unreadable, stop further partition work and use the backup or recovery media.
Situation 3: The Free Space Is Before the Target
Example layout: Unallocated | D: on one disk. Windows Disk Management cannot extend D: to the left, but a partition tool may enlarge an ordinary data volume from that side.
Step 1. Back up D:. In Qiling Disk Master's Disk management page, verify that the unallocated space touches D:'s left edge and that both are on the same disk. Select D: and click Move/Resize.
Step 2. In the lower preview, drag D:'s left edge left into the unallocated space. Do not drag the middle of D:, which moves the whole partition without enlarging it.
Step 3. Confirm that Unallocated space before it decreases and Partition size increases. Check that the new layout does not overlap another partition, then click Proceed.
Step 4. Wait for completion and restart if asked. Verify D:'s larger capacity and open several files. If the target is C: or another boot partition, do not treat it as this simple data-volume case; first prepare a verified system image and recovery media.
If the Space Is on Another Disk
Unallocated space on Disk 1 cannot be added to an ordinary basic partition on Disk 0. Keep both disks basic: move files to the second drive or clone/migrate the first disk to a larger replacement. A dynamic spanned volume changes recovery behavior and is not a way to enlarge the Windows boot volume.
Conclusion
Choose by position: free space immediately to the right can be added directly; if an ordinary data partition lies between, move it first and verify the new gap before extending; if free space is immediately to the left of a data partition, expand that partition's left edge. Keep the disk basic and verify files after each change.
Related Articles
- Add Unallocated Space Without Dynamic Disk
A related overview of basic-disk extension options. - Move Unallocated Space Next to C
How to inspect partition order before extending the system volume.
Products
Articles & Tutorials
- Data Recovery
- Data Backup
- File Recovery
- File Backup
- System Backup and Restore
- Disk and Partition Clone
- Technical articles
- Mobile articles
- Disk Master Help
- Windows Data Recovery Tutorials
- Windows Secure Delete Tutorials
- Windows Partition Management Tutorials
- Windows File Backup and Restore Tutorials
- Windows System Backup and Restore Tutorials
- Windows Disk Backup and Restore Tutorials
- Windows Clone Tutorials