Can't Skip Disk Check on Startup Windows 11 | What Should I Do?
| Workable Solutions | Step-by-step Troubleshooting |
|---|---|
| Skip Disk Check on Windows 11 |
1. Use CMD to Stop...Full steps 2. Use Registry Editor to Stop...Full steps |
| Disk Check Alternative - Qiling Partition Master | Step 1. Right-click the target partition that has a problem; Step 2. Choose "Advanced" > "Check File System"...Full steps |
Can't Skip Disk Check On Startup Windows 11
In Windows 11, a disk check is an automated process that detects and corrects problems on hard disk sectors. The system can identify issues at any time and initiate a check, which fixes potential problems. This process has been refined and optimized in Windows 11, making it more efficient and effective in repairing damages. However, users may want to skip this process on startup, and this article will guide you on how to do so.
We will explore ways to stop disk checking, both through the system's built-in methods and using a third-party utility, to prevent it from running unnecessarily.
Why Is Disk Checking Automatically Run on Startup?
When you turn on your laptop, the system automatically begins checking the disk, which can take a long time and may appear exhausting, but it's triggered by common issues such as disk corruption, file system errors, or hardware problems, prompting the system to run a disk check to ensure the disk is in a healthy state.
- Improper shutdown of a system can cause data loss, resulting in a disk check every time the system is turned on to ensure the hard disk is functioning properly.
- If your hard disk is experiencing problems, such as a bad sector, the system will initiate a disk check to detect any issues. If the disk check repeatedly runs, it may indicate that the hard drive is failing, as it's trying to compensate for the problem by repeatedly checking the disk.
- Virus and malware can significantly impact a system's performance, but a disk check can help detect any potential virus attacks, providing a detailed check of the system to ensure its security and stability.
Should I Skip Disk Check on Startup?
When you turn on your computer, it may go into a "scanning and repairing C drive" mode, indicating a problem with the boot drive. If it's checking drive D or E instead, the issue is likely with the data drive. If your computer is slow, running a comprehensive disk check can help.
To avoid running a disk check every time your system boots up, you can either press any key within the first few seconds of booting to disable it, or you can use the built-in Windows tools to disable the disk check reminder. This will prevent the system from displaying the scaling and repair notice each time it restarts, and will only remind you to check the drive when it's actually due for a disk check.
How to Skip Disk Check on Windows 11
To skip disk checking in Windows 11, you can cancel the automatic disk checking schedule by following these steps:
1. Use CMD to Stop Disk Checking
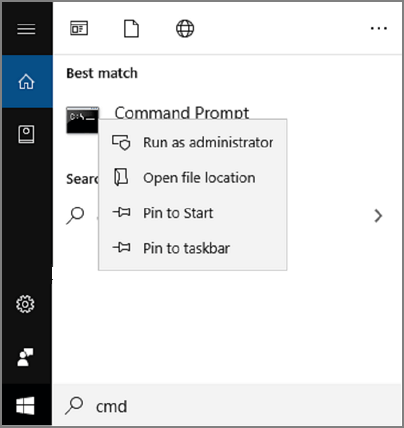
Step 1. To open the Command Prompt as an administrator, navigate to the Start menu, click on the search bar, and type "cmd". Then, right-click on the Command Prompt result and select "Run as Administrator" from the context menu.
Step 2. Enter the following command: chkntfs /x c:
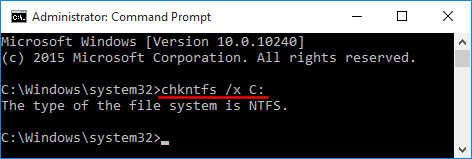
Here are the key points to remember to stop disk checking in one paragraph:
- Replace C with the letter of the drive you want to stop disk checking on startup
- The /x parameter is used to disable the auto-check on startup of the select drive.
- To stop multiple drives, you can use the following commands in the Command Prompt, with each drive letter listed at the end of each command. For example, if you want to stop the C, D, and E drives, you would use the following commands:
chkntfs /x c: d: e:
2. Stop Startup Disk Check with Registry Editor
Note: Be cautious when making changes to the Windows registry, as an incorrect edit can potentially corrupt your system. Proceed with caution.
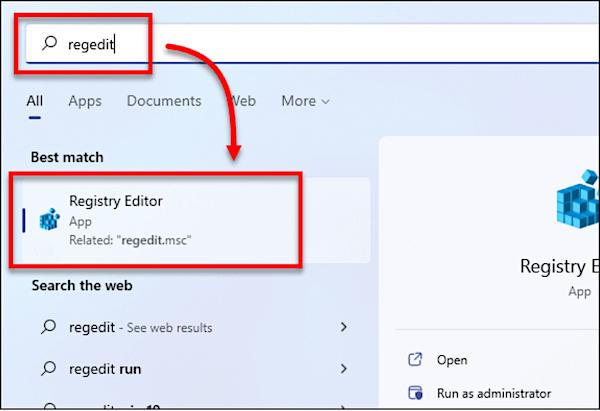
Step 1. To access the Registry Editor, go to the Start menu, type "Regedit" in the search bar, and press enter. This will open the Registry Editor on your Windows 10/11 system.
Step 2. The Registry Editor window should be open, and then follow the path: HKEY_LOCAL_MACHINE\SYSTEM\CurrentControlSet\Control\Session Manager.
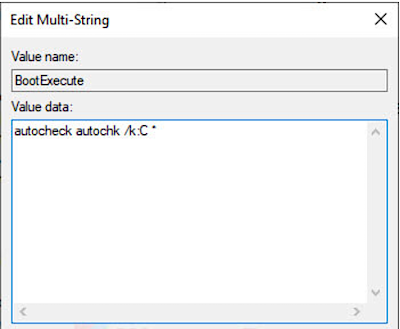
On the right pane, select and open "BootExcute".
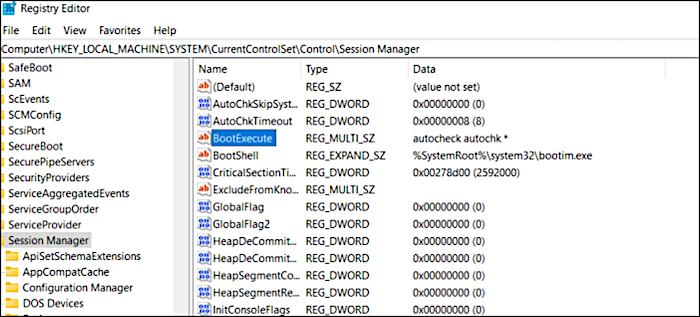
Step 3. In the value data field, change the value: autocheck autochk /k:C *
Note the following things
- Replace the letter C with the desired driver you wish to stop disk checking.
- To stop multiple disk checking, use the command `autocheck autochk /k:C /k:D *` in the following way: autocheck autochk /k:C /k:D *. This command disables automatic disk checking for all disks on the system, except for the C and D drives. The `/k` option is used to specify the drives to be excluded from the automatic checking process. By using `*` at the end of the command, you are telling the system to apply this rule to all disks.
- The parameter /k here auto-The command "autocheck autochk *" is used to check and stop checking drive C on startup. In case of any expected result, you can undo the value to default.
Any Alternative? Try Free Windows 11 Disk Check Tool
If you're experiencing issues with skipping disk check on startup in Windows 11, using a third-party tool like Qiling Partition Master can be a good solution. This program allows you to build and change partitions, providing a legitimate option for assistance. It's suitable for home, office, and enterprise users.
Step 1. Click the target partition that has a problem.
Step 2. Choose "Advanced" > "Check File System".
Step 3. In the Check File System window, select the "Fix the error on the disk" option.
Step 4. Click "Prceed" to check errors on your partition.
The salient features of Qiling Partition Master are listed below:
- Migrates operating system to SSD
- Increases C drive space
- Converts MBR to GPT without losing data
- Apply a hard disk health check
Conclusion
If you're having trouble skipping the disk check on startup in Windows 11, there are solutions available. You can opt for the system's default procedures, but be aware that they come with some risks, especially when using the registry editor method. A safer and more reliable option is to use Qiling Partition Master, which not only fixes the disk check issue but also ensures your data remains secure. You can try Qiling Partition Master for yourself.
Related Articles
- [Solved] My Games Take Forever to Load PC
- How to Convert MBR to GPT without Losing Data Windows Server
- SD Card Not Detected Windows 11/10 | How to Fix SD Card Not Showing Up on Windows 11/10
- How to Resize Window Server Partition (3 Ways Available)
- Partition Manager Tutorials
You can find all you needed solutions to manage hard drive space in Windows. Qiling Partition Master is reliable partition manager that help you to resize and manage disk space. - Data Backup and Drive Clone Tutorials
Windows File Recovery Tutorials