Can't Change Drive Letter in Windows Server
Can't Change Drive Letter in Windows Server
On a Windows server, the default drives are assigned letters, with the C drive containing the operating system, followed by D, E, and G, and any external disks designated as H.
You can change the disk letter to better organize your data and make it more convenient to access. This can be done manually on every device, allowing you to assign a new letter and improve data organization.
This article explores the process of changing a disk letter, starting with the default method provided in servers. However, we also examine why the disk change option is often greyed out, and recommend a third-party utility that is better suited to this task. By the end of the article, you will be able to determine the most effective approach for changing disk letters.
Change Drive Letter in Disk Management
You can change the disk letter using the default feature in Windows Server, which allows you to easily modify the drive letter through the Disk Management tool. To do this, you can follow the steps in Disk Management to allocate a new disk letter.
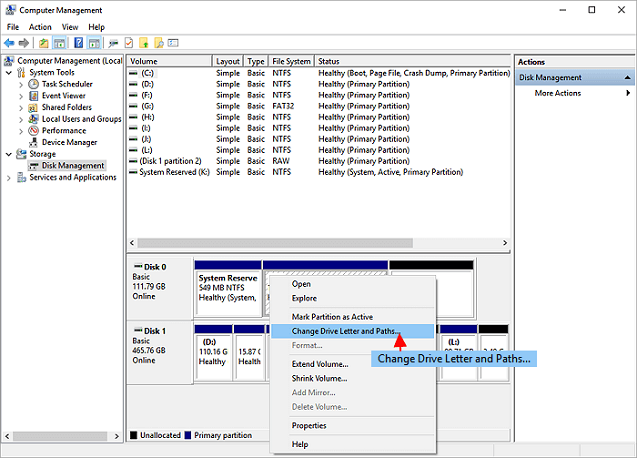
Step 1. To access Disk Management, right-click on the Windows button, which is usually located at the bottom left corner of the screen, and select "Disk Management" from the context menu. This will open the Disk Management window, where you can view and manage your computer's disk drives.

Step 2. In disk management, select the drive you want to change the letter, right-click on it and select "Change Drive Letter and Paths".
Step 3.To change the drive letter and paths, click on the "Change" option from the menu. Select the drive you want to change, in this case, drive F, and proceed with the changes.
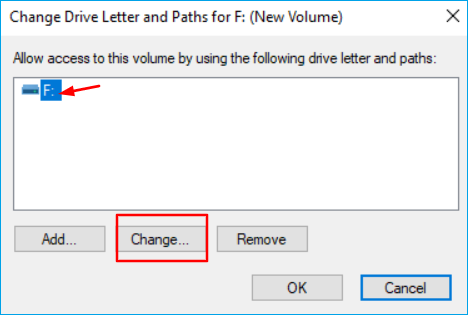
If the disk letter has not been assigned previously, you can click on the "Add" option to assign it.
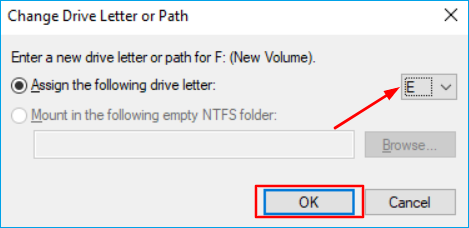
Step 4. To change the drive letter of a disk, select the disk in the list, click on the "Change" button, select the new drive letter, and click on "OK".
The drive letter was changed to the desired drive letter using disk management.
Why Change Drive Letter and Paths Grayed Out?
You may encounter an issue where the option to change the drive letter is greyed out, even if the drive appears to be in good condition. This can be caused by several factors, including a malfunctioning drive, corrupted system files, or a failing drive that is unable to be accessed properly by the operating system. In such cases, the drive letter change option may be unavailable, making it difficult to resolve the issue.
- The drive letter you want to change may be already in use, which prevents you from changing it.
- A system partition or a boot partition cannot be changed.
- The drive letter is being used on the connected drive.
- The volume is not ready to receive a drive letter.
- Another reason can be the unsupported operating system.
These are possible reasons for drive letter paths grayed out.
What to Do If You Can't Change Drive Letter?
Now that we have addressed the default solution and the reason for the inability to change the drive letter, we can proceed to the next step. A third-party utility is suggested, which is not only quick but also safer and easier to use. Qiling Partition Master Enterprise is a disk management alternative that can change the disk, create partitions, and assist in allocating drive space, allowing for maximum disk space utilization. This tool enables users to create partitions based on the required space, making it a convenient and efficient solution.
Qiling Partition Master Enterprise is a powerful partition manager that offers a range of features and tools to help users manage their computer's partitions. With its user-friendly interface, users can easily resize, move, merge, and split partitions, as well as convert between different file systems.
- Flexibility move and resize partition
- Quickly format partitions
- No risk of data loss
- Support to convert NTFS to FAT32
- Helps to resolve low disk space issues by merging partitions
- Check partition error and fix it
- 100% secure to use
- Easily repair disks
- Capable of improving partition recovery
- Rightly allocates the partition size to maximize the PC performance
To try Qiling Partition Master Enterprise, download the trial version from the official website. If you're a beginner, this is a good way to get started. Once downloaded, follow the steps to change your drive letter, which will guide you through the process.
Step 1. Run Qiling Partition Master, right-click the target partition and select "Change Drive Letter" to change the drive letter.
Step 2. Click the down arrow in the new window, then select a drive letter from the drop-down menu.
Conclusion
The issue of changing the disk letter space has been analyzed, with causes and solutions discussed. While Disk Management is a viable option, it often fails to allow changes to the disk letter, with the option being greyed out. A safer, faster, and easier solution is recommended, which is the Qiling Partition Master. This application efficiently allocates disc space and resolves all problems related to disk letters, including the greyed-out option, making it a reliable choice.
Related Articles
- How to dual boot Windows 11/10 with Windows 8 or 7?
- Can You Convert Basic to Dynamic in Windows 11? Yes, Here Is The Guide
- How to Fix USB won't format to FAT32, Check Three Easy Ways
- 3 Best Windows 11 Disk Format Tool/Utility Free Download
- Clean VS Formatting a Hard Drive, Can You Tell Me Their Difference
Is cleaning a hard drive the same as formatting a hard drive? Of course not. This article focuses on this question and tells you how to format a hard drive instead of cleaning a hard drive. - Does Formatting a Drive to exFAT Wipe It?
If you need to format your internal drive or external device to exFAT for some reason, you might wonder, 'Does formatting a drive to exFAT wipe it.' Here in this post, we explains the answer you are looking for.