How to Change File Type in Windows 10
PAGE CONTENT:
A file type is a category of files that share similar characteristics, such as format, extension, and usage. In Windows 10, you can change the file type of a file by changing its extension or using the "Save As" option in the File Explorer. This can be useful for converting files from one format to another, such as converting a Word document to a PDF or changing a video file from MP4 to AVI.
To change a file type on Windows 10 using File Explorer, right-click on the file and select "Rename." Then, add the desired file extension to the end of the file name, for example, ".txt" or ".
Fix 2. How to Edit File Type with Online Tool
Using CMD to Change Type for Multiple Files?
Can't Change File Type Windows 10? Fix Disk Error Now!
What is File Type and Can You Change File Type in Windows 10?
Right-To view the file type and extension, click on the file and select Properties from the menu. This will display the file type on the panel, and the extension (such as .doc, .xlsx, .pptx) will be visible. Setting a file extension allows specific programs to open the file, for example, .xlsx files will open with Microsoft Excel.
You can change the file type by renaming it, but some files created incorrectly may not open properly after being saved with a new extension.
If you need to change the file type in Windows 10, you have two fast ways to do so. First, you can use the built-in "Get Info" feature in File Explorer, which allows you to change the file type by right-clicking on the file, selecting "Properties," and then clicking on the "General" tab.
Fix 1. How to Change A File Type Windows 10 via File Explorer
1 - Making File Type Visible on Windows 10
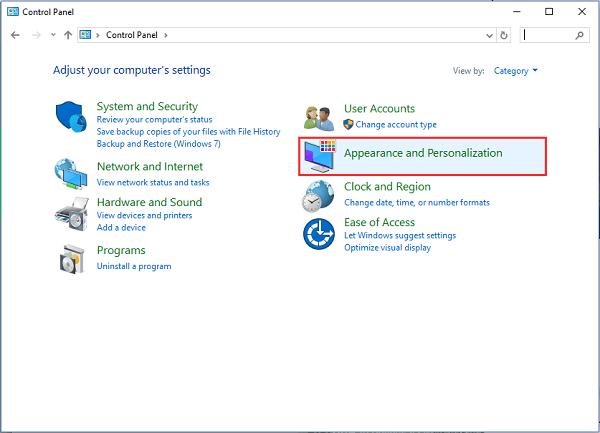
Step 1. To open the Control Panel in Windows 10, simply type "Control Panel" in the search box, usually located in the bottom left corner of the screen, and click on the result that appears. This will open the Control Panel window, where you can access various settings and tools to manage your computer.
Step 2. Click on Appearance and Personalization.
To find this, click Control Panel on the location path.
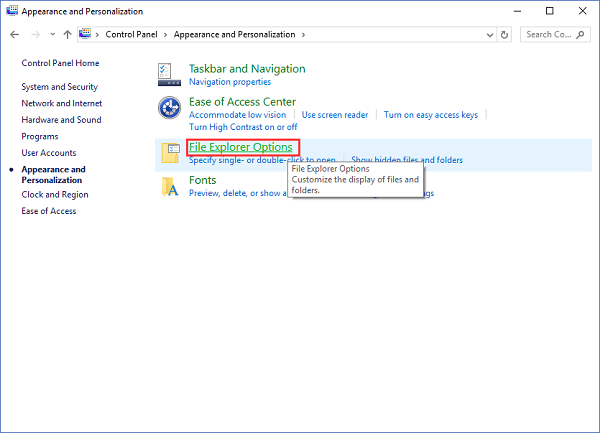
Step 3. Select the File Explorer Options on the panel.
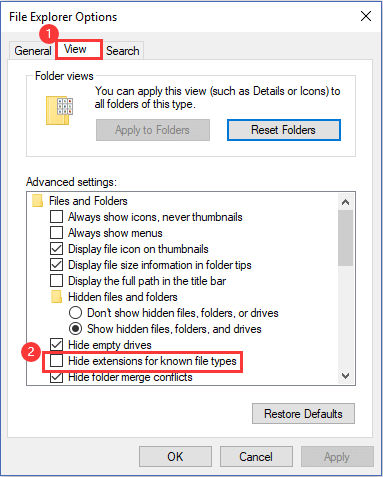
Step 4. To access the hidden file extensions, go to the View tab and then the Advanced settings below, where you can uncheck the option to hide extensions for known file types.
To hide file extensions for known file types, scroll down the list and look for "Hide extensions for known file types".
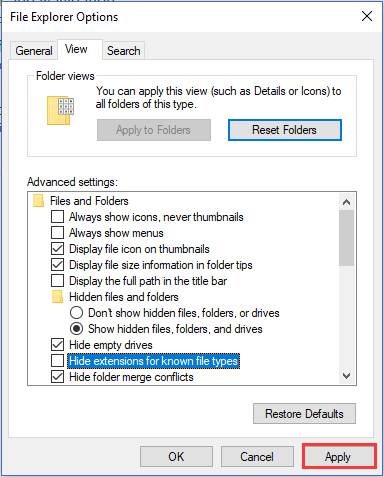
Step 5. Click Apply button and click OK.
2 - Change File Type
Step 1. To change a file's extension in File Explorer, open the application, navigate to the location where the file is stored, locate the file you want to modify, right-click on it, and select 'Rename' from the context menu. In the text box that appears, change the file extension to the desired one, and press Enter to confirm the change. For example, if you want to change a file called 'example.
Step 2. Right-click the file and select Rename from the drop-down menu.
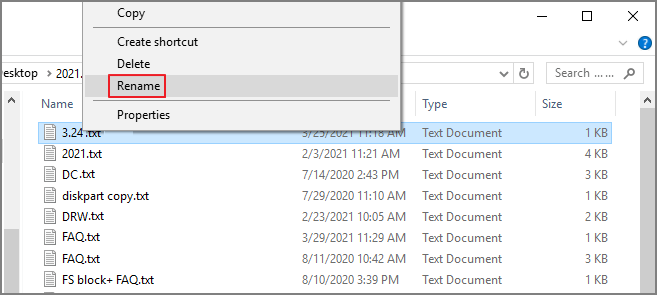
Step 3. Type the new file extension to replace the old extension. And then press Enter on the keyboard or click the blank space on the panel to save the new changes.

Step 4. The new extension has been successfully added, but a warning message appears, indicating that the extension is not verified by Google. This warning message will be displayed in the browser's address bar, reminding users that the extension is not trusted by Google.
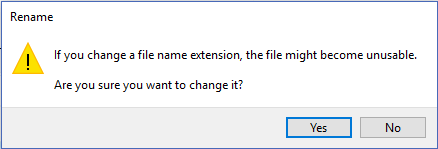
Rename windows will warn you that if you want to change a file type, the file might fail to work again. Select Yes if you want to continue.
To change a file extension, you can use the "Save As" feature in your computer's file explorer. By doing so, you can replace the existing file extension with a new one. For example, if you have a file with a .txt extension and you want to change it to .doc, you can save the file as .doc. If it works, the file will be recognized by existing programs to open it, such as Microsoft Word.
Read also:
Fix 2. How to Edit File Type with Online Tool
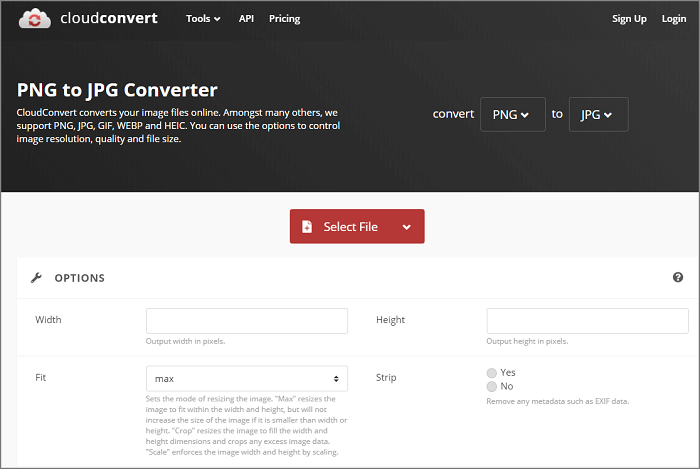
If the Rename option doesn't work for you, a better solution is to use an online file converter to change the file format. This way, you can download the converted file to the correct location and safely delete the original file, protecting your data by using a trustworthy website.
Set cloudconvert.com as an example:
Using CMD to Change Type for Multiple Files?
Unfortunately, the command line method of changing file extensions in bulk does not work reliably, resulting in an error message indicating that the folder is not recognized as an internal or external command. This makes it difficult to change file icons in bulk, requiring a manual process of editing the extension one by one.
If you still curious about CMD and like to try it, see as follows:
Hold the Shift key and right-click on the folder, then select Open command window here. If you don't see the options, it's not worth your time.
To change the file extension of a targeted file type, you need to type the storage path where the file is located, followed by the command line "ren *.(current file type) *.(new file type)" and press Enter. For example, if you want to change all .
Can't Change File Type Windows 10? Fix Disk Error Now!
The issue of "Can't change file type" might be caused by an unknown disk partition error. To resolve this, using a partition manager tool like Qiling Partition Master Free can be helpful. This tool allows you to check disk errors using its "Check File System" function, which can fix any hard drive errors it detects. This can help to resolve the issue and ensure smooth utilization of your disk.
To replace an old hard drive with a new one, you'll need partition manager software to create, resize, merge, format, or migrate an operating system to the new disk.
To check the file system, download the Qiling Partition Master Free and follow the step-by-step guide.
Step 1. To check the file system on your computer, open Open Qiling Partition Master, locate the disk, right-click the partition you want to check, and select "Advanced" > "Check File System".
Step 2. In the Check File System window, select the "Fix the error on the disk" option and click "Proceed" to continue.
Step 3. The software will start scanning your partition file system on your disk, and once it's done, click "Finish".
To Sum Up
To check disk errors, you can use two fast methods: using the built-in Check Disk (chkdsk) command in Windows or using a third-party program. If you're looking for a reliable solution using CMD, you can try the chkdsk command, and if you need more help, contact support@idiskhome.com.
Related Articles
- How to Create and Format exFAT Partitions in Windows 11/10/8/7 (Free Methods)
- How to Initialize SSD in Windows 10/8/7, How to Initialize a Hard Drive
- How to Partition 1TB Hard Disk in Windows 11/10/8/7
- Here's What to Do With Unallocated Space on SSD After Cloning
- Failed to Format Write-Protected NVMe Drive, Help
Need to fix a write-protected NVMe drive that fails to format? This article provides detailed steps to help you remove the issue and format the write-protected NVMe drive. - How to Format Write-Protected USB with Virus, Help
How to format a hard drive write-protected by virus? This short article provides a detailed guide on this issue. Dive into it and find the answer you want.