Cloned Drive Not Showing Full Capacity in Windows
Cloning a smaller disk to a larger one often copies the original partition sizes. The remaining capacity may be unallocated, hidden behind a recovery partition, or unavailable because of a partition-style limit. Do not assume the clone failed until you compare the physical drive size with the partition map.
Locate the missing space
Step 1. Boot from the cloned disk, then open Disk Management. Identify it by capacity and model, especially if the old source disk is still connected.
Step 2. Compare the number beside Disk N with the capacity printed on the drive. If the physical disk itself reports too little space, check the enclosure, controller, firmware, and vendor utility before editing partitions.
Step 3. Look for a black Unallocated block. Note whether it sits immediately to the right of C: or after a recovery partition.
Step 4. Check Properties, Volumes for GPT or MBR. MBR commonly limits usable address space to about 2 TB with 512-byte sectors.
Case 1: Unallocated space is adjacent to the volume
Make a verified backup of important files. Right-click the data or system volume immediately left of the unallocated block and choose Extend Volume. In the wizard, verify the selected disk and amount, then finish. Confirm the new size in Disk Management and File Explorer. Do not extend the wrong volume just because its command is available.
Case 2: A recovery partition separates C: from free space
Disk Management cannot extend C: across that partition. Keep the recovery partition in place unless you have a separate, tested recovery plan. After backing up, use a partition manager that can move the intervening partition into the free space, then extend C: into the space made adjacent. Review the proposed partition map and power requirements before execution. On a laptop, connect AC power and do not interrupt the operation.
Use Qiling Disk Master Pro to inspect the proposed layout
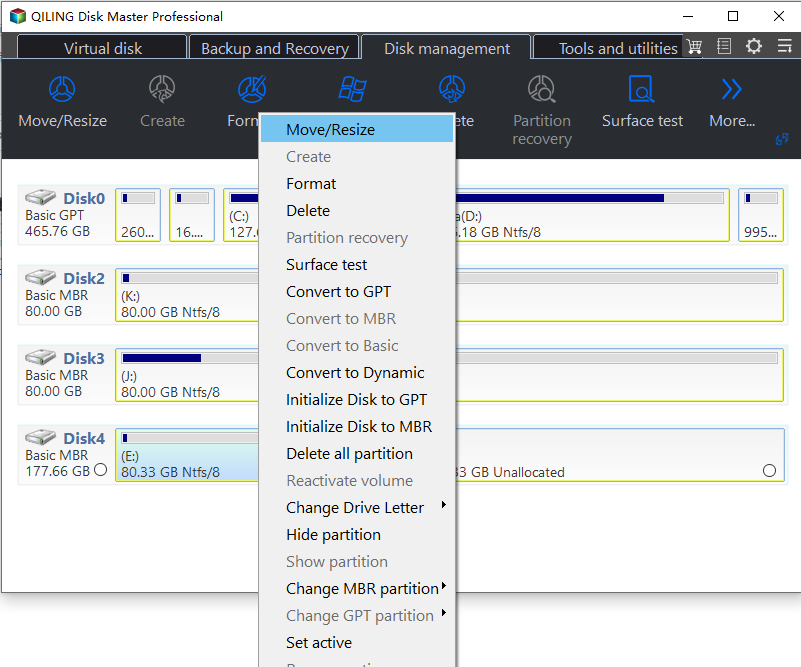
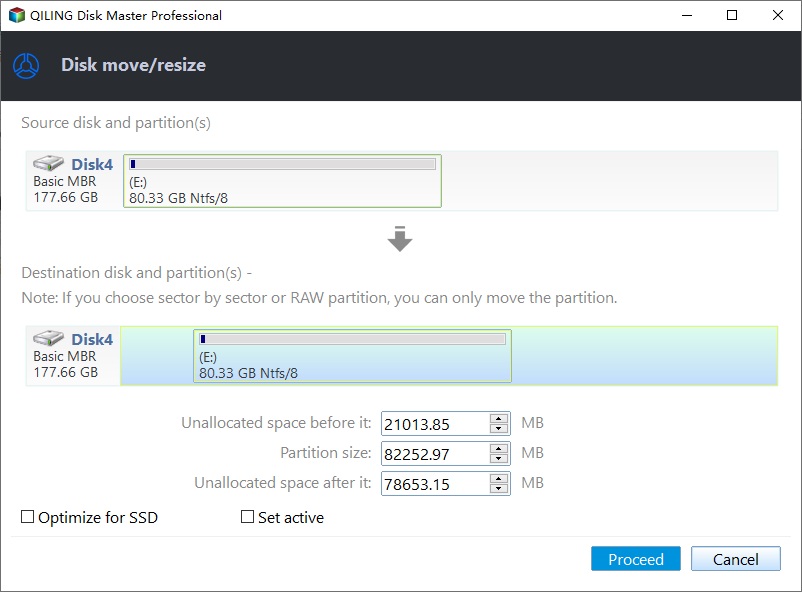
In Disk management, Qiling Disk Master Pro shows the cloned disk, its recovery partition, and any unallocated space in order. If the partitions are healthy and a full-disk backup is verified, select the intervening partition and open Move/Resize. Move it toward the free area without changing its size, review which space becomes adjacent to C:, and click Proceed only if the preview is correct. Then select C: and use Move/Resize again to extend it into the newly adjacent space. Verify Windows starts and its recovery environment still works afterward.
Case 3: MBR or device capacity is the limit
If the disk is larger than 2 TB but the upper area is inaccessible, confirm the current partition style and boot mode. A Windows system disk conversion requires a compatible UEFI boot configuration; do not switch modes casually. If the device itself reports a smaller capacity, changing partitions will not restore the missing hardware space.
Verify the cloned disk
Disconnect the old source temporarily, confirm that Windows boots from the clone, and inspect important files. Check recovery access before removing any recovery partition. Keep the source intact until the new disk has passed boot and data checks.
Related Articles
- SSD Capacity After Cloning
Troubleshoot unused capacity specifically on SSDs. - Restore a Disk Image
Recover from an image if the new layout fails.
Products
Articles & Tutorials
- Data Recovery
- Data Backup
- File Recovery
- File Backup
- System Backup and Restore
- Disk and Partition Clone
- Technical articles
- Mobile articles
- Disk Master Help
- Windows Data Recovery Tutorials
- Windows Secure Delete Tutorials
- Windows Partition Management Tutorials
- Windows File Backup and Restore Tutorials
- Windows System Backup and Restore Tutorials
- Windows Disk Backup and Restore Tutorials
- Windows Clone Tutorials