Top 9 Tips | How to Fix Steam Disk Write Error in Windows 10/8/7
9 Solutions to Fix Steam Disk Write Error (Quick Navigation)
To resolve Steam disk write errors, try restarting your computer or Steam client, checking for disk space and ensuring the drive is not full, verifying the integrity of game files, and disabling any disk write protection. If the issue persists, consider running Steam as an administrator, updating your operating system or graphics drivers, or checking for malware.
| Workable Solutions | Step-by-step Troubleshooting |
|---|---|
| Fix 1. Restart Steam or PC | Open any Steam window. In the top-left corner, click the word "Steam" to open a drop-down...Full steps |
| Fix 2. Clear Download Cache | Open "Steam", go to "Settings". Click "Downloads", and select "Clear Download Cache"...Full steps |
| Fix 3. Repair Steam Disk Bad Sectors | Download Qiling Partition Master and install it. Right-click the disk that you want to check...Full steps |
| Fix 4. Run as Administrator | Navigate to your Steam folder and right-click Steam.exe, click "Properties"...Full steps |
| Fix 5. Move Game Folder | Connect the destination drive to your computer. Choose the games you want...Full steps |
| Other Useful Fixes | Remove write protection > Check Steam disk bad sectors > Reinstall Steam...Full steps |
Steam Disk Write Error While Downloading/Upgrading
When installing or updating popular Steam games like Dota Underlords, Football Manager, Kenshi, Tree of Savior, and Team Fortress, users may encounter errors suggesting a Steam disk write error or disk read error. These errors can be frustrating and may require troubleshooting to resolve.
- An error occurred while updating [game title]
- An error occurred while installing [game title]
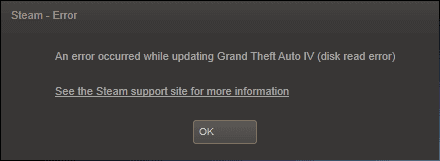
The detailed error message with disk-related extra information suggests that the issue can occur during a Steam game update or installation. As a result, Steam may become unable to complete the installation. To resolve the Steam disk problems, it is essential to take prompt action and repair the affected hard drive.
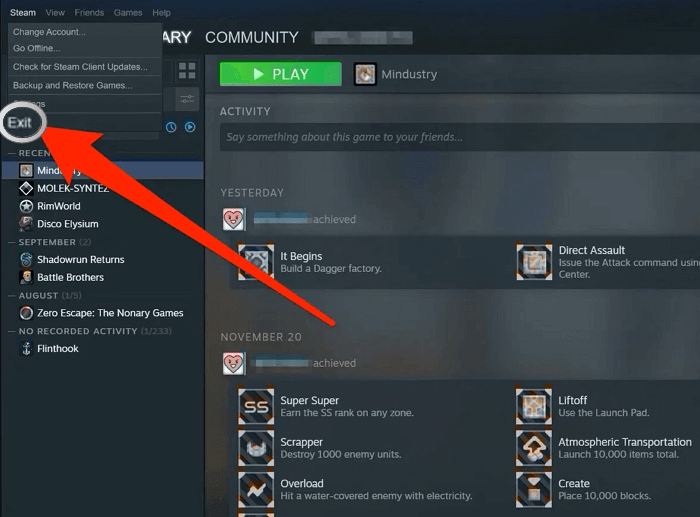
Fix 1. Restart Steam and Computer to Fix the Disk Write Error
Stuck in a frustrating situation? restarting can often be the solution. Whether it's a computer blue screen, black screen, disk error, or even a Steam disk error, a simple reboot of Steam and your PC can often resolve the issue and get you back on track.
To restart Steam:
Step 1. Open any Steam window.
Step 2. To open a drop-down menu, click the word "Steam" in the top-left corner.
Step 3. To exit Steam, select "Exit" from the drop-down menu on Windows or "Quit Steam" on Mac, and Steam will close.
Step 4. To continue, open Steam again, and log back in if you've been logged out.
If you encounter a disk read error or write error, try restarting your computer and see if the issue persists. If it does, you can try running a disk check or disk cleanup to see if it resolves the issue.
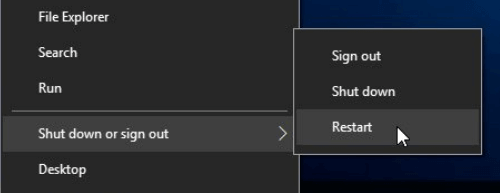
To restart PC:
Step 1. Click the "Start" icon.
Step 2. Go to "Shut down or sign out > Restart."
Fix 2. Clear Steam Download Cache to Fix Disk Error
To fix the error, clear the download cache, which forces the Steam client to flush locally cached configuration data and acquire it from the Steam server again.
To clear Steam download cache:
Step 1. Open "Steam", go to "Settings".
Step 2. Click "Downloads", and select "Clear Download Cache".
After that, try to reopen Steam and see if it works.
Fix 3. Check and Repair Steam Disk Bad Sectors
If you're experiencing a disk write error with Steam, Origin, or other games, it may be due to bad sectors on your drive, which can cause issues with writing data to the disk. To troubleshoot this, you can check your drive for bad sectors using tools like Chkdsk or a disk diagnostic tool. If bad sectors are found, you may need to replace your drive or use a drive recovery software to attempt to recover data from the affected areas.
1 - Check Bad Sectors on the Steam Disk
To check bad sectors on your hard drive, you can start by using the Surface Test feature, which is a built-in tool that's extremely easy to use. However, for more detailed help, you may need to use a third-party free partition manager tool like Qiling Partition Master, which can assist you in checking bad sectors on your hard drive.
Step 1. Open Qiling Partition Master, click the disk you want to check, and then click "Surface Test" to check the disk's surface.
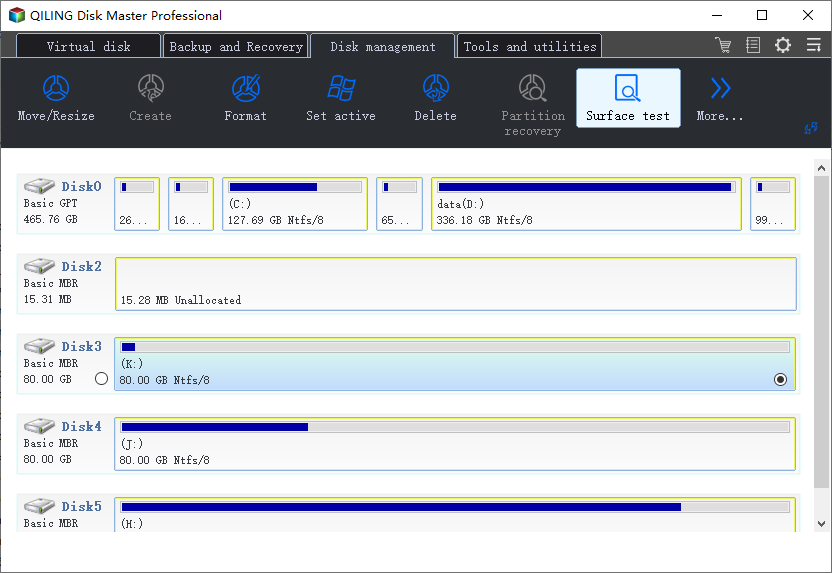
Step 2. The operation will be done right away and all bad sectors will be marked as red.
If the error is not found, go back to Steam and check if the game update is still stuck.
2 - Replace Failing Steam Hard Drive
If you're experiencing Steam downloading or upgrading errors, cloning your drive to another HDD and replacing the original drive can be a viable solution. Qiling Partition Master can assist with this process.
To replace a failing hard drive with a new one, use Qiling Partition Master's clone disk function to create an exact copy of the old hard drive on the new one, then shut down your computer, swap the old and new hard drives, and restart your computer to boot from the new hard drive.
Step 1. Select the source disk.
Right-To copy or clone a disk, click on the disk you want to copy or clone, then select the "Clone" option.
Step 2. Select the target disk.
Select the desired hard drive or solid-state drive (HDD/SSD) as the destination and proceed with the next step by clicking "Next".
Step 3. View the disk layout and edit the target disk partition size. This action allows you to adjust the partition size of the target disk, which is a crucial step in resizing or reconfiguring the disk layout. By editing the target disk partition size, you can allocate more or less space for specific partitions, ensuring optimal use of disk space and preventing potential issues related to insufficient storage.
Then click "Continue" when the program warns it will wipe out all data on the target disk. (If you have valuable data on the target disk, back up it in advance.)
To customize your disk layout, you can choose from three options: "Autofit the disk", "Clone as the source", or "Edit disk layout". If you want to leave more space for the C drive, select the last option.
Step 4. Click "Proceed" to start the disk cloning process.
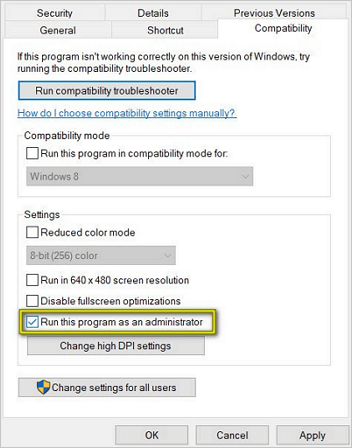
Fix 4. Run Steam as an Administrator to Fix It
Running software as an administrator gives it extra permissions and can fix several odd problems, but it's not always possible when you're not an administrator.
Step 1. Navigate to your Steam folder and right-click Steam.exe, click "Properties"
Step 2. Select the "Compatibility" tab.
Step 3. Under Privilege Level, check "Run this program as an administrator".
Step 4. Click "Apply > OK".
Fix 5. Move Steam Game Folder to Another Drive
To solve the Steam disk write error, consider moving Steam to a healthy drive. A manual copy may not guarantee success, but a tool like Qiling Disk Master can help. It offers three practical transfer modes: PC to PC, Image Transfer, and App Migration, making it the best overall Steam game transfer tool to automatically move a PC game to another drive.
To transfer Steam games to another drive:
Step 1. Connect the destination drive to your computer.
Step 2. Choose the games you want to change the location.
Step 3. Transfer the games to the destination drive.
Fix 6. Verify Integrity for Steam Game Files
If you're experiencing issues with Steam games, such as crashes or missing models, try verifying the integrity of the game files first. This can help ensure that the game's files are complete and not corrupted, which may be causing the problems.
Step 1. Reboot system and then launch Steam.
Step 2. To resolve disk errors in a game, select the "LIBRASY" tab, right-click the game causing the issue, and choose "Properties".
Step 3. Click the "LOCAL FILES" tab, and then click the "VERIFY INTEGRITY OF GAME FILES…" button.
Step 4. Steam starts verifying game files, which may take a couple of minutes, and some files may fail to verify, which is a normal occurrence for most Steam games, as they are local configuration files that cannot be disturbed.
Step 5. Once all files are validated successfully, you can retry installing updates and see if the disk error is resolved.

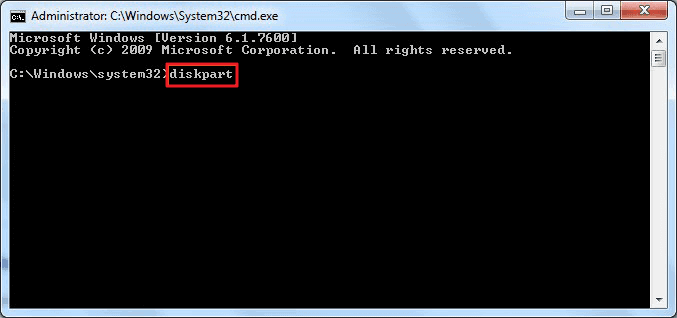
Fix 7. Remove Write Protection from the Steam Drive
When a disk is written-To resolve disk errors on Steam, you can try using the diskpart command to clear write protection and remove the error. This command allows you to modify the disk, which is protected, preventing you from formatting, writing data, or installing programs. By using diskpart, you can override the protection and resolve the issue. This should resolve the problem and allow you to use Steam without any issues.
Step 1. Press "Win + R", type cmd to open "Command Prompt".
Step 2. Type diskpart and hit "Enter".
Step 3. Type list disk and hit "Enter".
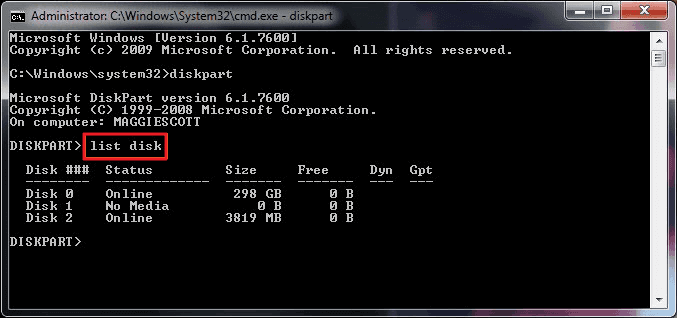
Step 4. Type `select disk 0` (Replace 0 with the write-protected device number) and press Enter.
Step 5. Type attributes disk clear readonly and hit "Enter".
Step 6. Type exit to close the diskpart window once the write protection removing process is finished.
Try restarting your PC and see if Steam works again.
If you're not tech-savvy and unfamiliar with command lines, - there are graphical-based solutions to help you remove write-protection from your hard drives, USB drives, and even SD cards.
Qiling CleanGenius is a tool that helps fix issues on drives without requiring command-line knowledge.
Here's an easy-Here's a one-paragraph guide on how to use this tool to get your issues sorted:
Step 1: DOWNLOAD and install Qiling CleanGenius (free) on your computer.
Step 2: Run Qiling CleanGenius on your PC, select Optimization and choose the Write Protection mode.
Step 3: Select the device that is write-protected and click Disable to remove the protection.
Fix 8. Remove Disk Write Error by Reinstalling Steam
If you're still experiencing a Steam disk write error on Windows 10, 8.1, 8, or 7, it might be necessary to reinstall Steam. This process can resolve any issues with the Steam client and service files, but it will also remove Steam and any installed game content from your machine.
To Uninstall Steam:
Step 1. To keep your Steam game installations separate from the Steam program itself, exit Steam, then move the Steamapps folder out of the C:\Program Files\Steam directory. This will allow you to keep your game installations separate from the Steam program.
Step 2. Click the Windows Start button and select "Control Panel".
Step 3. To uninstall Steam, open the "Add or Remove Programs" dialog, select "Steam" from the list, and click the "Change/Remove" button.
Step 4. Select the Automatic option and click "Next".
Step 5. Click "Finish" to uninstall Steam
To Install Steam:
Step 1. Visit https://store.steampowered.com/about/
Step 2. Click the "Install Steam" button and allow the Steam installer to download.

Step 3. Once downloaded, click "run/open" and follow the instructions to install the Steam client onto your computer.
To access your game keys, simply log in to your account, and all of your activated game keys will be available in the "Library" section.
Fix 9. Contact Steam Official Support to Fix Disk Write Error
If you're experiencing issues with Steam, you can turn to the official support team for assistance. They can guide you through potential solutions to your specific problem. Additionally, you can find help in the Steam Community forum, where users share their experiences and offer advice.
Step 1. Turn to the support team for help.
Step 2. Visit the Steam Community forum to get additional information.
Conclusion
If you're experiencing a Steam disk read or write error, ! We'vethis guide can help. Try one of the nine solutions we've outlined, and hopefully, one of them will solve the issue. If you have any other practical strategies for removing the disk write error on Steam, feel free to share them with us!
Disk Write Error Steam (FAQs)
If you're experiencing disk write errors, there are ways to resolve the issue. To start, you can try running a disk check on your system, which can help identify and repair any corrupted files or sectors on the disk.
How do I fix disk write error on Steam?
If you're experiencing a Steam disk write error in Windows 10, there are several solutions to try. You can restart your computer, disable and re-enable the Steam overlay, check for disk errors using the Check Disk utility, run a virus scan, update your graphics drivers, disable any third-party antivirus software, check for disk space issues, run a System File Checker scan, or try a clean boot.
- Fix 1. Restart Steam or PC
- Fix 2. Clear Download Cache
- Fix 3. Check and Repair Steam Disk Bad Sectors
- Fix 4. Run as Administrator
- Fix 5. Move Game Folder...
Why does my Steam say disk write error?
Steam Disk Write Error While Downloading/Installing:
A Steam disk write error occurs when Steam is unable to complete a game update or installation due to a problem writing to the disk. This can happen at any time during the installation process.
How can I repair my hard disk?
Steps to Repair Corrupted Hard Disk without Formatting
Step 1: Download Qiling Partition Master and install it. Right-click the disk you want to check, then click "Surface test" to check the disk.
Step 2: The operation will be immediately performed. Bad sectors will be marked as red...
What causes a disk read error?
The most common cause of this error is typically an incorrect Master Boot Record (MBR) configuration, often resulting from disk write errors, virus attacks, or power outages.
Related Articles
- There Is Not Enough Space on C Drive to Extract This Package [Solved]
- [Solved]How to Create EXT4 Partition in Windows 11/10
- Why Do Games Take Up So Much Space | Free Up PC Space
- Patriot Formatter | The Best USB Format Tool for Patriot Flash Drive
- Extend System Partition into Non-Contiguous Space with Freeware
If you're unable to add unallocated space to your C drive in Windows, you can use free partition software to extend your partition into non-contiguous unallocated space. This allows you to utilize free space that's not adjacent to your C drive, effectively expanding your C drive's capacity. - 3 Steps to Extend System Partition Before Upgrading to Windows 10
Wanna upgrade to Windows 10 but the system partition is not large enough? Here comes the free way to extend system partition before upgrading to Windows 10.