How to Partition External Hard Drive in Windows 11/10/8/7
To partition an external hard drive in Windows, you can use one of the three reliable disk management tools: follow the steps below. These tools allow you to partition the drive, making it available for storing files immediately. Follow the instructions on this page to learn how to partition your external hard drive and get started with storing files.
To partition a hard drive in Windows without losing data, you can use the built-in Disk Management tool. First, open the Disk Management tool by searching for it in the Start menu, then right-click on the unallocated space on the hard drive and select "New Simple Volume".
Why Do You Need to Partition An External Hard Drive
Computer users, especially those with Windows, are often used to creating multiple partitions on a hard drive for different purposes. Typically, a new hard drive comes with a single primary C drive, prompting users to create additional partitions like D, E, F, and G on their own.
You can partition an existing external or internal hard drive to organize your files and make it easier to manage your data. By creating separate partitions, you can allocate space for specific purposes, such as storing videos, documents, or music, and keep them separate from other files. This can help improve performance and reduce clutter on your hard drive.
Many users want to partition an external hard drive due to its numerous advantages, including the ability to organize files and folders more efficiently, improve data security by separating sensitive information from other data, increase storage capacity by allowing multiple partitions on a single drive, enhance performance by dedicating specific partitions for specific tasks, and provide flexibility in managing and sharing data between different users or devices.
- To better manage your data, it's a good idea to keep your working files and personal data on separate volumes. This helps maintain a clear distinction between what's related to your work and what's personal, making it easier to organize and save data properly.
- Saving backup and daily files into different volumes.
- Protect data security.
- Improve external hard drive performance.
If you have the same needs, you'll need a reliable way to partition your external hard drive. We'll discuss and help you address this issue with 3 reliable partition tools in the next part.
How to Partition An External Hard Drive Without Losing Data
To create and make partitions on an external hard drive in Windows 10/8/7, you can use the built-in Disk Management tool. First, connect the external hard drive to your computer and open the Disk Management tool by searching for it in the Start menu.
Here are three reliable methods to partition an external hard drive in Windows 11/10/8/7: Qiling Partition Master, Windows Disk Management, and DiskPart, which can help you effectively partition an external hard drive.
To make partitions on your disk, follow the guide for the chosen method. For example, if you choose the "Disk Management" method, open the Disk Management tool by searching for it in the Start menu, select the disk you want to partition, right-click on it, and choose "New Simple Volume" from the context menu.
- To partition an external hard drive with Qiling Partition Master, first download and install the software on your computer. Then, connect the external hard drive to your computer and launch Qiling Partition Master. The software will detect the external hard drive and display its current partition structure.
- To create a partition on an external hard drive using Disk Management, start by plugging in the external hard drive and opening Disk Management. You can do this by pressing the Windows key + R to open the Run dialog box, typing "diskmgmt.msc," and pressing Enter.
- To make a partition in an external hard disk using DiskPart, follow these steps: Open the Command Prompt as an administrator. Type "diskpart" and press Enter to open the DiskPart tool. List the disks by typing "list disk" and identify the external hard disk.
Note thatThe three tools listed are ordered from easiest to most difficult. If you're not familiar with Disk Management or DiskPart, it's recommended to start with Method 1 and use Qiling partition manager software for assistance. Before proceeding, make sure to back up your files from the external hard drive in advance.
Method 1. Partition External Hard Drive with Qiling Partition Master
You can partition an external hard drive in Windows 11/10/8/7/XP/Vista, and even Windows Servers, using built-in tools or third-party software. One way is to use the Disk Management tool, which can be accessed by typing "diskmgmt.
Qiling Partition Master is the easiest way to partition an external hard drive, making it simpler than Windows Disk Management and DiskPart. It allows users to resize, create, format, or delete partitions in just a few clicks.
The software offers a New Disk Guide feature that allows you to partition a new disk with just one click. It can be downloaded, installed, and activated on your computer, making it easy to create partitions on an external hard disk.
Tutorial 1: How to Partition A New External Hard Drive in One-Click
Connect your brand new external hard drive to your computer using a USB connection cable, then partition it right away by following the on-screen instructions, which can usually be completed in just one click.
Step 1. To create a new partition on the disk, open Qiling Partition Master and select the new disk. Click the "Create" button to initiate the process.
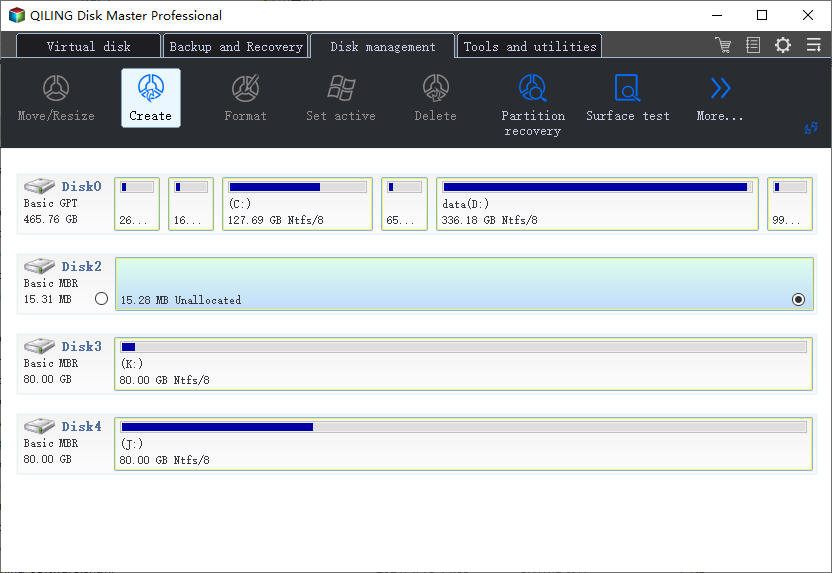
Step 2. You can continue to customize how many partitions you want to create, and set the partition style you want, such as MBR or GPT.
You can either customize the settings offered by Qiling Partition Master or accept the default settings provided by the software. Once you've completed the customization, you can proceed.
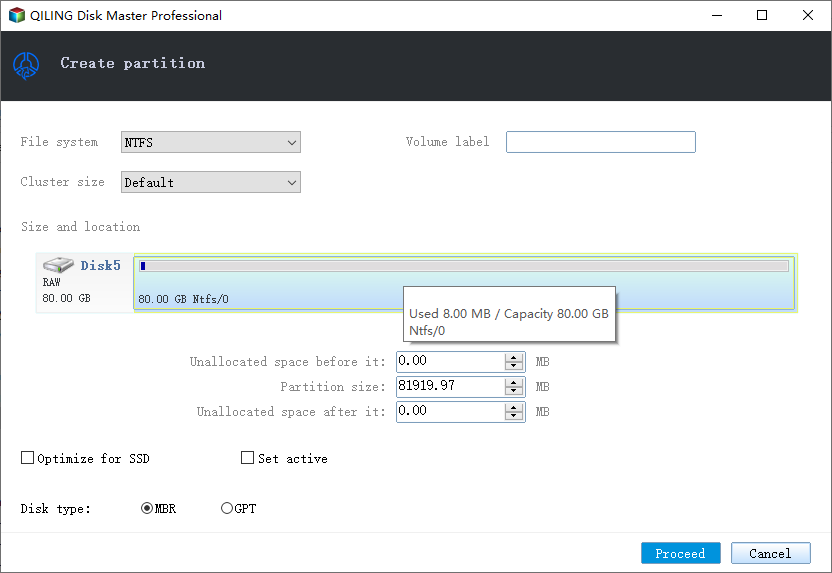
Step 3. Click "Proceed" to finalize partitioning the new HDD/SSD or external disk.
Tutorial 2: Partition A Used External Hard Drive in 3 Steps
If you need to repartition an external hard drive or an existing hard drive, you can follow a tutorial to create new partitions on it. This method is also applicable for partitioning an existing hard drive.
Step-by-step Guide:
Step 1. Check for free space
To divide a disk partition into multiple ones, ensure there is sufficient free space available on the disk to accommodate the new partitions.
Step 2. Shrink a disk partition to create unallocated space
To resize a partition with a lot of free space, start by clicking on the "Resize/Move" feature. Select the partition with ample free space. This action will initiate the resizing process, allowing you to allocate the unused space to other partitions if desired.

To free up space, drag either end of the partition to the right or left, allowing you to shrink its size, much like the red arrow does. This will create ample unallocated space, and you can see the exact amount of space decreased in the "Partition size" area.

To summarize, click "Proceed" to save changes, then go back to the main window where you should see unallocated space under the same disk as the one you shrunk.
Step 3. Create a new partition on unallocated space
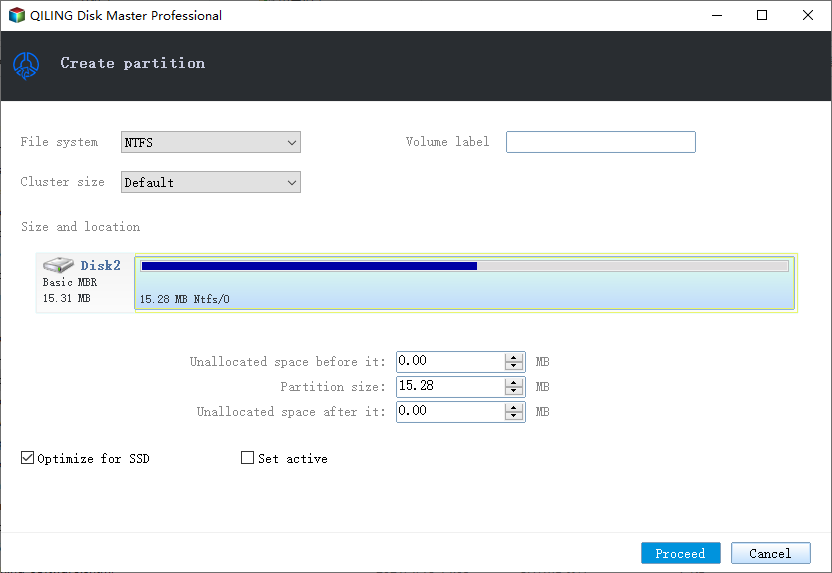
To turn the unallocated space into a usable partition drive with a recognized file system, right-click on the unallocated space and choose "Create".
Customize the partition information with various settings in the Advanced Settings, including drive letter, partition label, and file system (NTFS, FAT32, EXT2/3/4, exFAT) options.
To partition a hard drive in many more partitions, first, click "New" in Disk Management, then select the unallocated space and click "Next". In the "New Simple Volume Wizard", select the drive letter and click "Next". Choose a file system (FAT32, exFAT, NTFS) and click "Next".
Qiling contains advanced features to help manage disk space more effectively, including features to properly manage disk space.
- Hide or wipe a partition
- Merge two partitions into one
- Convert dynamic to basic disk or vice versa
- Transfer OS to SSD, etc.
Some of the features available in the Disk Management or DiskPart tools are not available in these tools.
Method 2. Create Partition on External Hard Disk Using Disk Management
Disk Management is a built-in tool in Windows 10/8/7 that allows users to manage partitions on their disks. With it, users can perform basic operations such as extending or shrinking a volume, creating a new one, changing drive letters and paths, and converting a hard disk to dynamic, all for free.
Connect your external hard drive to your PC, open Disk Management (Press the Windows key + R, type diskmgmt.msc and press Enter), right-click on the unallocated space, select New Simple Volume, follow the wizard to assign a drive letter and file system, and format the drive.
Partition External Hard Drive in Windows 10:
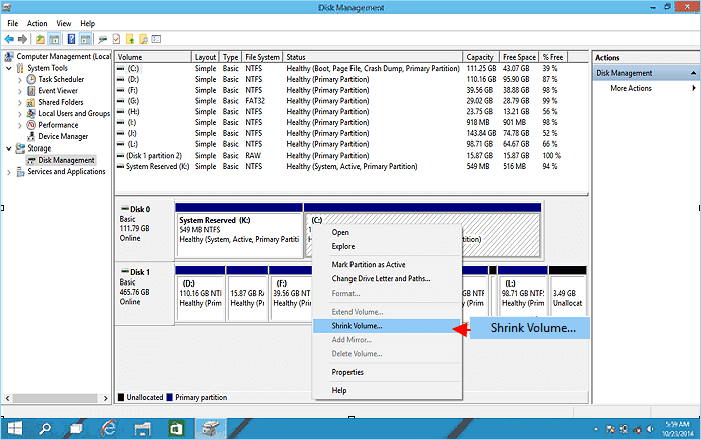
Step 1.To access the Disk Management tool in Windows 10, right-click on "This PC" and select "Manage", then choose "Disk Management" from the resulting window.
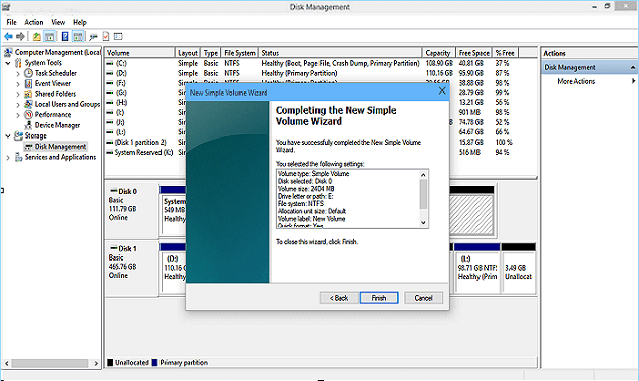
Step 2. To recreate a new partition on your external hard drive, right-click on the unallocated space and select "New Simple Volume" from the context menu.

To create a second partition on an external hard drive, right-click the drive and select "Shrink Volume". This will allow you to create a new partition on the remaining free space, giving you more flexibility and organization for your files.
Enter the amount of space you want to shrink in MB, then click on the Shrink button. Repeat to create a new volume.
Step 3. To proceed, enter the New Simple Volume Wizard interface by clicking Next and specify the desired volume size.

Step 4. To create a new partition in Windows 10, assign a "Drive Letter or Path" and set the partition file system as NTFS, then click "Finish" to complete the process.
Partition external hard drive in Windows 8:
Step 1. Connect the external hard drive to your Windows 8 PC, and then press the Windows key + R keys on your keyboard to open the Run dialog box. In the Run dialog box, type "diskmgmt.
Step 2. Type diskmgmt.msc and hit Enter to open Disk Management.
Step 3. To create a new partition on the external hard drive, right-click on the unallocated space and select "New Simple Volume".
Step 4. Enter the volume size in MB, click "Next" to continue.
Step 5. Set the drive letter and file system as NTFS, and click "Finish".
To partition an external hard drive in Windows 7:
Step 1. Connect the external hard drive to your Windows 7 computer and right-click on "My Computer" (also known as "Computer").
Step 2. Select "Manage" and click "Disk Management".
Step 3. Right-click on the unallocated space of your external hard drive, and select "New Simple Volume...".
Step 4. Enter the volume size, click "Next" to continue.
Step 5. Set the drive letter and file system as NTFS, then click "Finish".
Method 3. Make Partition in External Hard Disk via DiskPart
If you're an advanced user, you can use DiskPart to manage your external hard drive. Simply connect the drive to your computer and follow the steps to create partitions and manage the drive using DiskPart.
Step 1. To run the Command Prompt as an administrator in Windows, type "cmd" in the Windows Search box, right-click on Command Prompt and select "Run as Administrator".
Step 2. Type diskpart in command prompt and hit Enter.
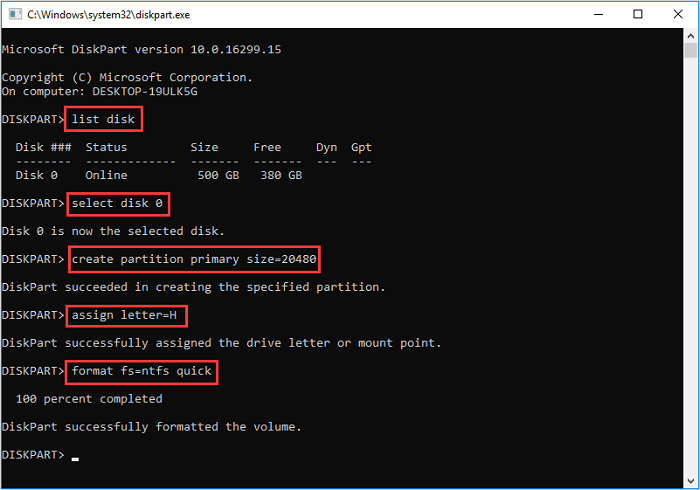
Step 3. Type commands and hit Enter each time to create and make new partitions on your new disk:
- list disk
- select disk 0 (Replace 0 with the disk number of your external hard drive.)
- create partition primary size=*** (Note that the size need to be in MB.)
- assign letter=H (Replace H with a new letter for your external hard drive.)
- format fs=ntfs quick
Step 4. After this, type exit to close DiskPart.
You can use the external hard drive to save files or transfer data without any limit after the process is completed.
Conclusion
This article provides a guide on how to partition an external hard drive in Windows 11/10/8/7, covering HDD, SSD, USB drive, and removable disk. Three reliable disk partitioning utilities are introduced to assist with the process: Qiling Partition Master Free, Windows Disk Management, and DiskPart.
The recommended tools can partition a new or old external hard drive into multiple blocks, solving the problem of partitioning a hard drive.
For Windows beginners, Qiling Partition Master is a great option to try. Its New Disk Guide feature simplifies the whole partition disk process into one click, making it easy to navigate.
Partition External Hard Drive FAQs
If you have further questions in managing external hard drives, check out and find satisfying answers below:
1. How to remove partition on external hard drive Windows 10?
To remove a partition on an external drive in Windows 10, you can use one of three methods: Qiling Partition Master, Windows 10 Disk Management, or Windows 10 Command Prompt.
If you're looking for a free tool to help you with your disk management, you might consider using the built-in Disk Management feature. This tool can assist with various tasks, such as creating, formatting, and deleting partitions, as well as resizing and moving them around.
- In Windows 10, you can open the Disk Management console by right-clicking the Start button and selecting "Disk Management" from the Start menu.
- In Disk Management, locate the external hard disk and the partition you want to remove.
- Right-To delete a partition, click on it and select "Delete Volume" from the context menu.
For more details, you can refer to the article "How to Remove Partition on External Hard Drive in Windows 10" for guidance on the process.
2. How to format an external hard drive?
- To format a new external hard drive, follow the steps on the provided page to partition the disk first and format it during the process.
- To format a used external hard drive, open File Explorer, right-click the external hard drive, select "Format", choose NTFS as the file system, and click "Start".
For more details, you may follow the instructions on how to format an external hard drive in Windows 10, which can be found at the specified link.
3. How to fix unallocated external hard drive?
If your external hard drive suddenly becomes unallocated or shows up as unallocated in your Windows 10/8/7 PC, you can try the following steps: check the disk management tool to see if the drive is listed, try to assign a drive letter to it, and if that doesn't work, try to initialize the disk and assign a drive letter again. These steps can help resolve the issue and get your external hard drive working properly again.
Step 1. Recover data from unallocated space on the external hard drive.
Step 2. Create a new partition on the unallocated disk.
To repair an unallocated external hard drive without losing data, follow the step-by-step guide provided in the link.
Related Articles
- Home Office Setup: Setting Up Home Office for Remote Work
- How to Extend or Increase C Drive in Windows 8/8.1
- How to Resize EFI System Partition on Windows 11/10/8/7
- How to Format 64GB SD Card/USB Flash Drive to FAT32
- The Best Way to Set up SSD for OS Only
Learn the advantages of using SSD for Windows OS only and how to set up SSD for OS only with the help of reliable software Qiling Disk Master step by step. - Prolong the Lifespan of Your SSD with Several Ways
This tutorial will explain the definition of SSD lifespan and how to prolong Synology/Crucial SSD read write lifespan in both desktop and laptop in several simple ways.