How to Extend or Increase C Drive in Windows 8/8.1
If you're experiencing a low space issue on your system C drive in Windows 8/8.1, Windows 7, or even Windows 10, this page will guide you through a solution. We'll use Windows 8 as an example to show you how to increase C drive space without formatting or losing any data.
How Can I Extend C Drive in Windows 8 without Formatting?
To extend your C drive without formatting a partition, you can use the built-in Disk Management tool in Windows 8. Since you don't have unallocated space, you'll need to shrink another partition to free up space. You can use the Disk Management tool to shrink a partition, such as the D drive, to create unallocated space that you can then assign to the C drive. Alternatively, if you have a spare hard drive or external storage, you can move files from the C drive to the other drive to free up space. Once you have unallocated space, you can extend the C drive using the Disk Management tool.
Some Windows beginners may be wondering how to extend the C drive, and the answer is that it can be done by adding unallocated space to the target partition, but this method requires some technical expertise.
To enlarge your C drive for free, pick up one of the following Windows 8 disk managers and navigate to the tutorial guidelines.
- #1. Qiling Free Partition Manager - Beginners' Pick
- #2. Disk Management - Experienced Users' Pick
- #3. DiskPart - Administrators' Choice
Method 1. Extend C Drive in Windows 8 with Qiling Partition Master
Applies to:All levels of Windows users, including beginners, can benefit from this software, as it works on Windows 8/8.1, Windows 7 and Windows 10.
Qiling Partition Master Free Edition is a magic Windows 8 disk manager that can extend Windows 8 system partition safely, supporting both 32-bit and 64-bit systems, with its "Resize/Move partition" feature allowing for simple and safe operations.
With this free partition software, you cannot only manage your disk partitions, but also execute some advanced operations that Disk Management and DiskPart don't support, such as.
- Merge partition
- Move partition
- Copy disk/partition
- Partition Recovery
- Convert Disk to MBR/GPT
- Migrate OS to SSD/HDD
Tutorial: Extend C Drive in Windows 8 With/Without Unallocated Space
Step 1: Free up unallocated space for C drive.
If there is no unallocated space on the system disk, select a partition next to the C: drive and choose "Resize/Move".

Move the left partition to the right to shrink it, leaving unallocated space behind the system C: drive, and then click "Proceed".

Step 2: Increase C drive space.
1. Click on C: drive and select "Resize/Move".
2. To add space to the C: drive, drag the system partition end into the unallocated space. This will merge the unallocated space with the system partition, effectively increasing the size of the C: drive.
Step 3: Keep all changes to extend C: drive
Click the "Proceed" to keep all changes so to extend the system C: drive.
After using Qiling Partition Master, the system partition in Windows 8 or Windows 8.1 has been successfully extended, as shown in Disk Management and File Explorer.
Method 2. Increase C Drive in Windows 8 Using Disk Management
Applies to: Experienced Windows 8/8.1 and Windows 7/10 users.
As a free Windows built-Disk Management in Disk Manager is a powerful tool for basic disk management. Besides extending volume size, it can also perform various tasks, such as managing disk partitions, creating and deleting volumes, formatting disks, and assigning drive letters. This feature is useful for managing disk space and ensuring that your computer's storage is organized and running smoothly.
- Create, delete and format volume
- Add or change the drive letter
- Extend and shrink volume
- Convert basic disk to dynamic disk
- Explore, open volume
- Convert MBR disk to GPTor convert GPT disk to MBR
- To convert a dynamic disk to a basic disk, you need to delete all dynamic volumes on the disk first. This is because dynamic disks contain multiple volumes, which are not compatible with basic disks.
- Mark partition as active
You can do the following operations on Windows 8 or Windows 8.1 32 bit or 64 bit with Disk Management to extend the C drive now. Be careful while you are executing the following steps.
Step-by-Step Guide: Increase C Drive Using Disk Management
Step 1. Right-click My Computer, select Manage -> Storage -> Disk Management, open Windows built-in Disk Management.
Step 2. Check if there is an unallocated space next to your C drive.
If the user has already completed the previous step, then proceed to the next one. Otherwise, go back to the previous step to complete it. This means that the user has not completed the previous step, so we should go back to it. Therefore, the correct response is to follow Step 3 to continue.
Step 3. Right-click on the partition next to your system C drive and select "Shrink Volume".
Step 4. Input the volume size that you want to shrink and add to C drive, click "OK" to confirm.
The unallocated space is now adjacent to your C drive.
Step 5. Right-click on C drive and select "Extend Volume".
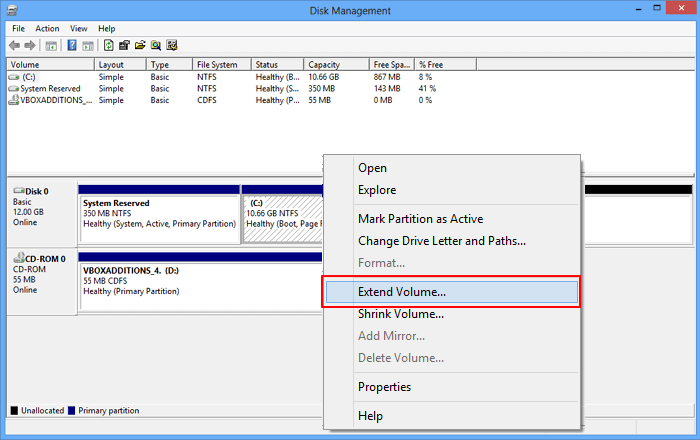
Step 6. Set and add the unallocated space to the C drive, and click "OK" to confirm.
After this, you will see that the C drive is now extended without any issues.
Despite some enhancements in Windows 8's Disk Management, it still falls short in partition management capabilities.
If you need to perform advanced partition management tasks in Windows 8, such as merging two partitions or migrating your OS to an SSD, using Qiling Partition Master is recommended for assistance.
Method 3. Extend C Drive in Windows 8 using DiskPart
Applies to: Advanced users like administrators in Windows 8/8.1, Windows 10/7, etc.
Another workaround is using DiskPart to extend system C drive space using Windows DiskPart, which is a free yet potentially tricky option for beginners.
To try, make sure to follow the steps below carefully.
Step 1. Type cmd in Search and right-click Command Prompt, select "Run as Administrator".
Step 2. Type diskpart and hit Enter to bring up the DiskPart command window.
Step 3. Type the following command lines and hit Enter each time:
- list disk
- select disk 0(Replace 0 with your system disk number)
- list volume
- select volume 2 (replace 2 with the volume number next to your C drive)
- shrink desired size MBThis command will shrink the volume, making unallocated space next to the C drive.
Step 4. Type the following command lines and hit Enter each time to extend C drive:
- list volume
- list volume 1(Replace 1 with the C drive number)
- extend
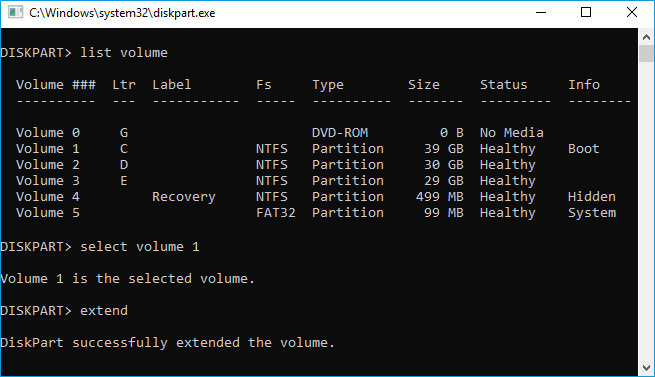
Step 5. When the process completes, type exit to close the command window.
After you've completed the steps above, you can reboot your PC and you'll have an extended C drive on your Windows 8 computer.
Conclusion
This page covers three practical Windows 8 disk managers, including Qiling Partition Master Free, Disk Management, and DiskPart, to help extend or increase the C drive for free.
If you're looking for a hassle-free way to manage your Windows 8 disk, consider using Qiling Partition Master. This tool offers a range of features that make it easy to use, including the ability to resize partitions, move them, and even convert between different file systems. Additionally, Qiling Partition Master provides advanced options for more complex tasks, making it a versatile tool for Windows 8 disk management.
Related Articles
- ScanDisk Windows 10: How to Scan and Repair Drive Windows 10/8/7
- Download Partition Magic Alternative Software to Resize Partition under Windows 10
- How to Add Unallocated Space to D Drive on Windows 10/8/7
- 3 Best Disk Repair Tools for Windows Server Free Download 2022
- How to Format a Disk or Drive in Windows 10, Help
Do you know how to format a disk or drive in Windows 10? This short article focuses on this issue and provides detailed guides on it. - How Can I Format a USB Having Multiple Partitions on Windows 11/10
Do you know how to format a USB having multiple partitions on Windows 11/10? This article gives a detailed guide on how to perform this action.