Fixes for (External) Hard Drive Shows Wrong Capacity
5+ Effective Fixes for Hard Drive Showing Wrong Capacity
Many users face issues with disk problems, such as SD cards reporting the wrong size, USB drives showing incorrect capacities, and hard drives displaying the wrong capacity. If you're experiencing similar issues, there are effective solutions available to resolve these problems.
| Workable Solutions | Step-by-step Troubleshooting |
|---|---|
| Fix 1. Update Hard Drive Driver | Click "Start", type Device Manager, and press "Enter". Click and expand "Disk drives"...Full steps |
| Fix 2. Reformat the Hard Drive | Click "Start", type cmd in the search box. Right-click on the Command Prompt and...Full steps |
| Fix 3. Convert MBR to GPT | You can fix this problem by converting MBR to GPT and then extend the partition...Full steps |
| Fix 4. Initialize the Hard Drive | In Windows 10/8, press "Windows + R" key, type diskmgmt.msc and click OK...Full steps |
| Fix 5. Check Physical Errors | You should check and repair partition errors to rectify the problem...Full steps |
Hard Drive Showing Wrong Free Space Problem
What demonstrated below is a real story of a user telling his 1TB hard drive showing only 0.18TB of free space.
Your 1TB WD external hard drive is showing only 0.18TB of free space, which is unexpected since the used space shouldn't exceed 200GB. This discrepancy could be due to various reasons, such as incorrect reporting of free space, corruption, or even a firmware issue. To resolve this, you may want to try checking the drive's properties in Windows or macOS, running a disk utility scan, or even formatting the drive if all else fails. However, formatting will erase all data on the drive, so be sure to back up any important files before proceeding. If you're unsure about any of these steps, it's always a good idea to consult the manufacturer's support resources or contact their customer support for guidance.
A new 500 GB hard drive may show 465 GB available, and some external hard drives or USB flash drives may display incorrect capacity and significantly reduced free space, but it's not necessarily a sign of corruption. The incorrect capacity can be due to various reasons.
Why Hard Drive Not Showing Full Capacity
Windows displaying the wrong amount of available space can be caused by several factors, excluding purchasing a fake hard drive from an unscrupulous merchant. Hidden files, formatting overhead, virus attacks, recovery partitions occupancy, and hard drive issues can all contribute to this problem. Additionally, other common causes include formatting overhead, virus attacks, recovery partitions occupancy, and hard drive issues, among others.
- The hard drive driver is outdated, which can cause the hard drive to display the wrong capacity in the Windows computer.
- The hard drive may not be properly formatted if the formatting process is incomplete or if an inappropriate tool is used. This can lead to data loss, system instability, and other issues.
- The hard drive was initialized with a wrong partition table, resulting in a 2TB space limitation. The excess space over 2TB appears as "Unallocated" in Disk Management and is not visible in File Explorer due to the MBR partition table's inability to address space exceeding 2TB.
- The Master Boot Record (MBR) or EFI information area (GPT header) can become corrupted due to accidental insertion and removal of devices, such as hard drives or USB drives, while the system is running or powered off. This corruption can occur when the system's boot process is interrupted, causing the MBR or GPT header to become inconsistent or invalid.
- Errors caused by bad sectors.
Many hard drives have an OEM or recovery partition that's invisible in My Computer, which can make them appear to have less disk space than advertised, but checking the Disk Management tool can reveal the real space taken by this partition.
For other simple causes, you can troubleshoot quickly. For instance, show hidden files and perform anti-virus to check whether the hard drive shows full capacity or not. If the problem is not solved, continue applying the corresponding solutions below. I hope they can help you.
Solution 1. Update Hard Drive Driver
Step 1. Click "Start", type Device Manager, and press "Enter".
Step 2. Click and expand "Disk drives". Right-click on the hard drive shows the wrong capacity and select "Update driver".
Step 3. To update your driver software, select "Search automatically for updated driver software" which will search for and install any available updates. If this method fails, you can manually search for and install the updated driver software on the official website.
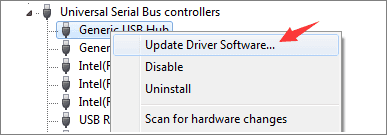
If the hard drive driver is up-to-date but issues persist, try uninstalling and reinstalling the driver to resolve the problem.
Solution 2. Reformat the External or Internal Hard Drive
To format a hard drive, you can use the command prompt in Windows or a partition management tool. If you're comfortable with command prompts, you can use the command "format" followed by the drive letter and colon, like "format C:". However, if you're not familiar with command prompts, it's safer to use a partition management tool like Disk Management or a third-party software to format the hard drive. This method is more user-friendly and reduces the risk of data loss or other issues.
- Warning
- Formatting a disk will erase all data on it, so make sure to back up any important files before proceeding. Alternatively, you can clone the entire hard drive to preserve the data.
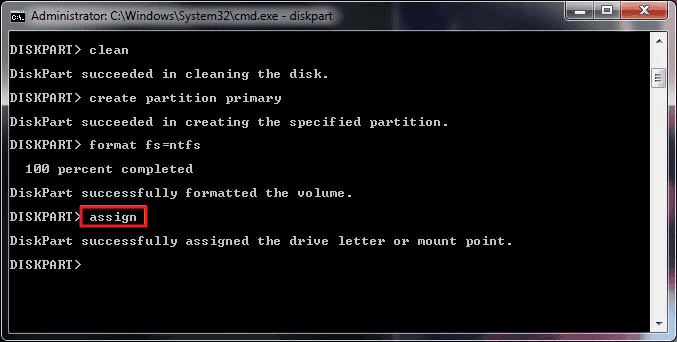
Method 1. Format Hard Drive via Command Prompt
Step 1. To run the Command Prompt as an administrator, start by clicking the "Start" button on your computer, then type "cmd" in the search box. Next, right-click on the Command Prompt that appears in the search results and select "Run as administrator" from the context menu. This will open the Command Prompt with elevated privileges, allowing you to run commands that require administrator access.
Step 2. Type diskpart and press "Enter". Then, input and execute the following commands in order.
Step 3. To list all disk drives connected to your computer, including external drives, type the command "list disk" and press Enter. This will display a list of all disk drives, including their disk number, file system, and total size. This is useful for identifying and managing your external drives and other storage devices connected to your computer.
Step 4. To correct the wrong hard drive capacity, check the disk number and type "select disk + disk number" in the command prompt, replacing "+" with the actual disk number (e.g. "select disk 1"). This tells diskpart to format the specified disk.
Step 5. The command "clean" initiates a cleaning process on the selected hard disk, removing all files and folders.
Step 6. Type create partition primary and press "Enter".
Step 7. To format the drive, type `format fs=ntfs` (or `format fs=exfat`) and press Enter. This command tells Diskpart to format the drive with the specified file system, such as NTFS or exFAT.
Step 8. Type assign to set a drive letter to the newly created partition.
Formatting a hard drive using Diskpart commands can be a bit complicated. If you're not comfortable with that process, there's an easier way to format your hard drive. You can format your hard drive using a more straightforward method.
Method 2. Format Hard Drive with an Easy Formatting Tool
If you're not familiar with Command Prompt, you can use a professional and easy-to-use hard drive formatting tool like Qiling Partition Master to format your HDD, SSD, SD card, or USB drive with ease.
Solution 3. Convert Hard Drive from MBR to GPT
If your external hard drive shows less available space due to its MBR style, you can resolve this issue by converting the MBR to GPT and then expanding the partition to incorporate the unallocated space. This will ensure that the drive utilizes its full capacity.
You can convert MBR to GPT using Windows Disk Management or Qiling Partition Master. However, Disk Management requires deleting all existing partitions first, which can be risky if you don't back up your hard drive beforehand. Alternatively, you can use Qiling Partition Master to directly convert the disk between GPT and MBR while keeping your partitions and data intact.
After you have succeeded in converting MBR to GPT, continue to expand your disk as follows.
Step 1. Locate the Target Partition.
To extend a partition, first locate the target partition and select "Resize/Move".

Step 2. Extend the Target Partition.
To add unallocated space to your current partition, drag the partition panel to the right or left, and then click "Proceed" to confirm the action.

Extra Option: Get Space from Another Drive
If there's not enough unallocated space on your disk, you can resize a partition with sufficient free space by clicking on it and selecting "Resize/Move".
To free up unallocated space, you can drag the dots of the big partition to the right, making it smaller. This will make room for the unallocated space to be used.
Then Click the "Proceed" to keep all the changes.
Solution 4. Back Up Data and Initialize the Hard Drive
MBR (Master Boot Record) errors and disk size errors are often caused by issues with the header of a storage device. In such cases, reinitializing the disk can resolve these problems. This process involves rewriting the header or MBR, which can correct errors and restore the disk to its original size.
- Important
-
- Before initializing the disk, make sure to export any essential files and data, as this process will completely wipe all existing information. This is a crucial step to ensure that important files are safely backed up before proceeding.
- If your hard drive is a new one, you can initialize it directly in two ways given below. If it's in use, you need to delete all the partitions before initializing it.
Method 1. Using Disk Management
Step 1. To access Disk Management in Windows, press the "Windows + R" key, type "diskmgmt.msc", and click OK in Windows 10/8, or right-click Computer and select Manage in Windows 7.
Step 2. To initialize a hard drive or SSD, find it in the Disk Management window, right-click it, select "Initialize Disk", and if it's listed as Offline, first right-click it and select "Online" before proceeding.
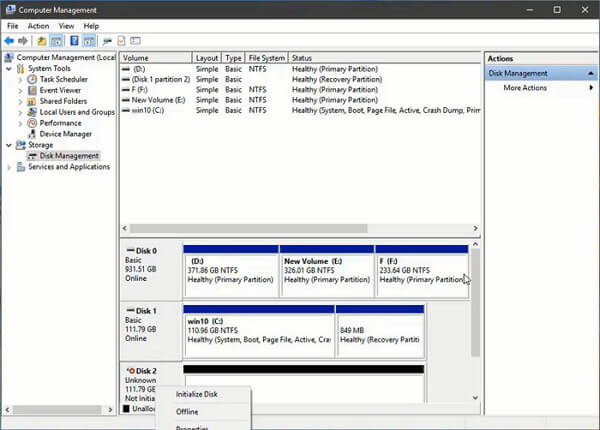
Step 3. In the Initialize Disk dialog box, select the correct disk to initialize and click OK to accept the default partition style, or change the partition style to GPT or MBR as desired.
Method 2. Using Qiling Partition Manager
Step 1. Open Qiling Partition Master and connect the hard drive or SSD to your PC.
To initialize a target hard drive or solid state drive (HDD/SSD), select the device and choose either "Initialize to MBR" or "Initialize to GPT" based on the desired partition scheme. This will execute the initialization operation.
Solution 5. Check for Physical Bad Sectors or Replace the Disk
If a hard disk has too many bad sectors, it may become unable to read and write correctly, and its capacity may be displayed incorrectly. In this case, you should check and repair partition errors to resolve the issue. However, if the situation is severe and the hard disk has many physical bad sectors, it may be necessary to replace it after backing up your data.
Final words
If you're experiencing a wrong capacity issue with your internal or external hard drive in Windows 10/8/7, there are methods available to address the problem. Qiling Partition Manager is a helpful tool for formatting, initializing, converting, and resizing hard drives, and it also offers features such as merging/creating/deleting partitions, recovering lost partitions, and migrating an OS to an SSD. You can try using it to resolve the issue.
External Hard Drive Showing Wrong Capacity FAQs
With these useful tips, you can easily and quickly solve your wrong capacity problem. If you have other related questions about hard drive only shows half capacity or other wrong capacities, you can read the following questions and answers.
Why do hard drives show the wrong capacity in Windows?
Windows may display the wrong amount of available space due to several reasons, including incorrect disk space calculations, corrupted system files, or issues with disk formatting. This can lead to inaccurate storage capacity readings, causing confusion and potential problems with data management and storage.
- Invisible shadow files
- Formatting overhead
- Hidden recovery partitions
- Misleading storage capacities advertised by hard drive manufacturers and more.
How do I restore my hard drive to full capacity?
There are five effective ways to restore the hard drive to full capacity:
- Update Hard Drive Driver
- Reformat the Hard Drive
- Convert MBR to GPT
- Initialize the Hard Drive
- Check Physical Errors
How do I fix USB incorrect size?
Formatting a USB drive is the best way to restore it to its full capacity, and there are several ways to do this, including using File Explorer, Command Prompt, Disk Management, or a third-party partition manager like Qiling Partition Master.
How do I check the capacity of my external hard drive?
To check the capacity of the external hard drive:
Step 1. Open File Explorer. Right-click on your external hard drive.
Step 2. Select Properties.
Step 3. You can view the capacity of your flash drive, which includes the total capacity, the amount of space being used, and the amount of free space available.
Related Articles
- [Server Helper] Convert NTFS to FAT32 in Server 2008/2012/2016/2022 without Data Loss
- [Solved]How to Create EXT4 Partition in Windows 11/10
- How to Wipe a Hard Drive without Deleting Windows
- How to Fix Broken Registry Items on Windows 11 (5 Quick Ways)
- Factory Reset vs. Format, Can You Tell Me the Difference?
Formatting C drive and factory resetting Windows are different. If you don't know the differences, we will introduce the differences between factory reset vs. format. - Failed to Format Write-Protected NVMe Drive, Help
Need to fix a write-protected NVMe drive that fails to format? This article provides detailed steps to help you remove the issue and format the write-protected NVMe drive.