How to Format a Hard Drive to FAT32 in Windows
FAT32 remains useful for some older devices, but it has a 4 GB maximum size for a single file. Formatting erases the selected partition; it does not repair a failing drive. Confirm the device's supported capacity and partition layout before choosing this file system.
Choose the Right File System and Back Up
Use FAT32 only when the target device specifically requires it. For ordinary Windows storage, NTFS is usually better; exFAT avoids FAT32's 4 GB single-file limit and is often easier across devices. Windows' graphical formatter typically does not offer FAT32 for volumes larger than 32 GB. A third-party formatter may expose FAT32 for larger supported volumes, but that does not mean every device will accept them. Copy all wanted files to another disk and verify the copy before formatting.
Method 1: Format a Small Data Volume in Windows
Step 1. Open File Explorer, identify the intended data volume by letter and capacity, and disconnect other removable drives to avoid confusion. Never choose the Windows C volume.
Step 2. Right-click the target drive and select Format. If FAT32 appears in the File system list, select it. Set a recognizable volume label and leave the default allocation unit size unless the device manufacturer requires something else.
Step 3. Review the selected drive letter again. Click Start and acknowledge the data-loss warning. Wait until Windows reports completion, then open the empty drive and confirm its file system is FAT32.
If FAT32 is unavailable, do not repeatedly try the same dialog. Check the device's specifications and use a suitable formatting tool only if the capacity and partition style are supported.
Method 2: Format with Qiling Partition Master
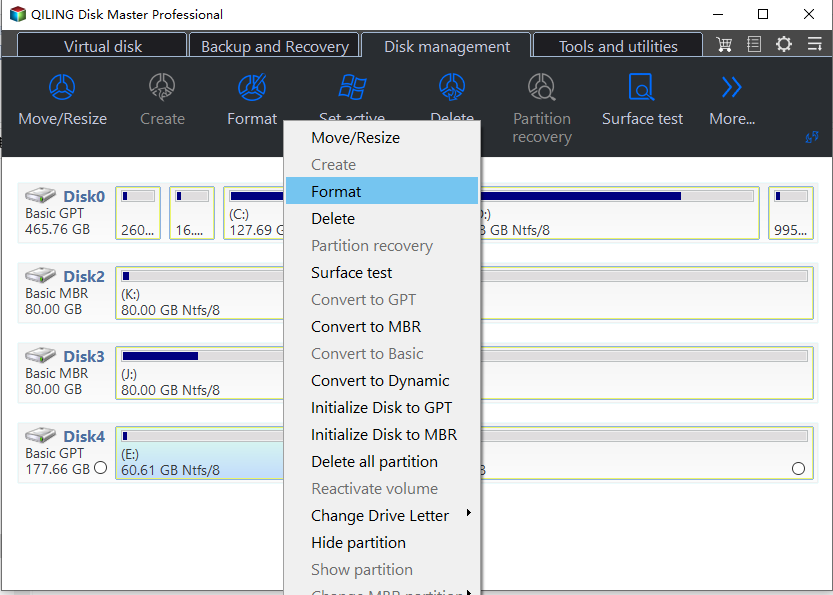
Step 1. After verifying the backup, open Qiling Partition Master. Find the data partition by disk number, capacity, and label. Select it and choose Format. Do not select EFI, Recovery, or the running Windows partition.
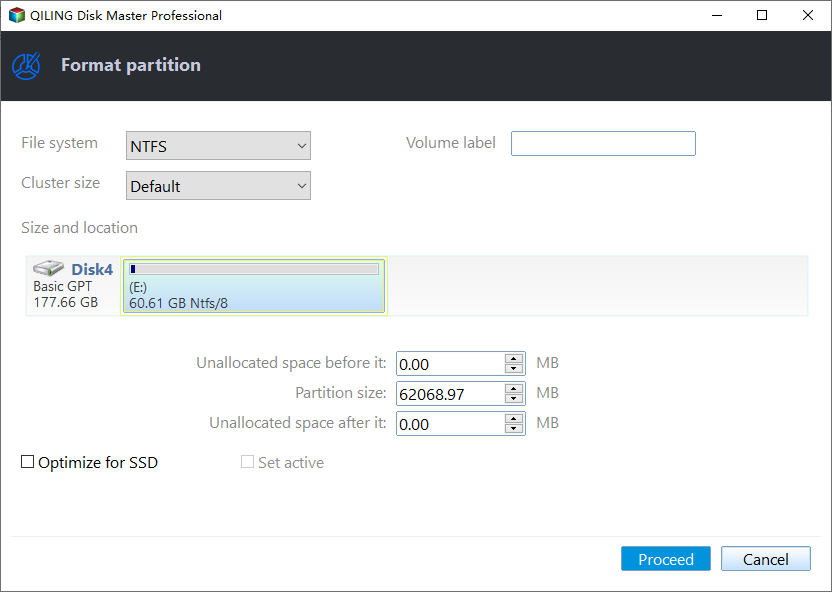
Step 2. In the format dialog, open the File system list and change the default NTFS setting shown in the example image to FAT32, if it is offered for this partition. Set the volume label and review the target partition again. If FAT32 is not available or the tool rejects the size, use another file system or a smaller supported partition instead of forcing it.
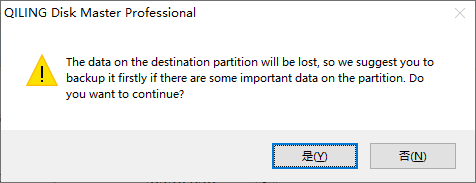
Step 3. Click Proceed and read the data-loss warning. Confirm only when the listed partition is the intended one and the backup has been checked.
Step 4. Wait for the formatting task to finish; do not disconnect the drive. Check FAT32 in the drive's Properties, then copy the backed-up files back. Files larger than 4 GB cannot be copied to FAT32 unchanged.
When Formatting Fails
If the drive is write-protected, remove the legitimate write-protection setting first. If Windows reports I/O errors, disconnects, or bad sectors, stop formatting and inspect drive health. A new file system cannot make failing hardware reliable. For a disk larger than the device supports, a smaller FAT32 data partition may be necessary; verify the device manual before repartitioning.
Conclusion
Back up first, format only the verified data partition, and check the device's FAT32 limits. If you need files over 4 GB, consider exFAT or NTFS instead.
Related Articles
- Is 128 GB Too Big for FAT32?
Understand Windows formatting limits and device compatibility. - NTFS vs exFAT vs FAT32
Compare file-size limits and typical uses before formatting.
Products
Articles & Tutorials
- Data Recovery
- Data Backup
- File Recovery
- File Backup
- System Backup and Restore
- Disk and Partition Clone
- Technical articles
- Mobile articles
- Disk Master Help
- Windows Data Recovery Tutorials
- Windows Secure Delete Tutorials
- Windows Partition Management Tutorials
- Windows File Backup and Restore Tutorials
- Windows System Backup and Restore Tutorials
- Windows Disk Backup and Restore Tutorials
- Windows Clone Tutorials