How to Disable Low Disk Space Warning in Windows 11/10
If you're receiving a pop-up warning message about running out of disk space on your Local Disk, you can disable the low disk space warning on Windows 11/10 by following a few simple steps. To do this, you'll need to navigate to the Local Disk properties, click on the "Disk Cleanup" button, and then select the "Clean up system files" option. From there, you can delete any unnecessary system files and free up space on your disk. Alternatively, you can also disable the low disk space warning by going to the "Settings" app, clicking on "System," and then selecting the "Storage" option. Here, you can click on the "Change" button next to the "Low disk space warning" option and toggle it off. By following these steps, you can disable the low disk space warning and free up space on your Local Disk.
- Method 1. Run Regedit Registry
- Method 2. Extend Low Space Disk to Disable the Warning Message
- Method 3. Delete Duplicate Files and Temp Files
- Method 4. Delete Junk Files or Large Files
Overview of Low Disk Space Warning Message
There are two types of low disk space warning messages, which is important to know before starting to fix the problem.
1. "You're running out of disk space on your Local Disk (X:). Click to see how to free up space on this drive."
2. Low Disk Space - "You're running out of space on this PC. Manage storage to view usage and free up some space."
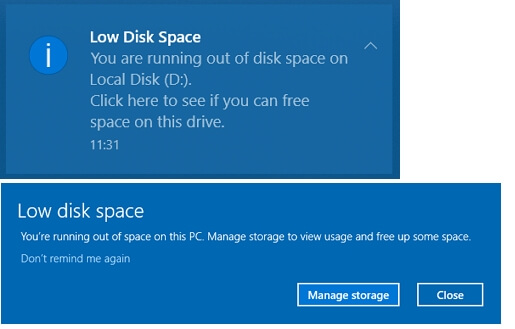
The error message indicates that there is insufficient space on the disk to save data, likely due to a full Temp folder in the C drive. This is causing the issue.
When a computer runs low on disk space, it can struggle to install apps and system updates, leading to slowdowns, crashes, or even complete system failures.
4 Methods to Disable Low Disk Space Warning Messages
To disable the low disk space warning message on Windows 11/10, you can try several methods. One approach is to adjust the disk space threshold, another is to disable the low disk space notification through Settings, and you can also consider using third-party software to manage disk space and suppress warnings. Additionally, you can also try checking the disk space usage and deleting unnecessary files to free up space, or use the built-in Storage sense tool to clean up disk space and disable warnings.
Method 1. Run Regedit Registry
The first method is for you to block the warning message.
1. To access the Registry Editor, click on Start and then select Run. In the Run dialog box, type REGEDIT and click OK to open the Registry Editor.
2. Go to the following location:
HKEY_CURRENT_USER\Software\Microsoft\Windows\CurrentVersion\Policies\Explorer

3. In the Registry Editor, right-click on the blank area in the right panel and create a new DWORD value by selecting New > DWORD value.
4. Name this new DWORD value NoLowDiscSpaceChecks.
5. To modify the registry, double-click on the new DWORD value and enter the value 1.
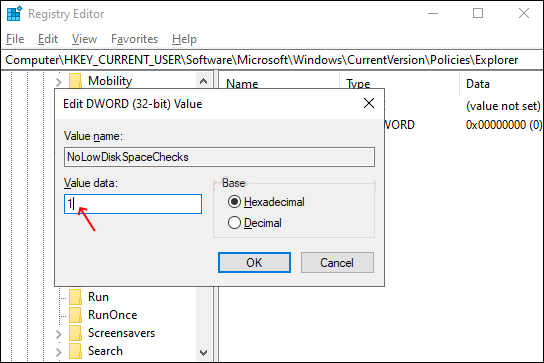
6. Close the Registry Editor and restart the computer.
Method 2. Extend Low Space Disk to Disable the Warning Message
To resolve the disk space issue, it's recommended to expand the disk space, which may require unallocated space on the disk. However, this process can be complex and challenging, so it's understandable to consider seeking professional help.
If you're struggling with disk space, ! Qiling Partition Master is a convenient tool that can help you adjust your disk space with just one click. With this tool, you can easily resize partitions, merge unallocated space, and even convert between FAT and NTFS file systems, all without requiring a reboot. It's a user-friendly and efficient solution to your disk space dilemmas.
To extend your disk space and disable the low disk space warning message on Windows 11/10, download Qiling Partition Master and follow the guide. This tool allows you to manage your disk space and make adjustments as needed, effectively eliminating the low disk space warning message.
Step 1. Click partition C, select Disk management, and click Resize/Move

Step2: To expand the C: partition, drag the C: partition end into the unallocated space and click "Proceed" to start the process.

Method 3. Delete Duplicate Files and Temp Files
To free up disk space, you can delete temporary files, which are often stored in the Temp folder, by manually clearing out these files. This can help resolve low disk space issues caused by duplicate and temporary files.
To clear files in the Windows Temp folder, go to File Explorer, navigate to the C: drive, then select the Windows folder, followed by the Temp folder, and finally delete or clear the files within it.
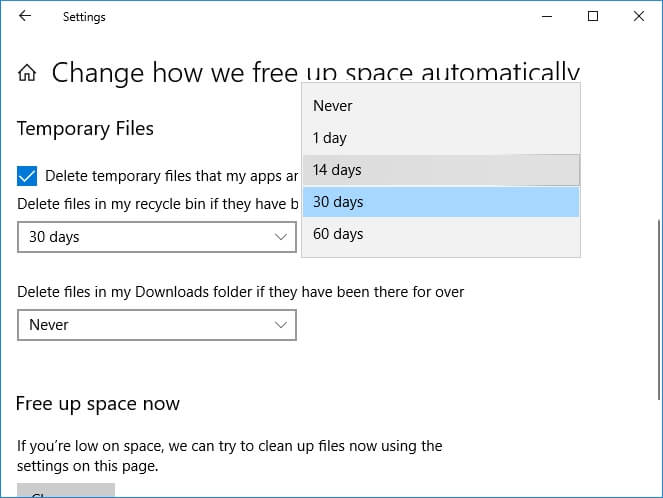
You can set up an automatic temporary clean up plan, which will remove temporary files and folders after a certain period of time, freeing up disk space and keeping your system organized. This can be done through various operating system features, such as Windows' Disk Cleanup tool or macOS' Storage tab in System Preferences.
Step 1.Go to Settings > System > Storage.
Step 2.To manage temporary files, consider moving them to a designated folder and setting up a cleanup plan. This plan can be implemented for various timeframes, such as 1 day, 14 days, 30 days, or more, depending on your specific needs and preferences.
Method 4. Delete Junk Files or Large Files
You may have received a low disk space warning because your computer is cluttered with junk files and large files. A tool like Qiling CleanGenius can help you quickly and easily scan and clean these system files and large files, freeing up disk space. For example, you can use Qiling CleanGenius to clean system files, following these simple steps: follow the steps below.
Step 1. Download and install Qiling Partition Master Suite.
Step 2.1. Install Qiling CleanGinus via PC Cleaner. 2.
Step 3.The software scans the entire computer to identify large, unnecessary files and system junk, allowing users to select and delete them with a single click.
Step 4.When the scan is complete, click "Done" to finish cleaning system junk files.
The Bottom Line
To disable the low disk space warning in Windows 10, you can use the Regedit registry to block the message, extend the disk space using a partition manager, or delete unnecessary files to free up space.
Related Articles
- C Drive is Full in Windows 11
- How Do I Clone SSD to External Hard Drive in Windows 11/10/8? 2 Ways Available
- How to Convert NTFS to FAT32 Without Losing Data
- How to Set SSD as Boot Drive [2022 Updated]
- How Do I Clone Disk in Windows Server? 2022 Full Guide
Upgrading and cloning disks in Windows Server computers is a straightforward process that can be completed in a few simple steps. - 2 Ways to Clone Seagate HDD to SSD | Try Seagate Disk Clone Software
You can clone a Seagate HDD to an SSD using the Seagate DiscWizard software that comes with the drive, which features cloning the entire disk to another. However, there are also some drawbacks to using this software, so another option is also available, Qiling Partition Wizard.