Why Windows 11 Has Multiple Recovery Partitions
Windows 11 may have more than one recovery partition after upgrades, cloning, or changes to the WinRE size requirement. A new partition may have been created because the older one lacked room. Multiple partitions are not by themselves a fault, and deleting the wrong one can remove the active recovery environment.
Map the partitions before changing anything
Step 1. Open Disk Management and record the physical disk number, partition order, sizes, and unallocated space. Do not assume the smallest Recovery block is obsolete.
Step 2. Open Command Prompt as administrator and run reagentc /info. Record whether Windows RE is enabled and the Windows RE location.
Step 3. Compare the location's harddisk and partition numbers with diskpart, list disk, select disk N, and list partition. Confirm disk N by model and capacity. Disk numbers can change after hardware reconnects.
Step 4. If the reported path is blank, disabled, or ambiguous, do not delete anything. Restore or diagnose WinRE first.
Decide whether cleanup is useful
Leave the partitions alone when Windows RE works and the extra space is small. Cleaning up is justified only when you need a specific adjacent space for a larger recovery partition or volume, and you can identify an inactive older partition with confidence. Back up the entire disk, test recovery media, save the BitLocker recovery key, and ensure AC power before any change.
Inspect the layout in Qiling Disk Master Pro
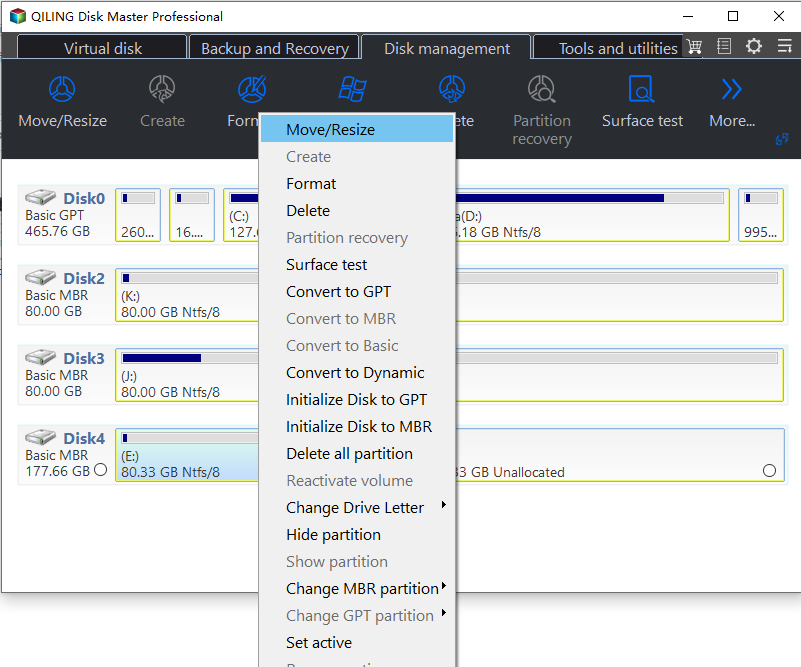
Qiling Disk Master Pro's Disk management view can help you see the order and sizes of Windows, EFI, and recovery partitions before planning a resize or move. It cannot tell you on its own which recovery partition is the active WinRE location; use reagentc /info for that decision. Do not click Delete or Move/Resize based on the graphical layout alone, and keep a tested disk image before changing a boot-critical partition.
If an older inactive partition must be removed
Warning: The steps below permanently delete the selected partition. They must never target the partition named by reagentc /info, the EFI System Partition, or a partition whose identity is uncertain.
Step 1. Confirm that WinRE is enabled and points to a different partition. Record the active location and take a screenshot of the disk map.
Step 2. Disconnect unrelated external disks. In an elevated Command Prompt, start diskpart, run list disk, then select disk N for the verified Windows disk.
Step 3. Run detail disk and list partition. Cross-check partition number, size, type, and position against your saved map and the active WinRE location.
Step 4. Only if every identifier matches the inactive partition, run select partition P and detail partition. Recheck the result before issuing delete partition override.
Step 5. Type exit, reopen Disk Management, and confirm that the expected area became unallocated. Extend a neighboring volume only if the space is adjacent and the layout is understood.
Step 6. Run reagentc /info again. Test entry into Advanced startup and verify that the recovery environment still works. If it does not, restore from the disk image or follow Microsoft's WinRE repair guidance before further partition work.
Avoid common mistakes
Do not delete all Recovery partitions, assume a drive letter identifies WinRE, or use a generic partition number copied from another PC. Keep the current active partition even if it is not the largest one. If BitLocker is enabled or the map differs from expectations, pause and use a technician with the full-disk backup.
Related Articles
- Recovery Partitions
Understand their purpose and risks. - Cloned Drive Capacity
Diagnose whether a recovery partition blocks expansion.
Products
Articles & Tutorials
- Data Recovery
- Data Backup
- File Recovery
- File Backup
- System Backup and Restore
- Disk and Partition Clone
- Technical articles
- Mobile articles
- Disk Master Help
- Windows Data Recovery Tutorials
- Windows Secure Delete Tutorials
- Windows Partition Management Tutorials
- Windows File Backup and Restore Tutorials
- Windows System Backup and Restore Tutorials
- Windows Disk Backup and Restore Tutorials
- Windows Clone Tutorials