Rufus vs. Etcher: Which One Is a Better Option to Create Bootable USB Drive
Creating a bootable USB drive was once a daunting task, but it's now easily achievable. With the technology advancements, you can now create a bootable USB flash drive for both Mac and Windows operating systems.
The success of this process is largely due to the availability of free and robust technologies like Etcher and Rufus, which have made it possible to create bootable USB drives with ease. These tools are designed to help users burn ISO files to USB drives, making it a seamless experience to install operating systems or run live sessions from a USB drive. By utilizing these tools, users can take advantage of their features and capabilities, making the process of creating a bootable USB drive a straightforward and efficient one.
Rufus, also known as The Reliable USB Formatting Utility with Source, is an open-source Microsoft application that allows users to create and format bootable USB drives or Live USB drives.
BalenaEtcher, also known as Etcher, is a free and open-source utility tool that allows users to write image files like .img or .iso files to storage media, as well as create zip folders to compile live SD cards and USB drives. It is compatible with Windows, Mac, and Linux operating systems.
Rufus and Etcher are both free utility tools that can create a bootable USB drive. The question is, which one is better?
To compare Rufus and Etcher, let's take a closer look at these two popular tools. Rufus is a free, open-source tool that can create bootable USB drives, back up and clone hard drives, and more, while Etcher is a free, open-source tool specifically designed for burning images to USB drives. Both tools are user-friendly and can be used to create bootable USB drives, but Rufus offers more features, including the ability to back up and clone hard drives, while Etcher is more streamlined and focused on the task of burning images to USB drives. Ultimately, the choice between Rufus and Etcher will depend on the specific needs of the user, with Rufus being a more versatile tool and Etcher being a more specialized tool.
Rufus vs. Etcher: Everything About Rufus
Rufus is a lightweight and powerful Windows program that can be installed on multiple operating systems on the same device. It serves as a utility kit that enables users to store their essential Windows applications on a portable USB drive, providing access to critical tools in case of a system failure.
Rufus offers basic and advanced options to optimize USB drives, allowing you to create a Windows 10 UEFI bootable USB drive from an ISO, and is useful for installing or running Windows on partitions or Mac devices.
Rufus Features
- It is a 100% free utility software for Windows users.
- Rufus has a DOS-To run legacy tools with FreeDOS and MBR partitions, you'll need a compatible environment. This typically involves setting up a virtual machine or a separate partition with a FreeDOS installation, which can then be used to run legacy tools without affecting the host operating system. Alternatively, you can also use a bootable USB drive or a CD/DVD with a FreeDOS installation to create a standalone environment for running legacy tools.
- This software enables users to format a USB disk into various file formats such as UDF, NTFS, ReFS, or FAT.
- Easily compute the MD5, SHA-256, and SHA-1 image hashes.
- Elevated UAC and UI structure.
- The program can be downloaded on both desktops and laptops.
- Offers an auto-update feature.
- Supports different regional languages.
- Microsoft allows users to download retail ISO DVD images of Windows 7, 8.1, and 10 directly from their servers.
- This tool allows booting USB drives to .iso files, which can include operating systems such as Linux and Windows, as well as raw disk image files.
Pros
- Easy to use.
- Several advanced features.
- GPT/UEFI support.
- Automatic USB detection.
- 100% free and open source.
Cons
- Only available on Windows.
- Can only install one distro on a USB.
How to Use Rufus
Step 1. Connect your clean USB drive to your computer and launch the Rufus program to proceed.
Step 2. Rufus will automatically identify your USB drive. To boot from it, simply tap on the Device and select your USB from the dropdown menu.
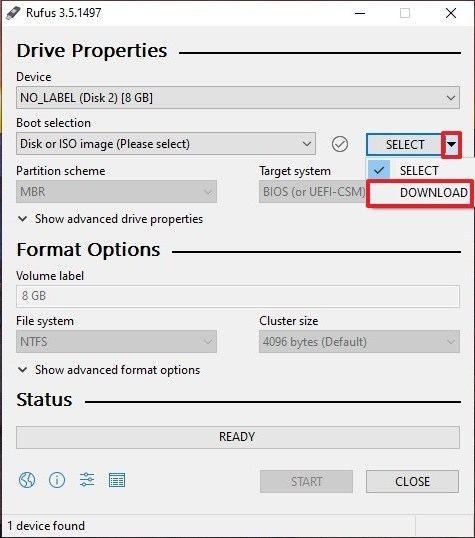
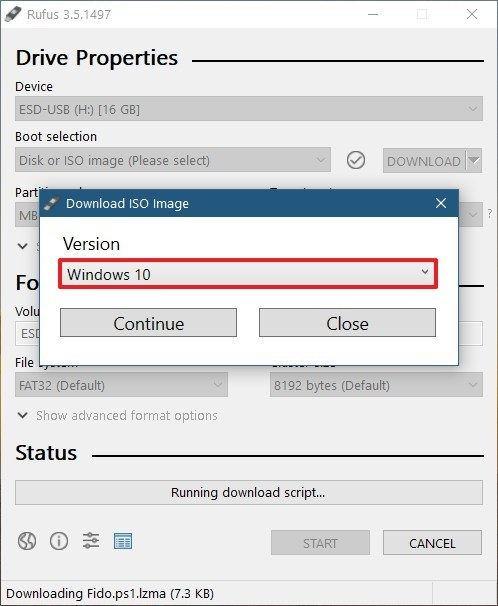
Step 3. Ensure the Boot Selection option is set to Disk or ISO image, and then click on the Select button. Then, open a file explorer window to locate and select the ISO image to burn on a flash drive.
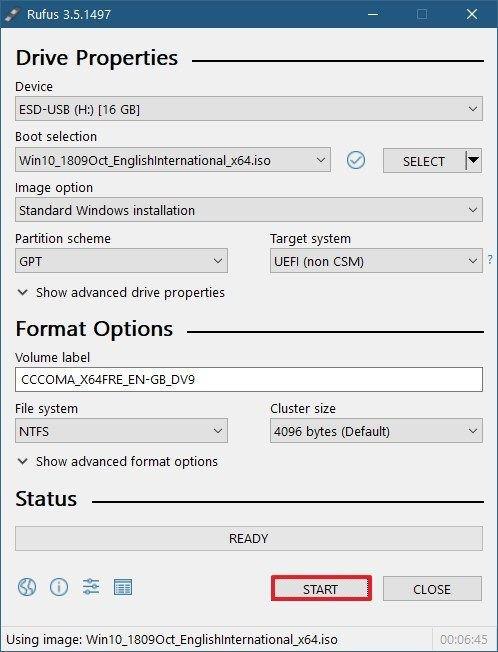
Step 4. To create a Standard Windows installation, Rufus will automatically select the correct Partition Scheme. However, you can also manually change it if you prefer.
Step 5. To create a bootable USB drive with Rufus, provide a name to the Volume label or leave it, keep the File System and Cluster size settings to default, and then click on the Start button.
Step 6. When a warning message appears, simply click on OK and let the process complete on its own after a few minutes.
Rufus vs. Etcher: Everything About Etcher
balenaEtcher was developed by balena and is licensed under Apache License 2.0. It is designed using the Electron framework, making it compatible with macOS and Linux, among other leading operating systems.
Etcher allows users to burn different image files onto a USB, including .iso, .img, and zipped folders, with its source code freely available for modification.
Etcher Features
- Etcher has a modern, simple, and visually appealing user interface, as well as a command-line interface available.
- This tool allows you to flash multiple boot partitions to a USB or SD card, making it easy to create a portable version of your operating system or to boot multiple operating systems from a single device.
- Balena constantly updates Etcher with new and improved features.
- Offers data security to your USB files.
- It helps to detect corrupted cards.
- Instate live CD versions of Clonezilla, GParted, or Tux2live.
Pros
- Compatible with Mac, Linux, and Windows.
- User-friendly graphic interface.
- Free to use and modify.
- Burns images faster.
Cons
- Lacks the ability to perform advanced tweaking.
- The file size is larger than Rufus.
- The device sends data to balena by default, which can be manually turned off.
How to Use Etcher
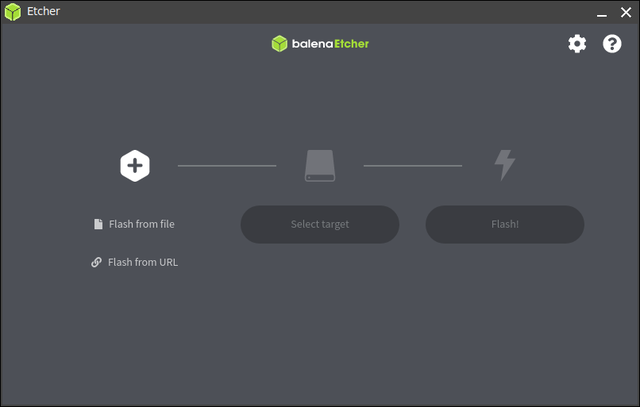
Step 1. Open Etcher and connect a USB drive to your computer.
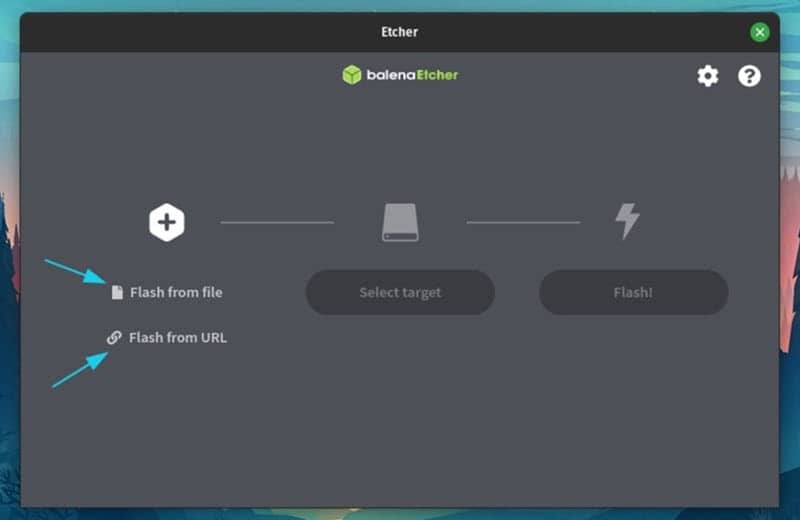
Step 2. Select your source image by dragging and dropping it to the Etcher dashboard.
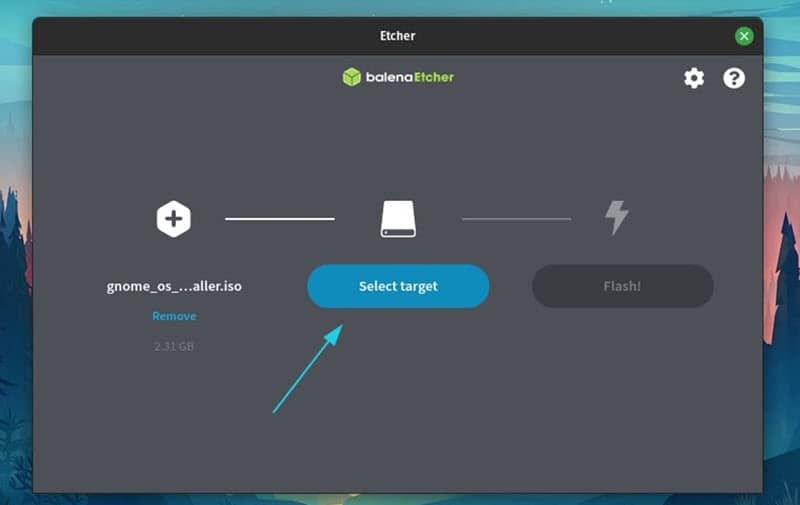
Step 3. Choose the USB drive you want to boot.
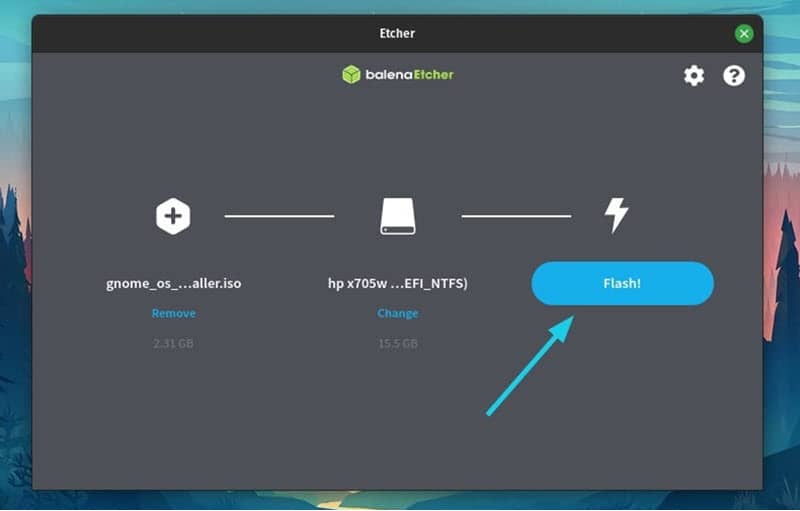
Step 4. Click on the Flash button and wait for a few minutes to complete the burning process.
Rufus vs. Etcher: Which One Is Better?
Both Rufus and Etcher are great programs that can easily create a bootable USB drive, making them both the best options in our opinion.
Some users prefer Rufus over Etcher for creating bootable USB drives because it offers a more user-friendly interface and a wider range of options for customizing the USB drive.
- Rufus offers more features and options to boot external drives
- Etcher uses system drives to detect target drives, which can be risky and may result in data loss.
Rufus is only compatible with Windows, whereas Etcher supports all three major operating systems: Windows, Mac, and Linux.
Both Rufus and Etcher have their own set of advantages and disadvantages, making them suitable for different use cases. Ultimately, the choice between the two tools depends on your specific requirements and needs, and selecting the correct one will ensure a successful USB drive booting experience.
The Third Choice to Make a Bootable USB Drive - Qiling OS2Go
If you're looking for a more advanced utility tool than Rufus and Etcher to create a bootable USB drive, Qiling Disk Master is a good option. Unlike Rufus and Etcher, Qiling Disk Master creates bootable drives in a different way, making it a distinct alternative.
This software allows you to copy your operating system to a USB drive, enabling you to run it on any device, and also enables the creation of a Windows To Go USB drive with ease.
This tool is compatible with Windows 11/10/8/7 and allows users to run Windows games or applications on a Mac.
Qiling OS2Go is a feature-rich tool that surpasses Rufus and Etcher in terms of functionality. It allows users to create bootable USB drives with ease, following a simple process.
Step 1. To use Qiling OS2Go, first install it on your Windows computer, which will show you the used space on your system drive. Next, plug in a USB drive that is larger than the used space on your system drive. Then, select the target USB drive and click Next to proceed.
Step 2. Qiling OS2Go will notify you that the following operation would delete all data on your drive. Make sure to back up all important data before clicking the Continue button to proceed.
Step 3.Adjust the disk layout on the target drive to match the resource drive, or customize it according to your needs. If using a Solid State Drive as the Windows bootable drive, select that option and click Proceed.
Step 4.Qiling OS2Go will start to create the portable USB drive, which may take a while depending on your OS and network condition. Once the progress reaches 100%, the USB drive will be bootable.
Step 5. To access the BIOS settings, insert the portable Windows USB into your computer, start it up, and press the required key (usually F2, DEL, F10, or another key depending on your computer's model), then select the option to boot from the USB disk.
Note: To ensure a successful boot, make sure that the boot mode of the portable USB and your target computer match, whether it's UEFI or Legacy, to avoid any booting issues.
Sum Up
Rufus and Etcher, two popular free and open-source programs for creating bootable flash drives, have some significant drawbacks. Rufus is limited to Windows compatibility, while Etcher poses a risk to your data.
We recommend using Qiling OS2Go, a safe and highly compatible program that allows you to enjoy a bootable USB drive on any PC or Mac without the need for a clean install of Windows OS. While it may not be free, its ease of use and flexibility make it a worthwhile investment.
Related Articles
- How to Play Windows Minecraft on Mac Smoothly Without Overheating
- How to Clone Windows 11 to An External Hard Drive
- How to Install Windows 10 on External Hard Drive Mac
- How to Effectively Create Bootable Windows 7 USB Drive
- Free Partition Tool for SD Card [With How-to Guide]
There is a free SD card partition tool called Qiling Disk Master that allows you to create, delete, resize, extend, shrink, and merge partitions on SD cards. Install it now! - Fixed: Your Password Has Expired and Must Be Changed
To resolve the 'Your Password Has Expired and Must Be Changed' issue, follow these steps: update your password securely by navigating to the password reset page, entering your current password, and creating a new one that meets the required complexity standards.