How to Install Windows 10 on External Hard Drive Mac
It's a dream come true to have the best of both Mac and Windows in one system, but is it possible? While some might think it's far-fetched, exploring this idea is worth considering. If such a system existed, users could enjoy the features of both Windows and Mac on a single computer, combining the advantages of each OS. This would be a game-changer for those who miss their old Windows system after getting a new Macbook, or vice versa. The possibilities are endless, and it's an idea worth exploring.
Can You Install Windows 10 on Mac?
While we know how to install Linux flavors from Windows, the question remains: can we install Windows 10 on a Mac? The answer is yes, we can technically install Windows 10 on a Mac. This article will explore the process of doing so.
To have a seamless experience between Mac and Windows, you can use BootCamp Assistant to install Windows 10 on your mac, or use Qiling OS2Go to install a portable Windows 10. We will explore both options in the next sections.
How to install Windows 10 on Mac?
Method 1. Create a Portable Windows USB Drive with OS2Go
Qiling OS2Go is a portable option that allows you to take your Windows 10 on a USB drive, using the host system's accessories, making it ideal for situations like boot failure, and is suitable for novice users.
Key Features of OS2Go:
- The software allows users to access their Windows 10 operating system from any device, as long as the USB drive is connected to it. This means users can start their computer from the USB drive and have access to their Windows 10 desktop, files, and applications, even if they are using a different device.
- It requires no free space on your Mac.
- It is a pocket-friendly portable option that can be carried easily.
- The software supports installing Windows 11 on an old PC, or a Mac computer.
- Game player-friendly. Users can play Windows-only games on their Mac computers.
Step 1. To use Qiling OS2Go, first install it on your Windows computer, which will show you the used space on your system drive. Then, plug in a USB drive that is larger than the used space on your system drive. Next, choose the target USB drive and click Next to continue.
Step 2. Qiling OS2Go will notify you that the following operation would delete all data on your drive. Make sure to back up all important data before proceeding, then click the Continue button.
Step 3. The disk layout will be adjusted to match the resource drive's layout, and you can also customize it as needed. If a Solid State Drive is being used as the Windows bootable drive, select the option to do so. Then, click Proceed.
Step 4. Qiling OS2Go will create a portable USB drive, which may take some time, depending on your operating system and network connection. Once the process is complete, the USB drive will be bootable.
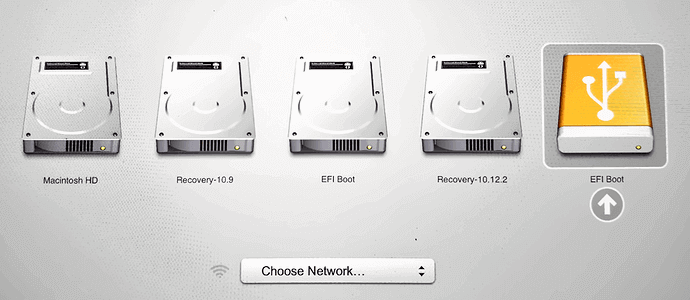
Step 5. To boot your Mac from a Windows USB, insert the portable Windows USB and start your Mac. Press the Option/Alt key, then choose the yellow EFI Boot icon to boot from the USB drive, and follow the on-screen instructions.
For Mac Game Lover - How to Play Fortnite on Mac 2022
Since 2020, Apple has prevented Epic Games from signing games and patches for distribution on Mac, leaving Mac users unable to play Fortnite. This article aims to help Mac game enthusiasts find a way to play Fortnite on their Mac computers again.

Method 2. Install Windows 10 on Mac with BootCamp
The BootCamp assistant on a Mac allows users to install Windows 10 and switch between Mac and Windows 10 with each restart, effectively enabling dual booting.
To install Windows 10 on your Mac, ensure you have the latest Mac Updates, which include BootCamp by default. Also, make sure your Mac device has at least 128 GB of free space for a smooth experience. You'll also need a 16GB flash drive and the Windows 10 ISO. Once you have all the necessary requirements, you're ready to proceed with the installation.
Step 1. To change the secure boot setting to "Full Security", start Mac from macOS recovery, log in with desired user credentials, go to the Mac OS utilities window, and then select "Startup Security Utility". From there, choose "Full Security" from the available options.
Step 2. Go to Finder, and type "Boot Camp Assistant".
Step 3. Once you click continue, you'll be able to select the space for installation using a slider, which can be dragged to fit your space requirements. After selecting the space, choose the Windows 10 ISO file from the provided options.
Step 4. After selecting the ISO, click on the install button to launch the Windows installer, which will then prompt you to select the partition for installation.
Step 5. Once the partition is selected, the Windows installation process will begin with minimal on-screen instructions.
Step 6. After completing the Windows installation, the Mac will automatically reboot into Windows and launch the "Welcome to the Boot Camp Installer". Simply follow the on-screen instructions to complete the drivers' installation, and then the Mac will restart again to finalize the process.
Switching between Windows and Mac OS is straightforward. Simply restart your Mac system and press and hold the "Option" key during startup, which will give you the option to choose between Windows 10 and Mac.
Conclusion
BootCamp Assistant is a safe choice for Mac users to install Windows, which works like a native OS and provides all its features, but requires more advanced computer knowledge and larger disk space.
Creating a portable Windows USB drive is a cost-efficient method that's easy and convenient, requiring minimal space on your Mac. Alternatively, if you don't have enough free space, using Qiling OS2Go is the best choice.
Related Articles
- How Can You Put Windows 10 on A USB
- 2022 Best WinToUSB Alternative for Creating a Portable Windows 11/10/7 USB Drive
- Windows 11 to Go | How to Create Windows 11 Portable USB Drive
- Put Your Windows 10 on Another Computer
- How to Solve Lenovo OKR Button Not Working
lenovo onekey recovery not working problem may be caused by system upgrade, boot partition resizing, recovery partition damage or deletion, etc. The best way to solve this is to find an alternative of Lenovo OKR. - One Click Backup System with 1 Click Backup Software
This article explains to Lenovo OneKey Recovery, Asus Backtracker, and Qiling Disk Master, the best 3 software for one click system backup, and how to use it.