Solved 2022: Unable to Recover Your PC. The System is Too Small
You're experiencing an issue with your PC where it's unable to recover from a missing system file, specifically the one in \WINDOWS\system32\config\system, and the recovery drive is also failing due to a small system drive. Can you tell me more about your system specs, such as the size of your system drive and any other relevant details?
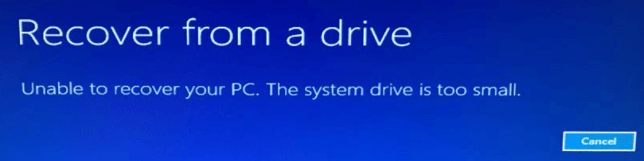
If your system crashes suddenly, you can use the system image to create a full copy of all data on your computer, including files, system settings, and Windows. To do this, start with the Windows System Image Recovery program. However, the recovery process may be slow due to the restoration process, and an error message "Unable to recover your PC. The system drive is too small" may appear. This article will provide solutions to fix this frustrating error.
The Reasons for the "Drive is too small" Error
Before we start fixing the problem, let's identify the reason behind the error and find the corresponding method based on that reason.
Start with the reasons, let's see what culprits are causing the error.
- The targeted disk for system image restoration doesn't have enough space.
- The system image issue can be resolved by recreating the system image, which is typically done during the system creation process.
- The existing partition on the hard disk may cause an error to happen, or there's a conflict between the original disk and the target disk.
Now that you've identified the reasons behind your goals, let's dive into the main part with effective strategies to help you achieve them.
Methods to Fix "Unable to recover your pc. The system drive is too small"
Here we gathered 4 fixes to cope with the error.
Option 1. Check Your Disk Capacity
To format and delete a target disk volume with Qiling Partition Master, follow these steps: First, launch the Qiling Partition Master software and select the target disk volume you want to format and delete from the disk map. Next, click on the "Delete" button in the toolbar to delete the selected partition. Then, confirm the deletion by clicking "Yes" in the pop-up window.
Option 3. Modify Minimum Required Size
Option 4. Recreate A System Image by Control Panel
Option 1. Check Your Disk Capacity
When this error occurs, the easiest way is to check the capacity of your hard drive to ensure it's larger than or equal to the source disk.
How to check hard disk capacity:
- Right-click the hard drive.
- Select Properties from the drop-down menu.
- You can check your hard drive capacity under the General section.

If the option is no good for coping with that error, move to the next solution. If the option is no good for coping with that error, move to the next solution.
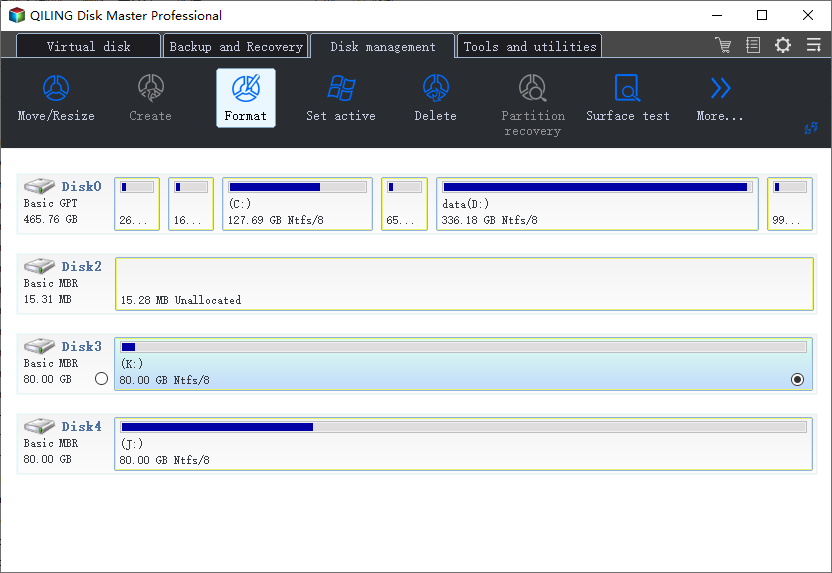
Option 2. Format and Delete Target Disk Volume with Qiling Partition Master
If you're trying to restore a disk with partitions and encounter an error, use a tool to format the target hard disk. Note that formatting will erase all data on the disk.
Formatting a partition means the data in it is erased, but the partition itself remains, retaining its original drive letter. Deleting a partition, on the other hand, completely removes the partition, including its drive letter, and frees up the space for new use. (Note: This is the opposite of what you originally stated, formatting a partition would not retain the drive letter, instead it would make the partition unallocated)
Qiling Partition Master is a useful software that allows you to format, delete, resize, and merge partitions in a few simple steps. To use it, connect the target disk to your PC and download Qiling Partition Master.
Step 1. Run Qiling Partition Master, right-click the hard drive partition you intend to format and choose "Format".
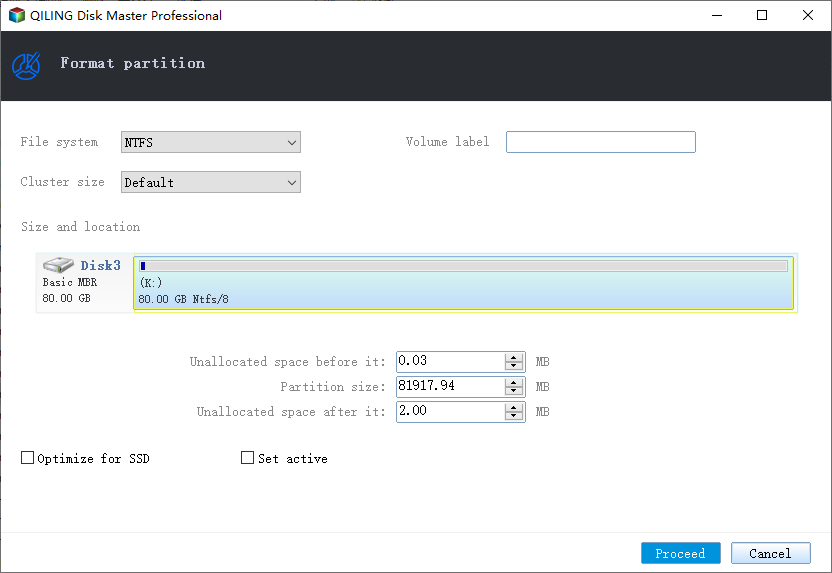
Step 2. Set the Partition label, File system, and Cluster size for the partition to be formatted, then click "Proceed" in the new window.
Step 3. To start the formatting process, you will see a warning window. Click "OK" in it to begin formatting the partition on your hard drive.
After formatting is completed, right-click the volume and click the "Delete..." option.
Option 3. Modify Minimum Required Size
After creating the system image, your minimum required size will be saved on the file named $PBR_ResetConfig.xml.
The file contains a MinSize value that indicates the minimum size required by the target drive. If the actual capacity of the target drive is less than this value, it needs to be edited to match the drive's actual capacity.
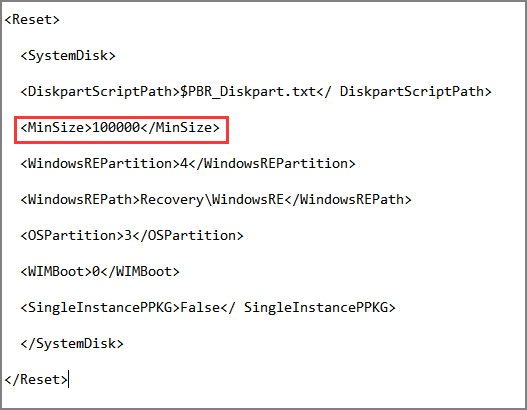
To edit the MinSize setting, locate the sources, open the $PBR_ResetConfig.xml file in Notepad, navigate to the Reset > System Disk section, and then modify the MinSize value.
Option 4. Recreate A System Image by Control Panel
Step 1. Type Control Panel on the search box and click to open.
Step 2. Click "Backup and Restore" and select "Create a system image" on the left panel.
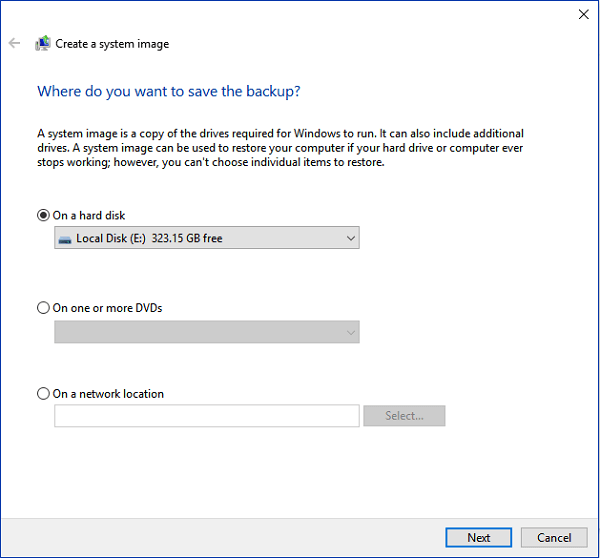
Step 3. Choose where you want to save the backup and click "Next".
- On a hard disk.
- On one or more DVDs.
- On a network location.
Step 4. Confirm your backup settings, then click the "Start backup" button.
Wait for the Windows preparing to create backup...
Step 5. Saving the system image.
Extra tip: Recover the computer from a created system image
Step 1. Open Control Panel > Backup and Restore
Step 2. Click Recover system settings or your computer.
Step 3. Under the System Restore section, click Advanced recovery methods.
Step 4. On the next page, click "Use a system image you created earlier to recover your computer".
Step 5. Before restoring the system image, the utility will ask you whether you want to back up your files. If you need to back up your files, click Back up Now, otherwise click Skip.
Step 6. To continue the recovery process, click the "Restart" button to restart your computer. This will allow the recovery process to complete.
Related Articles
- 5 Ways to Hide Drives in Windows 10 | Check Your In-depth Tutorial
- Free Download SD Card Formatter: All Memory Card Format Software Free Download
- How to Reformat a Hard Drive in Windows 11/10 and Mac [2022 Guide]
- PC Won't Turn on, But Motherboard Light Is on/It's Plugged In
- Fix Guide of Recovery Blue Screen on Windows 10
Here's a fix guide of recovery blue screen on Windows 10 to provide suitable solutions for users to repair different blue screen errors. - Freeware: Reformat Hard Drive to FAT32 from NTFS or exFAT
If you need to reformat a hard drive from NTFS to FAT32 or exFAT, you can use various tools such as Disk Management, Diskpart, or a free partition manager to complete the task.