Can I Upgrade Windows 8.1/8 to Windows 11? 2022 Step-By-Step Guide
You can upgrade your Windows 8 to 11, but it's not a straightforward process and the free upgrade path is not guaranteed. Some experts suggest that you might be able to get a free upgrade, but it's not a straightforward process and requires some technical know-how. The free upgrade path for Windows 10 users was a one-time offer, and it's not clear if the same will be available for Windows 8 users. It's recommended to check the official Microsoft website for more information and to see if the free upgrade is still available. However, keep in mind that upgrading to Windows 11 may require some technical expertise and may not be suitable for all users. It's always a good idea to back up your data and create a system image before attempting any upgrades.
If you're unsure if your Windows 8 computer supports Windows 11 or don't have access to install the new update, ! You can still get the new update installed on your old computer without losing any data, and we've got a step-by-step guide to help you do just that. Let's get started!
Before You Start: Before the update, make sure to backup your important files and data to an external hard drive. This will ensure that your files are safe and can be restored if anything goes wrong during the update process.
Guide 1. Learn Windows 11 Requirements
Microsoft has updated the system requirements for Windows 11, and users need to meet these requirements to upgrade from Windows 8/8.1 to Windows 11. The minimum system requirements include a 64-bit CPU, 4GB of RAM, and a 64GB storage drive, among other specifications. To initiate the upgrade process, it's recommended to first familiarize yourself with these requirements.
Here is a list of Windows 11 minimum requirements:
- Processor:1 GHz or faster processor with 2 or more cores and a 64-bit processor or System on a Chip (SoC).
- Memory: 4 GB RAM
- Storage: 64 GB or larger storage device
- System firmware: UEFI, Secure Boot capable
- TPM: Trusted Platform Module (TPM) version 2.0
- Graphics card: DirectX 12 compatible graphics / WDDM 2.x
- Display: >9" with HD Resolution (720p)p)
- Internet connection:Windows 11 Home edition requires internet connectivity and a Microsoft account to complete device setup on first use.
You can go and follow Windows 11 specifications to learn more details about Windows 11 requirements.
To check if your computer meets the requirements for Windows 11, follow Guide 2.
Guide 2. Run Windows 11 Checker, See If Your PC Is Compatible with Windows 11
There are many Windows 11 compatibility checking apps available online that can help, although Microsoft's own PC health check is not yet available.
Here's how to check the compatibility of your computer for Windows 11 with Windows 11 Upgrade Checker, all in one paragraph: To check if your computer is compatible with Windows 11, you can use the Windows 11 Upgrade Checker. This tool will scan your computer and let you know if it meets the system requirements for Windows 11, which include a 64-bit processor, at least 4GB of RAM, and a compatible graphics card.
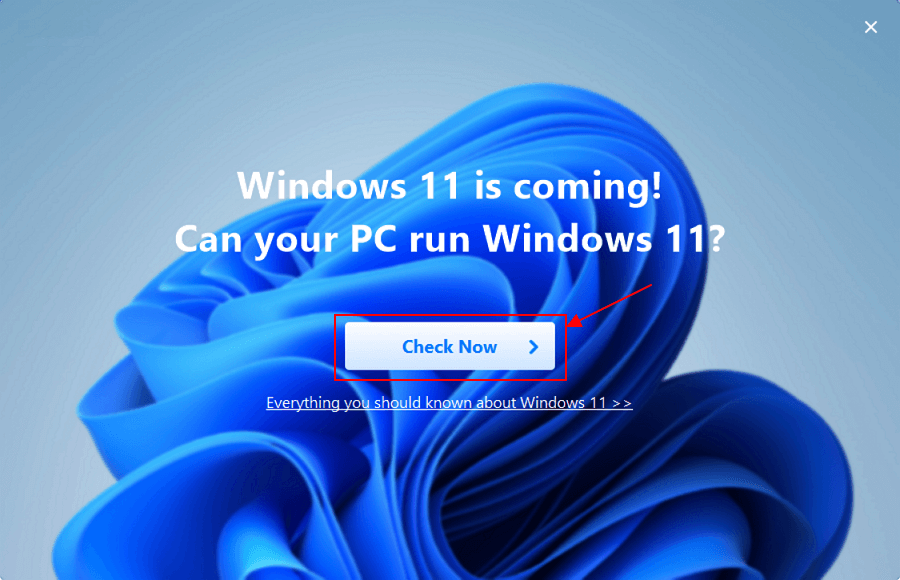
Step 1.Download Windows 11 Upgrade Checker.
Step 2.Click the Check Nowbutton to start.
Step 3.The Windows 11 compatibility result window will soon appear, listing both incompatible and compatible configuration items.
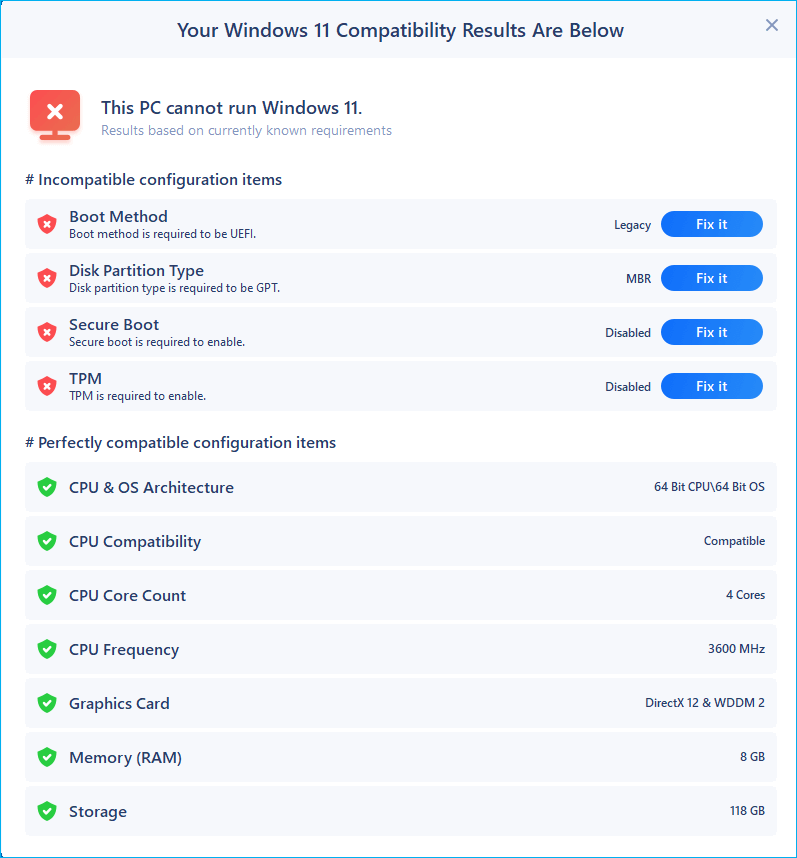
You only need to focus on the incompatible configuration section to see if your computer meets the requirements for Windows 11. If any of the issues listed appear in the result, it means your computer is not compatible with Windows 11.
- Disk Partition Type
- Boot Method
- Secure Boot
- TPM
To fix the issues and make Windows 8/8.1 ready for Windows 11 upgrade, you can follow these steps: Update to the latest version of Windows 8.1, ensure your computer meets the minimum system requirements for Windows 11, check for and install any pending Windows updates, and upgrade to Windows 10 if you're on Windows 8.1. This will help resolve the compatibility issues and ensure a smooth upgrade to Windows 11.
Guide 3. Fix Windows 11 Compatibility Issues in Windows 8.1/8 PC
To fix the issues preventing Windows 8 from supporting Windows 11, follow these three steps. Firstly, install the Windows 8.1 Update to ensure your system is up-to-date.
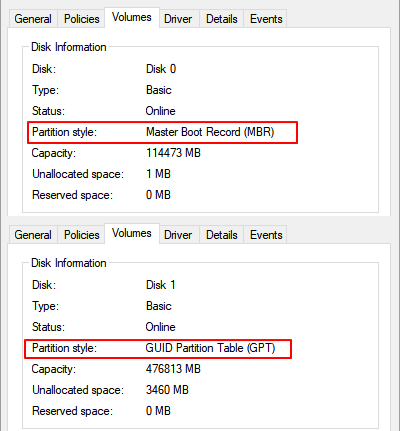
#1. Convert OS Disk from MBR to GPT
Windows 11 requires the OS drive to be GPT for UEFI and Secure Boot Modes. To check the disk type, open Disk Management, right-click on the OS disk, and verify its type. If it's MBR, you'll need to convert it to GPT for a successful Windows 11 upgrade.
To convert a disk to GPT, you can try using Disk Management or the Command Prompt (CMD) to delete all partitions on the disk, effectively resetting it to a blank slate. However, this approach requires deleting all data and partitions, which can be a significant drawback, making it less user-friendly.
Fortunately, you have a third way out. It is to turn to reliable partition manager software - Qiling Partition Master for help, which converts your disk to MBR or GPT type without losing any data.
To prepare your computer to boot up from GPT and install Windows 11, you'll need to address the Boot Method and Secure Boot issues that are currently preventing it from booting.
#2. Enable UEFI Boot Mode and Secure Boot
If your computer doesn't support UEFI mode, it won't support secure boot and can't be updated to Windows 11.
To check if a computer supports UEFI mode, you can follow these steps: Look for a UEFI firmware setting in the BIOS settings. Check if the computer's motherboard manual or documentation mentions UEFI support. Check if the computer has a UEFI firmware version that is 2.
Step 1. Restart PC and press F2/F10/F12/Del to enter BIOS.
Step 2. To check if your computer supports UEFI mode, go to the Boot Menu, click the Boot Mode section, and see if your computer supports UEFI mode.
- If you see a UEFI mode, it means your computer supports this boot mode, which is a more secure and modern alternative to traditional BIOS.
- If it's currently disabled, move to the next guide to enable UEFI and Secure Mode.
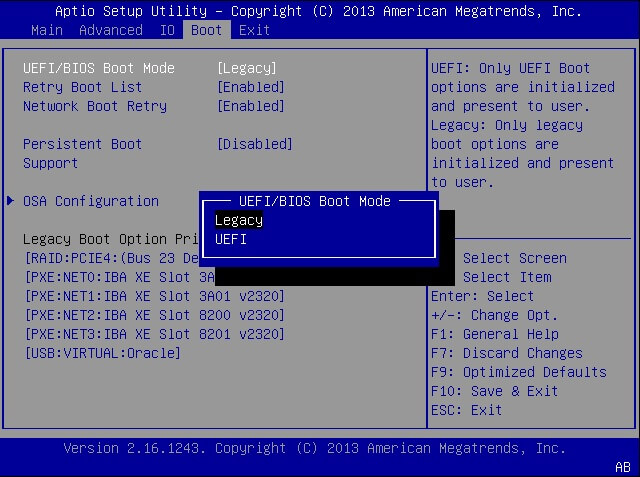
Enable UEFI Mode:
Step 1. Restart PC and press F2/F10/F12/Del to enter BIOS.
Step 2. To switch from Legacy to UEFI Boot Mode, go to the Boot Menu, click on Boot Mode, and select UEFI as the boot mode from the available options. This will change the boot mode from Legacy to UEFI.

Step 3. Save the changes and exit to restart the PC.
Enable Secure Boot:
Step 1. Restart PC and re-enter BIOS settings.
Step 2. To enable Secure Boot, go to the boot menu and switch it from Disabled to Enabled.
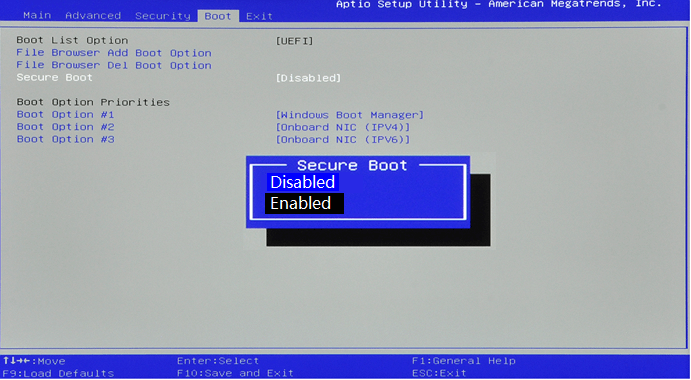
Step 3. Save the changes and exit to restart the PC.
#3. Enable TPM 2.0 Chip for Windows 11
Windows 11 update requires a computer with a TPM 2.0 chip and it must be enabled to secure the computer and use encryption features like BitLocker.
To get the Windows 11 update, you'll also need to ensure that your computer supports TPM 2.0 and enable it.
Guide to Check If Your Windows 8 PC Supports TPM 2.0:
Step 1. Press Windows + R keys, type tpm.msc in the Run dialog, and click "OK".
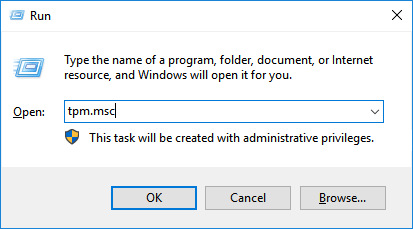
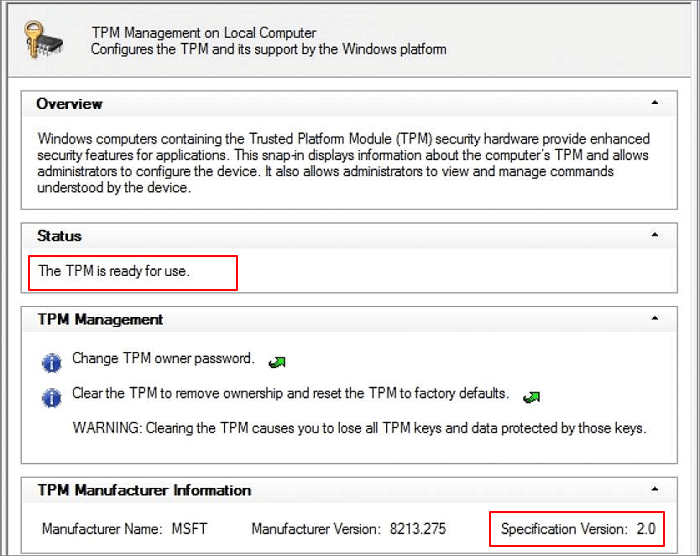
Step 2. If the TPM utility is open, check if the TPM is in use by looking for a checkbox or toggle that indicates whether the TPM is enabled or disabled. If the TPM is in use, the checkbox or toggle should be checked or enabled.
If you see it, you'll see it under the Status section, marked as "The TPM is ready for use".
Step 3. Check the TPM version under the TPM Manufacturer Information section.
Stay with Windows 8 for OS stability if it's not the latest version or an older version.
If your computer has TPM 2.0, you're good to install and run Windows 11, so proceed to the next guide to enable it.
Enable TPM 2.0 Chip for Windows 11 Upgrade:
Step 1. Restart PC and press F2/F10/Del key to enter BIOS.
Step 2. Go to the Security section > Advanced > Click TPM Support.
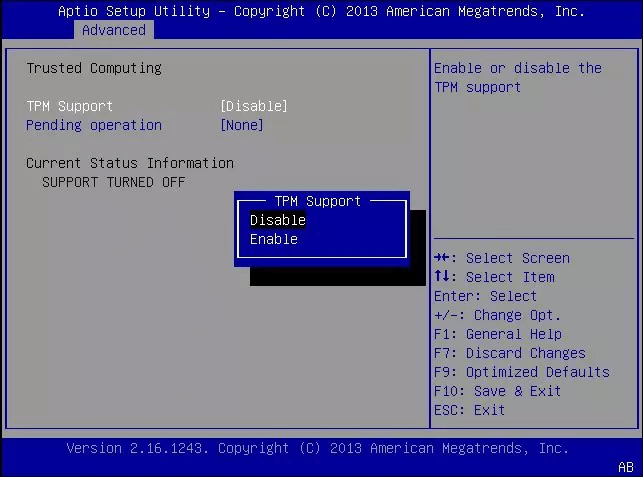
Step 3. Check the TPM State and if it's Disabled, change it to Enabled.
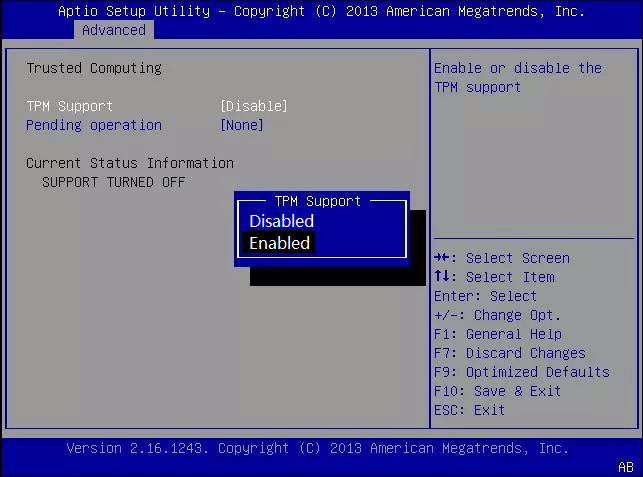
Step 4. Save the changes and exit BIOS.
After addressing the issues, your computer is now ready to install the new Windows 11 update.
Guide 4. How to Install Windows 11, Upgrade Windows 8 to Windows 11 for Free
To get Windows 11, you can either upgrade your existing Windows 10 installation to the beta version through the Windows Update settings, or you can download the ISO file from Microsoft's official website and perform a clean installation.
You can use Qiling Win11 Builder to automatically check and download the latest Windows 11 for you to install on your computer, which will save you time and effort.
Here is how to install Windows 11 on your Windows 8 computer in one paragraph:
Method 1. Download Windows 11 on Windows 8 via Qiling Win11 Builder
The follow-up steps are the same as presented in Method 3.
Method 2. Upgrade Windows 8 to Windows 11 for Free via Insider Program
Step 1. Download Windows 11 Update
#1. Get Windows 11 Update as Insider:
- Open Windows Insider Programpage, sign in.
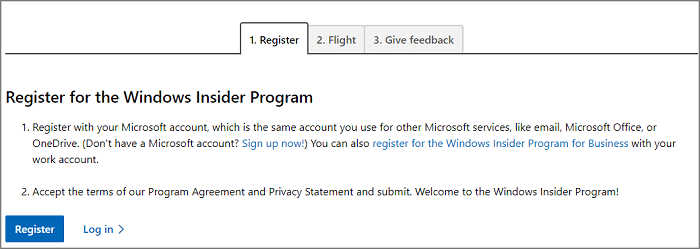
- Go to Settings >Update & Security>Windows Insider Program >Get Started.
- Select + to connect your account and select Dev channel.
- Confirm the Privacy Statement and program terms, then select either Restart Now or Restart Later.
- After a computer restart, go to Settings > Update & Security > Windows Update and click Check for Updates.
#2. Check and Get Windows 11 Update on PC
- To check for Windows updates, go to Settings, then click on Update & Security, followed by Windows Update, and finally click on Check for Updates.
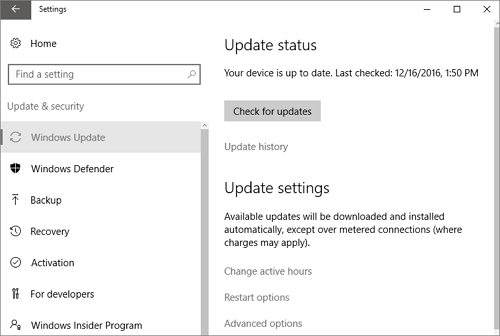
Step 2.When the new update is available, clickDownload and install.
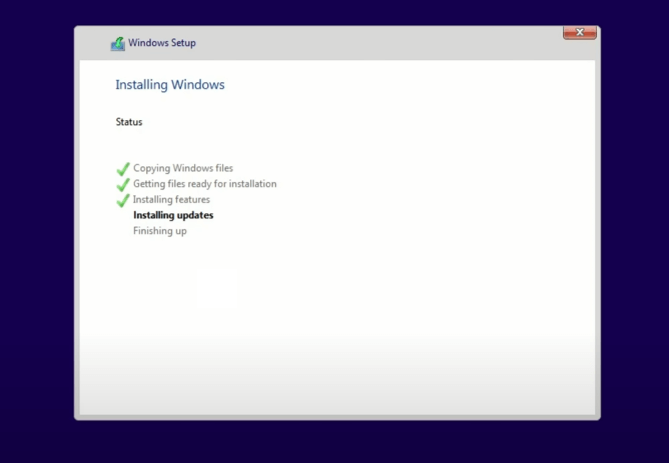
Step 3. Follow the on-screen guidelines and wait for Windows 11 to be installed on your computer.
Step 4. After installing Windows 11, you can now move or transfer the OS to a newly installed SSD, which can improve the overall performance and speed of your computer.
Method 3. Manually Install Windows 11 on Windows 8 from USB
Step 1. To prepare an empty USB external drive with up to 8GB or bigger space, you would need to format it. This process will erase all data on the drive, so make sure it's empty before proceeding.
Step 2.The first step to install Windows 11 is to go to the Windows 11 page and download its ISO file to your computer.
Step 3. Burn the ISO file into your USB drive.
You can directly download the Windows 11 creation media and install it to your USB drive.
Step 4. Reboot your PC and enter the BIOS settings. From there, set the USB drive as the boot drive, allowing it to take over the boot process and initiate the installation or boot process from the USB drive.
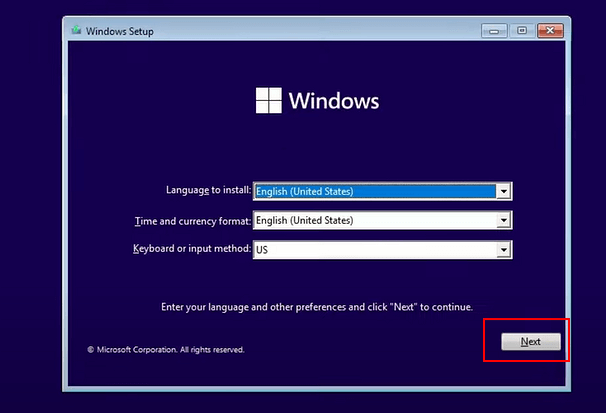
Step 5. Once the computer boots on the USB disk, follow the onscreen instructions to install Windows 11.
Step 6. Set the Language, Time and currency format, Keyboard or input method, and click Next to move on.
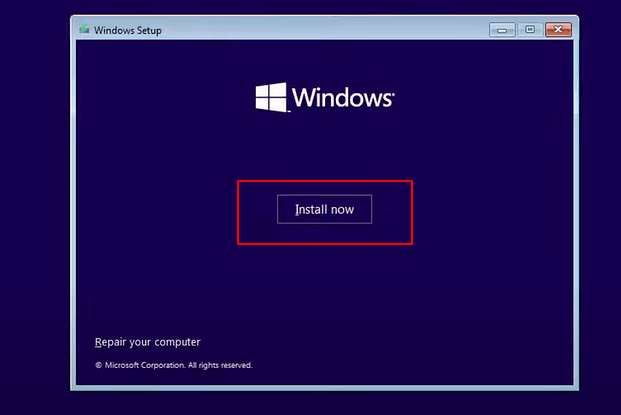
Step 7. Click Install Now to enter the next step.
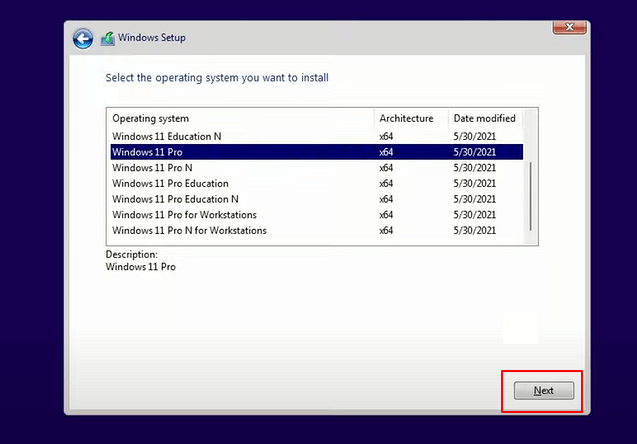
Step 8. Click I don't have a product keyto continue.
Step 9. Select the desired Windows 11 edition and click Next to proceed.
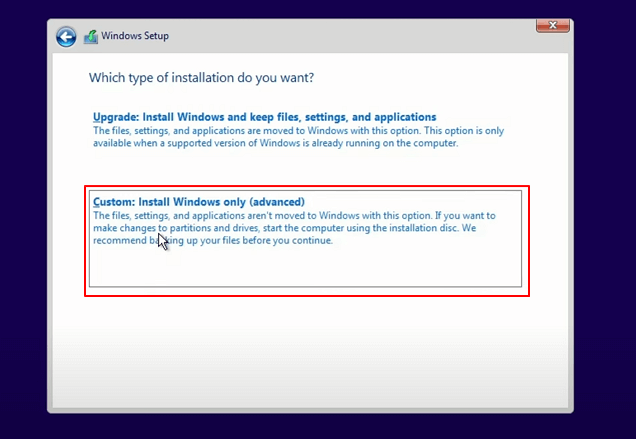
Step 10.Click to accept the Microsoft License Term and click Next.
Step 11. Click Custome: Install Windows onlyon the new disk.
Step 12. Select the Windows 8 OS drive as the target disk and click Next to proceed.
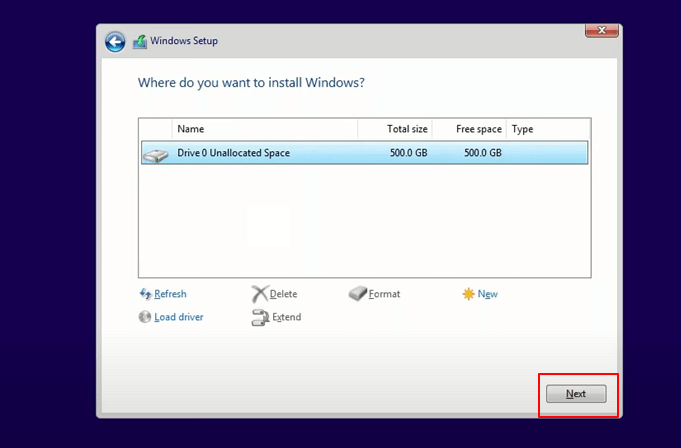
Step 13. Wait for the installing process to complete, the computer will restart automatically.
Then follow the on-To set up your computer, start by ensuring the power cord is securely plugged into both the computer and the wall outlet. Next, press the power button to turn it on. Follow the on-screen instructions to select your language and time zone.
Further Tip: About Windows 11 Product Key
According to most Microsoft and geeks, it's still free to upgrade Windows 8 or 8.1 to Windows 11, so you don't need to worry about the product key issue.
Though Upgrading Windows 8 to Windows 11 Is A Bit Complex, You Can Do It Alone
This page outlines the complete process of upgrading from Windows 8.1/8 to Windows 11, providing a step-by-step guide for users to follow.
You can upgrade an old computer like Windows 8 to Windows 11, as long as your computer meets the Windows 11 requirements. This can be done on your own, without needing professional assistance.
To install Windows 11 on a Windows 8 computer, follow this guide to navigate the slightly complex process on your own.
Related Articles
- "The Disk Check Could Not Be Performed" Solutions
- 3 Ways: How to Increase C Drive Space in Windows 11/10/8/7
- Format to FAT32 for USB or External Hard Drive in Windows 10
- How to Open Command Prompt in Windows 11
- Disk Management Combine 2 Partitions in Windows
If you want to use Disk Management to merge partitions without losing data in Windows 7, 8, 10, and 11, you can refer to this article to get a step-by-step tutorial. - Quick Fixed: Extend Volume Is Disabled in Windows 11, 10, 8, 7 for C Drive
If you're encountering the issue of Extend Volume being disabled in Windows 11, 10, 8, 7, particularly for the C drive, you can resolve it using a reliable partition manager.