Format to FAT32 for USB or External Hard Drive in Windows 10
On Windows 10/8.1/8/7, there are four ways to format to FAT32, which is compatible with most devices. For small capacity flash drives, pen drives, or SD cards (2GB-32GB), any of the four methods work. However, for larger storage devices like USB flash drives, HDDs, or external hard drives (over 32GB), only third-party USB format tools and the Windows Command Prompt can be used.
1. Third-party USB format tool
2. Windows 10 Explorer quick format
3. Windows 10 Disk Management format
If you're unable to format a disk to FAT32 in Windows 10 using built-in formatting tools, try using the command line, a third-party tool, or a bootable USB drive with a FAT32-formatted OS. If none of these methods work, you can try using a disk editor or a low-level format tool. If you're still facing issues, you may need to use a different operating system or a specialized tool to format the disk to FAT32.
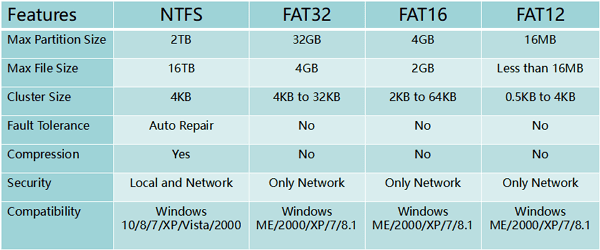
What You Need to Know About File Systems
In computing, a file system determines how data is stored and retrieved. Windows file systems include FAT16, FAT32, and NTFS, among others, and can be converted on USB flash drives or external hard drives. The chart below compares four common file systems, highlighting features such as max partition size and compatibility.
Notice:
Formatting a USB drive or external hard drive will remove all existing files on the device. Please make sure you have backed up any important files before formatting to avoid further data loss.
Solution 1. Format to FAT32 Using FAT32 Formatter Windows 10
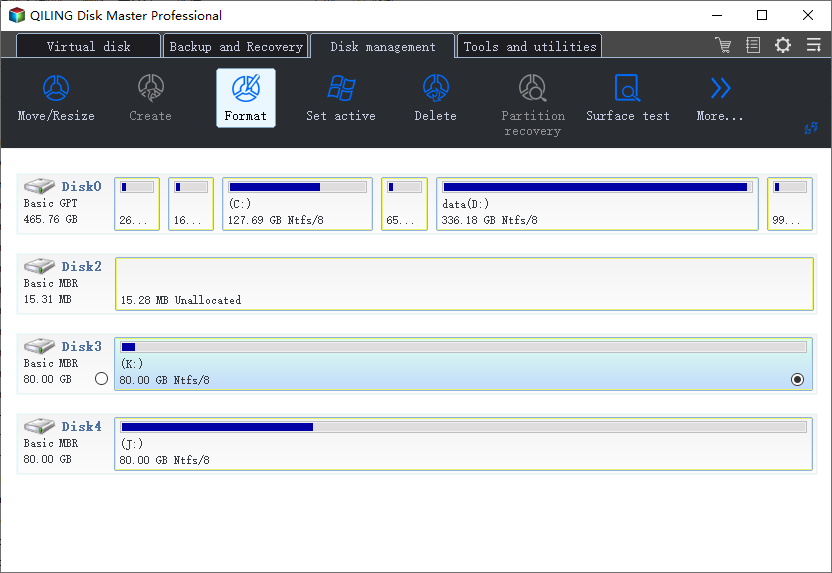
A professional third-Windows 10 users can simplify and secure the formatting process with the help of a FAT32 formatting tool. We recommend using Qiling Partition Master, which offers a Format feature that not only supports FAT32 but also NTFS, EXT2, EXT3, and ReFS formats. This tool can be particularly useful for formatting USB drives.
Download and install Partition Magic, a powerful partition manager that can help you format a USB drive to FAT32 in Windows 10.
Step 1. Click the external drive or USB you intend to format and choose "Format" in "Disk management" page.
Step 2. In the next window, set the Partition label, File system, and Cluster size for the partition, then click "Proceed".
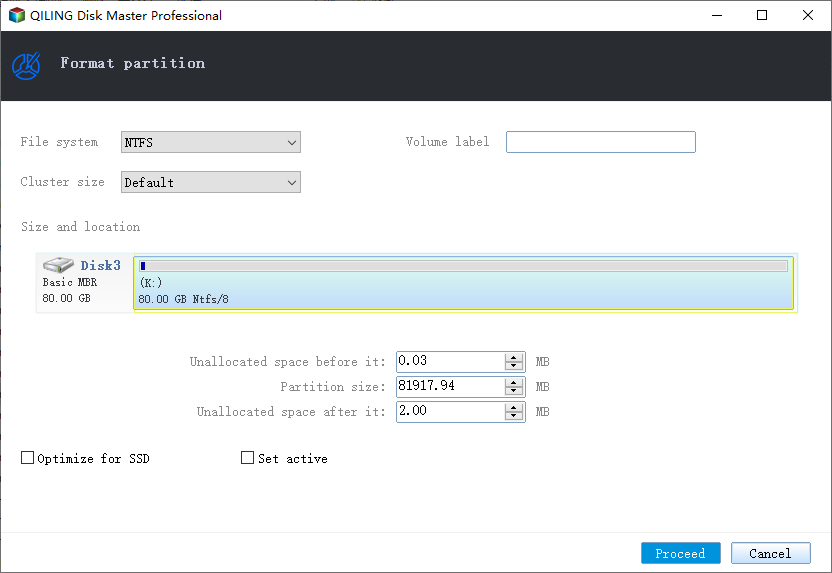
Step 3. Check warning message and click "OK" to format the hard drive partition.
Solution 2. Format to FAT32 Windows 10 via File Explorer
The USB drive should have a storage capacity of no more than 32GB to avoid any formatting issues. If the capacity exceeds 32GB, the USB drive must be formatted to NTFS.
To format USB under 32GB to FAT32 in Windows 10 Explorer, follow the three steps:
Step 1. Connect USB or external hard drive to Windows 10 PC.
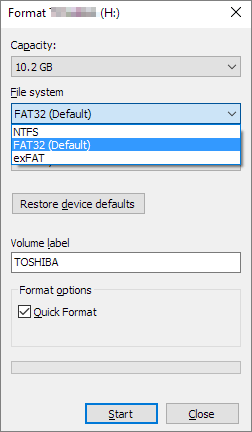
Step 2. Open File Explorer, locate and right-click on the USB drive, select "Format".
Step 3. Set the FAT32 as the target file system, tick "Quick Format" and click "Start" to start the formatting.
The process is complete. The USB drive has been formatted to FAT32. You can now use it with older devices that don't support exFAT.
Solution 3. Format USB/External Drive to FAT32 with Disk Management
The USB drive requirements for the program are similar to those for the Explorer, with the need to be under 32GB in order to format to FAT32 within the program.
Follow the 3-step guide here to format to FAT32:
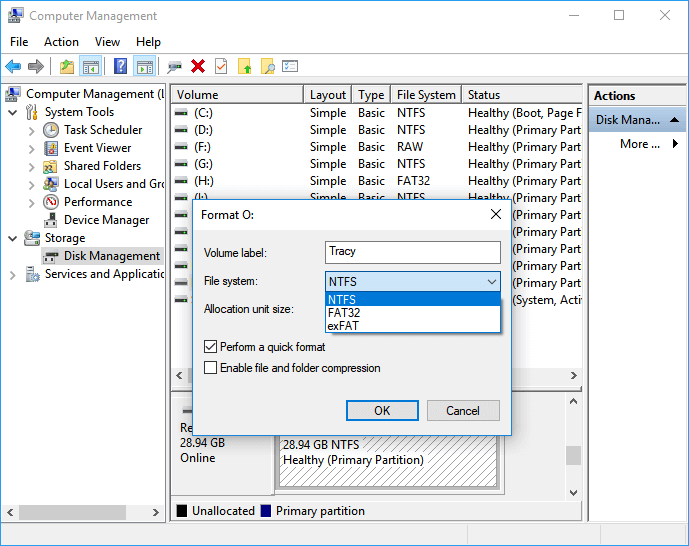
Step 1. In Windows 10, go to This PC > Manage > Disk Management.
Step 2. Locate and right-click on your USB flash drive or external hard drive, select "Format".
Step 3. Set the USB file system to FAT32, tick "Perform a quick format" and click "OK" to confirm.
Solution 4. Format to FAT32 Windows 10 Using Command Prompt
To format a flash drive or external hard drive to FAT32 in Windows 10 using the command line, you can use the built-in command-line tool called Diskpart. First, open the Command Prompt as an administrator, then type "diskpart" and press Enter. Next, type "list disk" and press Enter to list all the disks on your system, including the flash drive or external hard drive you want to format.
Be cautious when using command lines on your PC to format a USB drive, as improper operations can cause serious issues.
Here are the details of how to use CMD, DiskPart, or PowerShell command lines formatting device in one paragraph shortly:
Option 1. Use CMD - Command Prompt
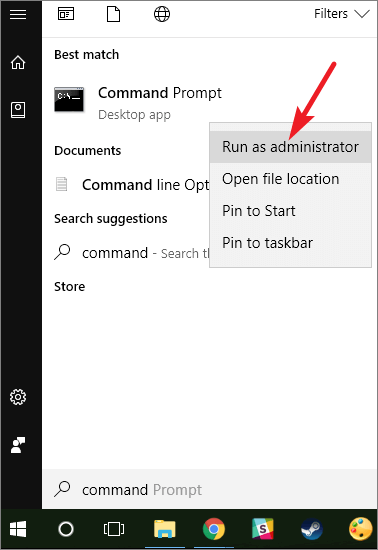
Step 1. Type command prompt in Windows 10 search bar or right-click on "Windows icon" > select "Search", and type cmd.
Step 2. Right-click on "Command Prompt" and select "Run as Administrator".
Step 3. Check the USB label and type Format /FS:FAT32 O: at the prompt and hit "Enter" (replace O: with the drive letter of your USB drive).
Windows 10 will begin formatting the USB flash drive or external hard drive into FAT32 shortly.
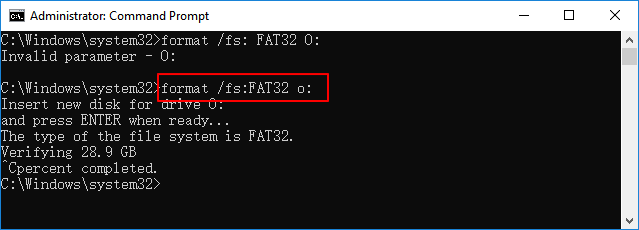
Step 4. Type exit when the process has completed.
Option 2. Use DiskPart
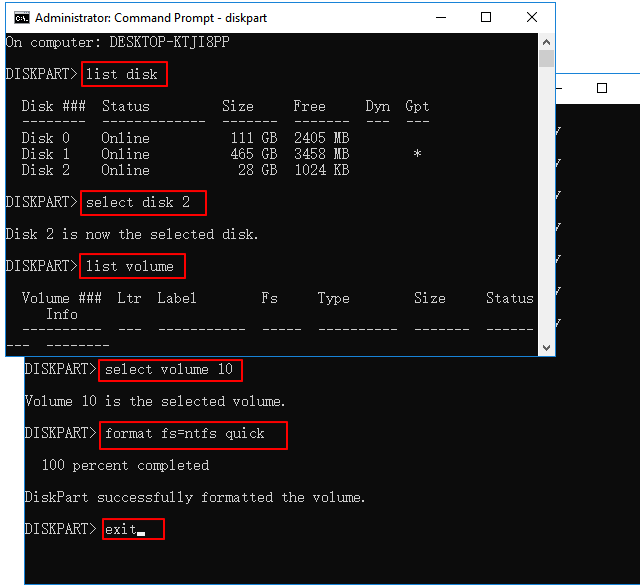
Step 1. Type diskpart in Windows search bar and hit Enter.
Step 2. Hit Enter each time when you type the below command lines to quick format hard drive:
- list disk
- select disk 2 (Replace 2 with your USB disk number)
- list volume
- select volume 10 (Replace 10 with the volume number of the USB drive that you want to format)
- format fs=fat32 quick
Step 3. Type exit and hit Enter to close the program when DiskPart reports it has successfully formatted the USB.
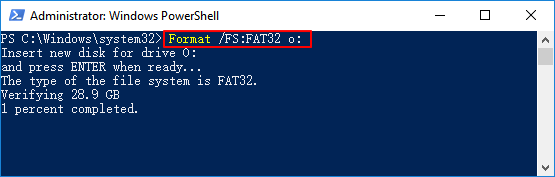
Option 3. Use PowerShell
Step 1. Right-click on the Windows icon and select "Windows PowerShell Admin", click "Yes" to open it.
Step 2. Check the USB drive label, type Format /FS:FAT32 o: in PowerShell, and hit Enter.
Step 3.Type exit when the formatting process completes.
Additional Fixes for "Cannot Format to FAT32" in Windows 10
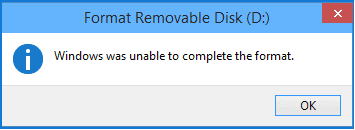
If you encounter issues formatting a USB drive or receive a warning from Windows that it was unable to complete the format, don't worry. This problem often arises when trying to format a drive to FAT32 in Windows 10. In this case, the issue is not with the drive itself, but rather with Windows 10's inability to format to FAT32 due to its file system limitations.
Reasons for Why You Can't Format to FAT32
Here are the main reasons why you can't format devices to FAT32:
1. File system error, bad sectors exist on USB/external hard drive
2. The USB drive contains 2 partitions, or the partition that needs to be formatted to FAT32 is not the first primary partition.
3. If the partition in your USB or external hard drive is larger than 32GB, you can use a tool like Qiling Partition Master or MiniTool Partition Wizard to resize or split the partition into smaller ones, allowing you to format and use the excess space. Alternatively, you can also use the built-in Disk Management tool in Windows to resize the partition.
4. The USB drive or external hard drive is write-protected
To resolve issues with FAT32 format in Windows 10, consider switching your USB drive to FAT32. This can be a quick fix to troubleshoot problems.
Fix 1. Check disk error, fix file system errors or soft bad sectors
To do so, both the third-Qiling Partition Master and Windows Disk Check are two party partition manager software that can work together to efficiently manage and maintain your computer's hard drive partitions. With these tools, you can easily resize, move, and merge partitions, as well as check for and fix disk errors, ensuring your system runs smoothly and efficiently.
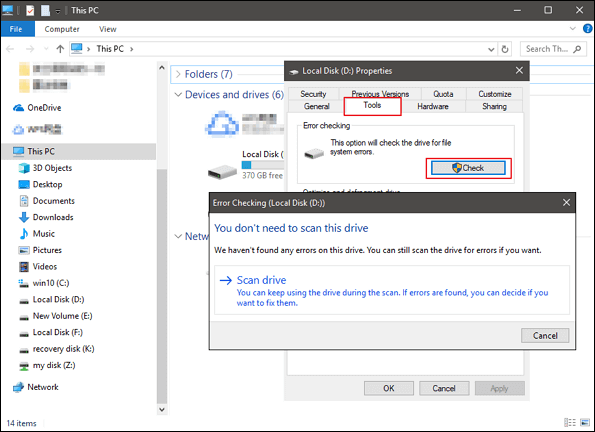
Step 1. Open File Explorer, locate and right-click the USB or external hard drive, and click "Properties".
Step 2. Go to "Tools" and click "Check" under Error-checking.
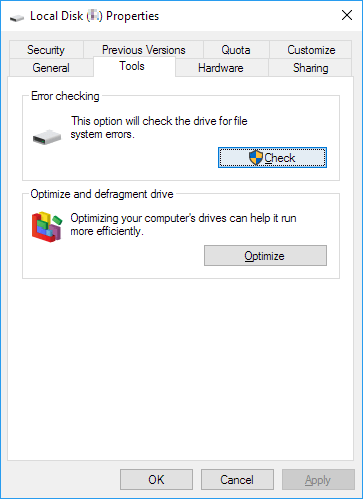
Step 3. Select "Scan and repair drive".
Select the "Check" option, then choose "Automatically fix file system errors" and "Scan for and attempt recovery of bad sectors", then click "Start".
Fix 2. Delete all partitions and create a new FAT32 partition on USB drive
If your Windows system is before Windows 8.1 or your USB drive doesn't support creating two primary partitions, the computer won't be able to recognize or format the non-primary partition on the USB drive to FAT32.
To resolve the issue, delete all existing partitions on the USB drive and create a new FAT32 partition on it.
Step 1. Connect USB to PC and open Disk Management.
Step 2. Locate and right-click the primary partition on USB and select "Delete Volume", click "Yes" to confirm.
Step 3. Right-click on the logical partition on the USB drive, select "Delete Volume".
Step 4. Click "Yes" to confirm.
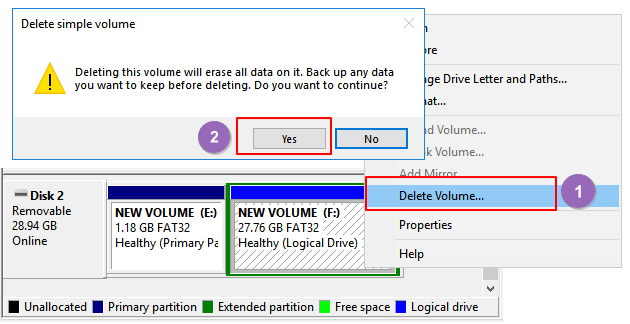
Step 5. The logical partition will become free space, right-click on it and select "Delete Partition", click "Yes" to confirm.
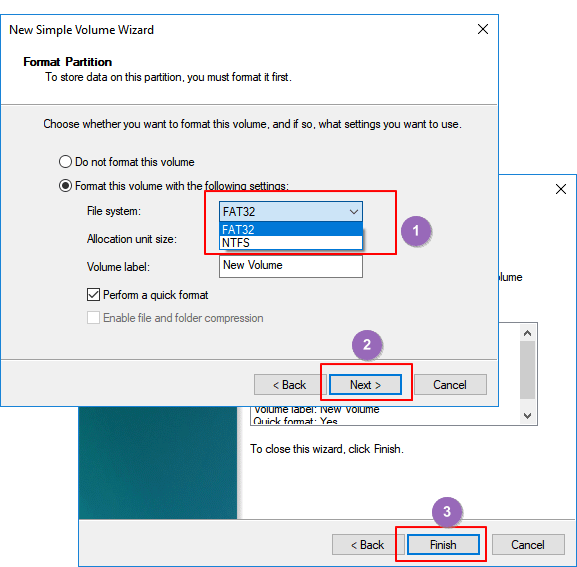
Step 6. When the USB becomes unallocated, right-click on the unallocated space and select "New Simple Volume" > "Next".
Step 7. Follow the on-screen instructions to specify the volume size, drive letter, and set the file system to FAT32, then click "Next" and finally "Finish" to complete the process.
After converting your USB or external hard drive to FAT32, you won't need to format it again, making it ready for use with older operating systems and devices.
Fix 3. Select NTFS as the file system or split USB larget partition to smaller FAT32 partitions
The FAT32 file system has a maximum size limit of 32GB, meaning devices larger than this cannot be formatted with it.
When your USB drive partition is larger than 32GB, you can't format it into FAT32, but there are three solutions to this issue.
Method 1. Apply Qiling Partition Master to format USB to FAT32
Unlike Windows built-Qiling Partition Master allows you to format a USB drive larger than 32GB to FAT32 with ease. You can simply go back to the partition manager and directly format your USB to FAT32 without any limitations.
Method 2. Set NTFS as the file system of your USB drive
NTFS allows for the storage of a single file larger than 4GB and supports creating partitions larger than 32GB.
If you only want to keep one partition on the USB drive, setting the NTFS file system is the best choice as it allows you to make full use of the drive space.
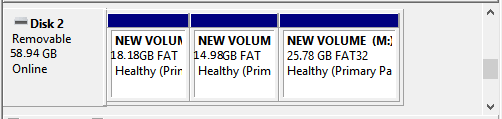
Method 3. Divide USB partition into small ones (less than 32GB) with FAT32
To split the USB partition into small ones and format them into FAT32, you can use a tool like Qiling Partition Master or MiniTool Partition Wizard. These tools allow you to resize and split the existing partition into smaller ones, and then format each of them into FAT32.
Pre-conditions: Windows system (versions after 8.1) and USB drive both support two or more partitions.
Step 1. Use Disk Management to delete the USB partition.
Step 2. Create two or more partitions smaller than 32GB with the FAT32 file system.
Fix 4. Remove USB write protection and format USB to FAT32
When the USB drive is write-Here are the detailed steps to resolve the issue of formatting a protected or locked external hard drive into FAT32:
Step 1. Remove USB write protection and unlock USB
To remove USB write protection on Windows 10/8/7, refer to this link: remove USB write protection.
Step 2. Format USB to FAT32
After removing the USB write protection, you can apply any one of the solutions in Part 1 to format your USB drive to FAT32.
Final Word
Formatting a USB or external hard drive to FAT32 can be a challenge, especially when trying to format devices larger than 32GB. To resolve this issue, you can follow the steps outlined on this page to format your device to FAT32, ensuring that you don't lose any data in the process. With the help of these solutions, you'll be able to successfully format your USB or external hard drive to FAT32, even if it's larger than 32GB.
To convert devices into NTFS without formatting, refer to the guide on how to convert FAT to NTFS for assistance.
Related Articles
- 12 Ways to Fix Low Disk Space Error on Windows 11/10/8/7 [2022 New]
- Sleep vs Hibernate on Windows 10/8/8.1/7 (Complete Guide)
- Beginner's Guide - Install A New Hard Drive/SSD in Windows 10/8/7
- Free Download 2021 Best Memory Card Format Tool, Format SD Card for Free
- How to Improve SSD Performance in Windows 11 [Step-by-Step]
- SATA vs SSD: Which One to Choose [Indepth Comparison]
- Dell Backup and Recovery Windows 10 & Its Alternative
Dell Backup and Recovery is a software tool that helps you protect your Windows 10 Dell computer by creating backups of your data and system. This article will walk you through the process of using Dell Backup and Recovery, as well as provide alternative options that may better meet your needs. By the end of this post, you'll have a better understanding of how to safeguard your computer and may discover a more suitable tool for your backup and recovery needs.