Why Is Shrinking a Partition Taking So Long
Shrinking a partition can take minutes or hours depending on disk speed, file placement, errors, and how much data must move.
This guide helps you decide whether to wait, check disk health, cancel safely, or use a clearer resize workflow.
PAGE CONTENT
- What This Problem Means
- Before You Start
- Use Windows Built-in Tools First
- Use the Qiling Product Workflow
- Check the Result
- FAQs
What This Problem Means
A shrink operation changes partition boundaries. If files sit near the end of the partition, Windows may need to move data first.
- HDDs are slow when moving many small files.
- Bad sectors or file system errors delay resizing.
- Antivirus and background tasks can slow the process.
- Large shrink amounts take longer.
- Important
- Do not force shut down while a resize is actively changing partition data unless the system is completely unresponsive and you accept the risk.
Before You Start
Connect power, close programs, and check disk health before resizing important partitions.
- Confirm the exact disk, partition, USB drive, SD card, or Windows installation you are changing.
- Copy irreplaceable files to another drive if the device is still readable.
- Check whether BitLocker, Secure Boot, UEFI/Legacy mode, or a vendor recovery partition is involved.
- Avoid formatting, deleting, wiping, or running DiskPart clean until you know whether data must be recovered first.
Use Windows Built-in Tools First
Use Windows tools to find out whether the shrink task is still running, blocked by errors, or limited by unmovable files. Do not mix these actions together; handle them one by one.
Function 1: Check Whether the Shrink Task Is Still Working
Step 1. Press Ctrl + Shift + Esc to open Task Manager.
Step 2. Click Performance and select the disk that contains the partition being shrunk.
Step 3. Watch the disk activity for several minutes. If active time, read speed, or write speed keeps changing, the shrink operation is still working.
Step 4. Keep the computer powered on and wait. Do not restart or force shut down while Windows is still moving partition data.
Function 2: Repair File System Errors Before Shrinking Again
Step 1. Open Command Prompt as administrator.
Step 2. Run chkdsk C: /f. Replace C: with the drive letter of the partition you want to shrink.
Step 3. If Windows asks to schedule the check on the next restart, type Y and restart the computer.
Step 4. Wait for CHKDSK to finish. If it reports many bad sectors or repeated read errors, back up the files before trying to shrink again.
Function 3: Remove Common Shrink Blockers
Step 1. Run Disk Cleanup or Storage Sense to remove temporary files.
Step 2. Temporarily turn off hibernation by running powercfg /h off in an administrator Command Prompt.
Step 3. If you already have a separate backup, reduce old restore points from System Protection. Do not remove restore points if they are your only rollback option.
Step 4. Restart Windows so locked files are released, then try the shrink operation again.
Function 4: Shrink in Smaller Amounts with Disk Management
Step 1. Right-click Start and open Disk Management.
Step 2. Right-click the target partition and choose Shrink Volume.
Step 3. Enter a smaller shrink size first, such as 10 GB or 20 GB, instead of shrinking a very large amount at once.
Step 4. Repeat the shrink operation only after the previous one finishes and the partition remains healthy.
Detailed Qiling Disk Master Workflow
Use Qiling Disk Master when Disk Management cannot finish the shrink task, the available shrink size is too small, or you need to move unallocated space after shrinking. The following functions are separate workflows. Choose only the one that matches your goal.
Function 1: Check the Target Disk and Partition First
Step 1. Open Qiling Disk Master and locate the disk that contains the partition you want to shrink.
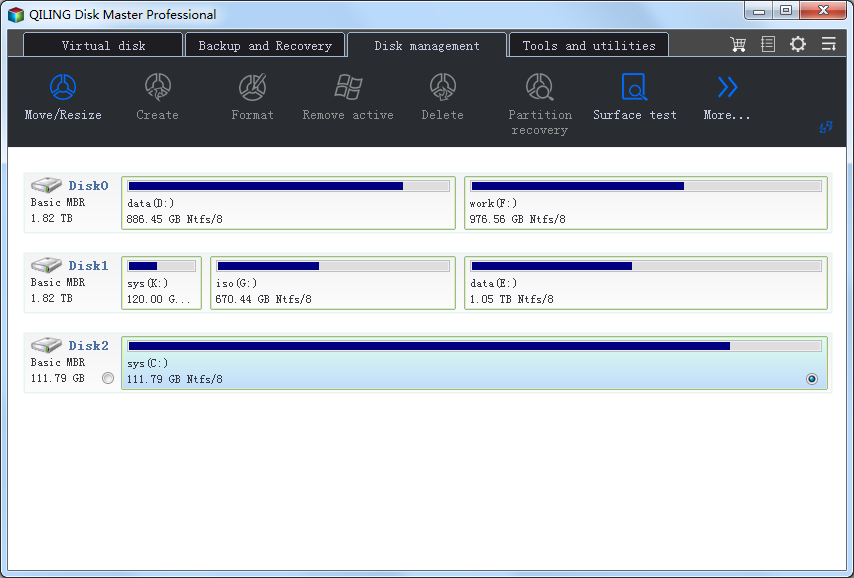
Step 2. Confirm the drive letter, capacity, file system, and partition position. Make sure you are not selecting the wrong disk or a hidden recovery partition.
Step 3. If the disk shows errors, unstable behavior, or abnormal health warnings, back up or recover important files before resizing.
Function 2: Shrink a Partition
Step 1. Select the partition that needs to be made smaller.
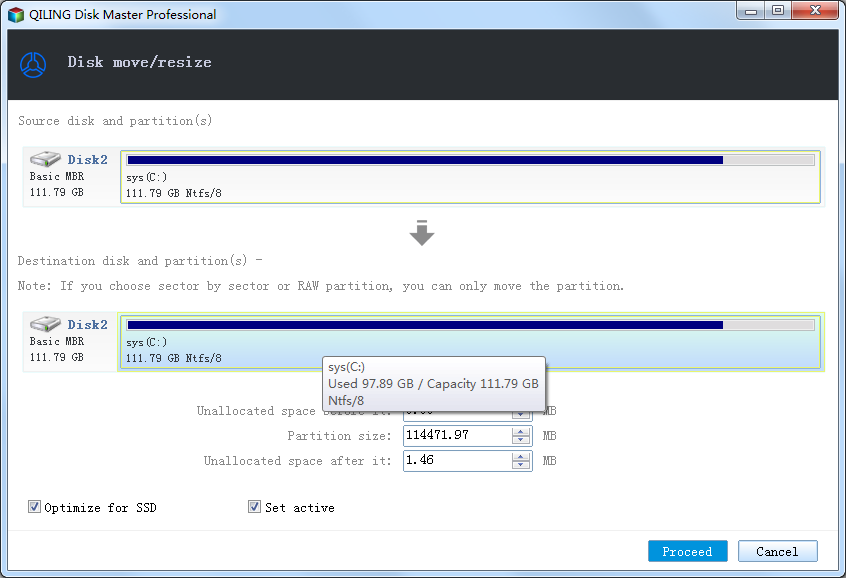
Step 2. Choose the resize or move option.
Step 3. Drag the partition border inward or enter the exact new partition size. Leave enough free space for Windows updates, temporary files, and installed programs.
Step 4. Preview the pending operation. Confirm that only the intended partition is being reduced and that EFI, System Reserved, Recovery, and data partitions remain in place.
Step 5. Click Proceed to start shrinking. Keep the computer powered on until the operation completes.
Function 3: Move Unallocated Space After Shrinking
Step 1. After shrinking, check where the new unallocated space appears.
Step 2. If the unallocated space is not next to the partition you want to extend, select the partition between them and choose the resize or move option.
Step 3. Move that partition left or right so the unallocated space becomes adjacent to the target partition.
Step 4. Preview the new layout carefully. This operation may move data, so do not interrupt it once it starts.
Step 5. Click Proceed and wait for the move operation to finish.
Function 4: Extend or Create a Partition with the Unallocated Space
Step 1. To extend an existing partition, select that partition and choose the resize or move option.
Step 2. Drag the border into the adjacent unallocated space or enter the final partition size.
Step 3. To create a new partition instead, select the unallocated space and choose the create partition option.
Step 4. Choose a drive letter, file system, partition size, and label for the new partition.
Step 5. Preview the pending changes, click Proceed, and restart if prompted.
Step 6. Reopen Disk Management and File Explorer to verify the final size, drive letter, and file access.
Check the Result
Restart, run a file system check if prompted, and confirm partition size and files.
- Restart Windows and confirm the drive, partition, backup task, or cloned disk appears as expected.
- Open several files instead of only checking that a drive letter exists.
- Keep one recent backup on an external drive before making another high-risk change.
- If the same error returns, check hardware health, cable quality, firmware, and Event Viewer before repeating the same operation.
FAQs
How long should shrinking take?
A small SSD shrink may take minutes; a large HDD resize can take hours.
Can I cancel shrinking?
Cancel only before changes are applied. Interrupting active movement can corrupt data.
Why is Shrink Volume stuck calculating?
Windows may be checking file placement, restore points, and disk errors.
Conclusion
A slow shrink usually means Windows is checking or moving data. Prepare with cleanup, health checks, backups, and a previewed Qiling Disk Master resize.
Related Articles
- Best Free Partition Manager Software of 2026
- How to Clone HDD to SSD in Windows 10/11/7
- Windows System Backup and Restore Tutorials
- Windows Data Recovery Tutorials
Products
Articles & Tutorials
- Data Recovery
- Data Backup
- File Recovery
- File Backup
- System Backup and Restore
- Disk and Partition Clone
- Technical articles
- Mobile articles
- Disk Master Help
- Windows Data Recovery Tutorials
- Windows Secure Delete Tutorials
- Windows Partition Management Tutorials
- Windows File Backup and Restore Tutorials
- Windows System Backup and Restore Tutorials
- Windows Disk Backup and Restore Tutorials
- Windows Clone Tutorials