Will Shrinking the C Drive in Windows 10 Cause Issues?
Shrinking C usually keeps Windows and files intact, but it is still a partition change. Problems are more likely when C is nearly full, BitLocker recovery information is unavailable, or the process loses power.
Check Whether C Can Be Shrunk
In File Explorer, check C's used and free space. Leave enough space for Windows updates, applications, and temporary files after shrinking; do not shrink C to only a few gigabytes above its current usage. Back up the system, save the BitLocker recovery key if encryption is on, close running applications, and connect AC power. If the disk reports SMART warnings or read errors, address those before moving partitions.
Method 1: Use Windows Disk Management
Step 1. Right-click Start and open Disk Management. Confirm that the selected C volume belongs to the intended disk, and note its current size and free space.
Step 2. Right-click C and choose Shrink Volume. Wait while Windows queries the maximum shrink size. Enter the amount to shrink in MB, not the desired final C size. For example, 10240 MB creates roughly 10 GB of unallocated space.
Step 3. Read the resulting size shown in the dialog. If the remaining C size is too small, cancel and choose a smaller shrink amount. Click Shrink and wait; do not restart during the operation.
Step 4. Confirm C still opens and Windows boots. Disk Management should show new unallocated space directly after C. Windows does not automatically create a new partition in it; use New Simple Volume only if you want a separate drive.
Method 2: Use Qiling Partition Master
Step 1. Open Qiling Partition Master after completing the backup and power checks. Identify the Windows disk and C partition by size and drive letter. Select C and choose Move/Resize; do not select a small EFI or Recovery partition.
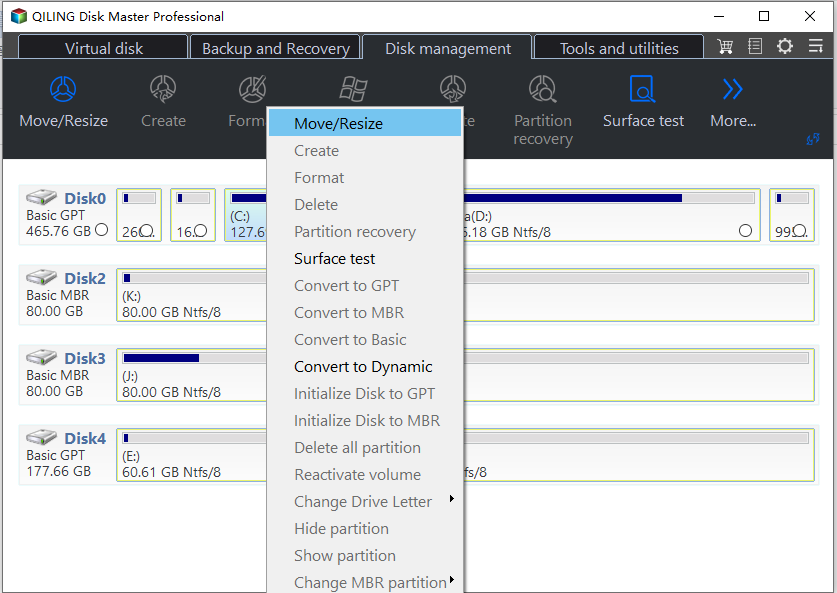
Step 2. In the resize dialog, drag the right edge of C left or enter the desired new size. Check both the remaining C size and the amount of unallocated space shown before confirming.
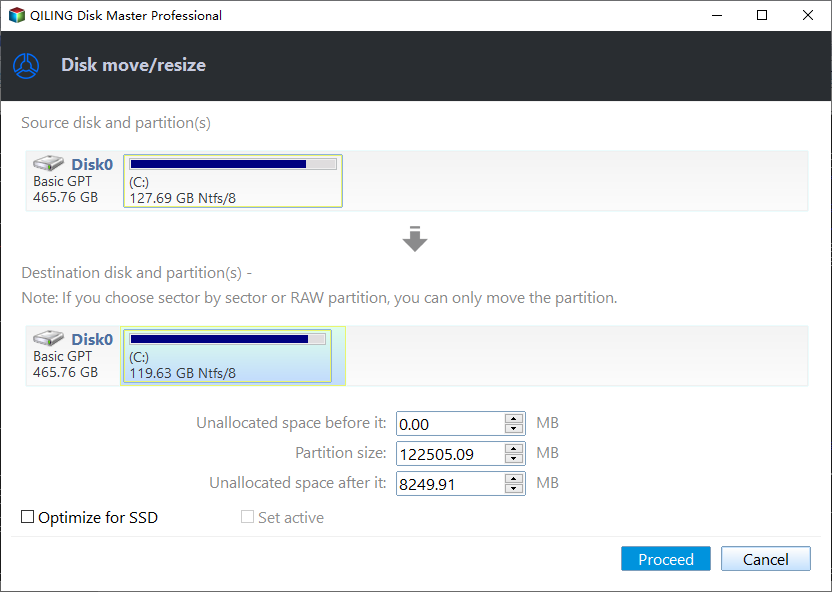
Step 3. Click Proceed to execute the change. If the tool requests a restart to work on the system partition, allow it and leave the computer powered on until the process completes. Do not stop a running move or resize operation.
Step 4. After Windows starts, verify C's size in Disk Management, open several files, and check that Windows Update still has sufficient free space.
If Windows Offers Less Shrink Space Than Expected
Windows may stop shrinking at unmovable data such as the page file or shadow copies. Run Disk Cleanup and optimize the volume once, then query again. Do not delete recovery partitions or disable protection just to force a larger shrink. If you need more space than Windows safely permits, make a full backup before using an offline partition tool; on an unhealthy drive, clone or replace the drive first.
Conclusion
A moderate C-drive shrink on a healthy, backed-up disk is usually manageable. Verify the final free space, keep recovery information available, and stop if the disk reports errors.
Related Articles
- Why Is Shrinking a Partition Taking So Long?
Understand long resize operations and when to wait or investigate. - Move Unallocated Space Next to C
What to do when the free space is not positioned for a later C-drive extension.
Products
Articles & Tutorials
- Data Recovery
- Data Backup
- File Recovery
- File Backup
- System Backup and Restore
- Disk and Partition Clone
- Technical articles
- Mobile articles
- Disk Master Help
- Windows Data Recovery Tutorials
- Windows Secure Delete Tutorials
- Windows Partition Management Tutorials
- Windows File Backup and Restore Tutorials
- Windows System Backup and Restore Tutorials
- Windows Disk Backup and Restore Tutorials
- Windows Clone Tutorials