Windows 11 Home VS Pro, Which Is Better? Your Tips Are Here
The Windows 11 Home and Pro editions have sparked confusion among users, but understanding their differences can help you make an informed decision. The main differences between the two editions lie in their features and functionalities, which can be clarified by following the provided guidelines to install the desired edition on your computer. By doing so, you can choose the edition that best suits your needs and preferences.
| Workable Solutions | Step-by-step Troubleshooting |
|---|---|
| 1. Windows 11 Home VS Pro | Follow the differences to find which will be suitable for you...Full steps |
| 2. Which One Should You Select | Most users are probably fit for the Windows 11 Home edition...Full steps |
| 3. How to Install Windows 11 Home or Pro | #1. Check If Your PC Supports Windows 11 > #2. Prepare Computer Ready for Windows 1 ...Full steps |
Windows 11 Home VS Pro, Which Is Better?
The differences between these options will help you determine which one is more suitable for you.
Price - The main difference between Windows 11 Home and Pro is the price, with the Home edition costing $139.99 and the Pro edition costing $199.99, assuming Microsoft maintains the same pricing as Windows 10.
Setting up - Windows 11 Home edition requires a Microsoft account and internet connection to set up, whereas Windows 11 Pro does not. Additionally, Windows 11 Home edition cannot be joined to an active directory, which is necessary for managing business devices.
User interface - The user interface is almost identical across all Windows versions, but with some minor differences. A key distinction between the home and pro editions lies in their support for virtualization technologies, with Hyper-v and Windows Sandbox not supported in the Home edition. Additionally, Microsoft Remote Desktop is not available for remote access to a Windows 11 Home PC.
Windows 11 Pro supports Hyper-v, a built-in virtualization feature that lets users test different OS without affecting the primary system. This feature is also available to Home users through third-party software, allowing them to try out various operating systems and earlier Windows versions.
CPU and RAM support - Windows 11 Home and Pro have different hardware limits. While Windows 11 Home supports up to 64 CPU cores and 128 GB of RAM, Windows 11 Pro can handle up to 128 CPU cores and 2TB of RAM, making it more suitable for heavy users.
Security - Windows 11 Pro offers enhanced security features, including BitLocker encryption and Windows Information Protection (WIP), to protect sensitive business data, whereas Windows 11 Home has basic security features.
Enterprise management - Windows 11 Home and Pro both have an enterprise management feature, but with some key differences. While the majority of this feature is not available in Windows 11 Home, Windows 11 Pro offers a Group policy that allows IT administrators to set up settings for groups of devices at once. Additionally, there is an update for business that enables businesses to customize how updates are delivered to their consumers, helping to avoid potential problems.
Hardware - Windows 11 Home and Pro have the same minimum system requirements, but Home has a memory limit of 128 GB, whereas Pro has a limit of 2 TB, making it suitable for creating multiple virtual machines with large RAM.
Summary of the features difference-
| Feature | Home | Pro |
| Microsoft account needed | No | Yes |
| Join Active Directory | No | Yes |
| Hyper-V | No | Yes |
| Windows Sandbox | No | Yes |
| Microsoft Remote desktop | Client only | Yes |
| Device encryption | Yes | Yes |
| Windows Hello | Yes | Yes |
| Network protection | Yes | Yes |
| Internet protection | Yes | Yes |
| Parental protection | Yes | Yes |
| Secure Boot | Yes | Yes |
| Windows Defender Antivirus | Yes | Yes |
| BitLocker Device encryption | No | Yes |
| Windows information protection | No | Yes |
| MDM | No | Yes |
| Group Policy | No | Yes |
| Enterprise State Roaming with Azure | No | Yes |
| Assigned Access | No | Yes |
| Dynamic Provisioning | No | Yes |
| Windows update for Business | No | Yes |
| Kiosk mode | No | Yes |
| Maximum RAM | 128GB | 2TB |
| Maximum no. of CPUs | 1 | 2 |
| Maximum no. of CPU cores | 64 | 128 |
If you have a PC with Windows 11 Home edition and want the Pro edition, you can upgrade.
Windows 11 Home or Pro Edition, Which One Should You Select?
Windows 11 Home edition is likely sufficient for most users, as it offers a range of features that cater to non-business users. In contrast, the Pro edition is geared towards business users and those who work with multiple virtual machines, offering advanced features and security protections. If you're a business user or have specific needs, the Pro edition is the better choice, but for others, the Home edition's lower price point and still robust feature set make it a more affordable and suitable option. Ultimately, the decision between Windows 11 Home and Pro depends on your individual needs and requirements.
How to Install Desired Windows 11 Home or Pro on Your PC?
Give a complete step-by-step guide down below to help Windows users to install Windows 11 Home edition or Pro edition on their computer.
#1. Check If Your PC Supports Windows 11
To install Windows on a PC, it needs to meet certain basic requirements. These include a 64-bit processor, at least 4 GB of RAM, a 64-bit UEFI firmware, and a compatible graphics card.
- Processor: 64-bit architecture at 1 GHz or faster.
- RAM: 4 GB or higher
- Storage: 64 GB or larger storage device.
- System firmware: UEFI, Secure Boot capable
- TPM: Trusted Platform Module (TPM) - version 2.0
- Graphics card: Directx 12 or later capable; WDDM 2.0 driver or newer.
- Display: 720p high-definition display with a screen size larger than 9 inches diagonally, utilizing 8-bit or higher color channel depth.
- Internet connection/MSA:Windows 11 Home edition requires an internet connection and a Microsoft Account to set up the device on first use, and also needs internet connectivity to switch out of S mode.
To check if your PC can support Windows 11, you can use the Qiling Windows 11 checker. Simply download the tool and click the "check now" button.
#2. Prepare Computer Ready for Windows 11 Installation or Upgrade
To prepare your PC for upgrading to Windows 11 or installing it, start by backing up all essential files to an external hard drive to ensure their safety. Next, you'll need to convert the OS drive from Master Boot Record (MBR) to GUID Partition Table (GPT).
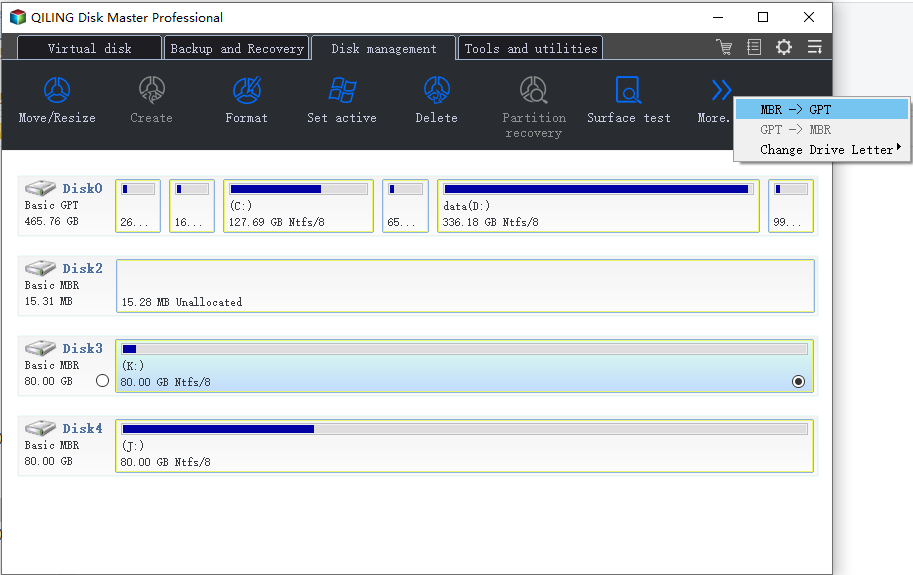
To convert your MBR drive to GPT, check if your drive is GPT or MBR. If it's MBR, you'll need to convert it as Windows 11 requires GPT. You can use Qiling Partition Master software to do this. Simply download the software, right-click the MBR disk you want to convert, and select "Convert to GPT".
Step 1.Download and launch Qiling Partition Master on your Windows computer.
Step 2.To convert a Master Boot Record (MBR) disk to a GUID Partition Table (GPT) disk, select the MBR disk, click "More..." in the context menu, and choose "MBR -> GPT".
Then, you need to Enable UEFI and Secure Boot Mode on your computer.
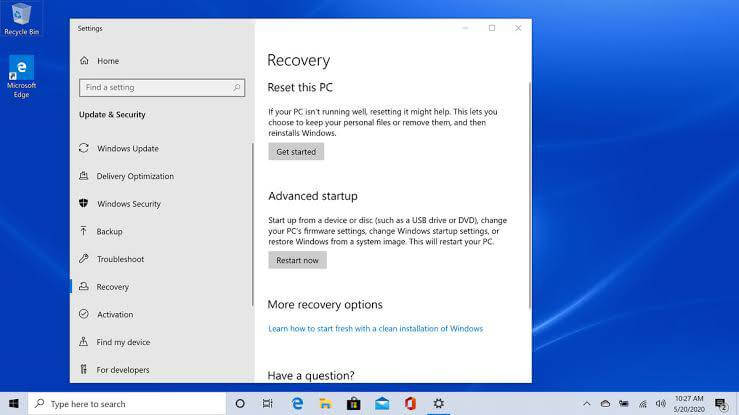
From Windows:
- Go to" Settings" charm
- Click "Recovery"
- From Recovery, click "Advanced Startup"
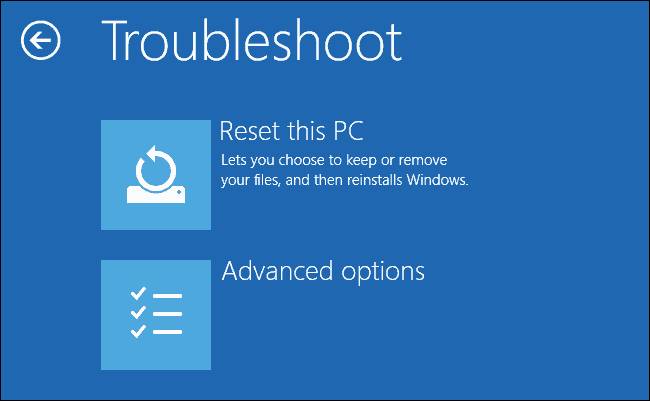
From Recovery to advance startup Select an Image
- Click "Restart now".
- When the PC reboots, go to "Troubleshoot".
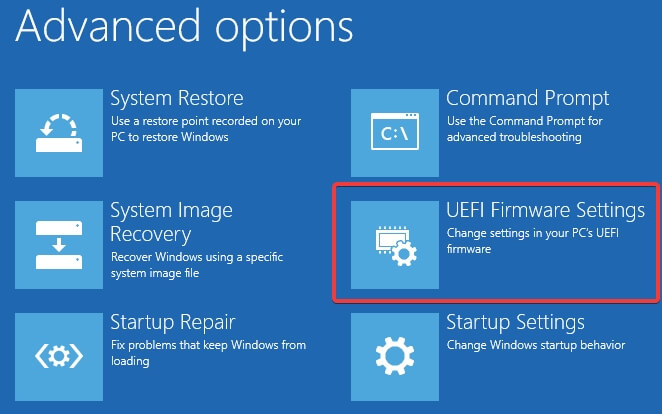
● To secure your system, go to the BIOS settings and navigate to Advanced Options: "UEFI Firmware Settings". From there, find the Secure Boot setting and change it to Enabled. This will ensure that your system boots securely.
#3. Download and Install Windows 11 Home or Pro Edition
To download and install Windows Home or Pro edition on your computer, start by going to the official Microsoft website and selecting the appropriate edition for your needs. Once you've chosen the correct version, click on the "Download" button to begin the download process.
To install Windows 11 on your PC via a clean installation using a bootable USB, follow these steps: Create a bootable USB drive with the Windows 11 installation media, insert the USB drive into your PC, and restart your computer. Enter the BIOS settings by pressing the designated key (usually F2, F12, or Del), navigate to the boot settings, and set the USB drive as the first boot device.
● Start your device with Windows 11 USB media.
● On prompt, press any one key to boot the device.
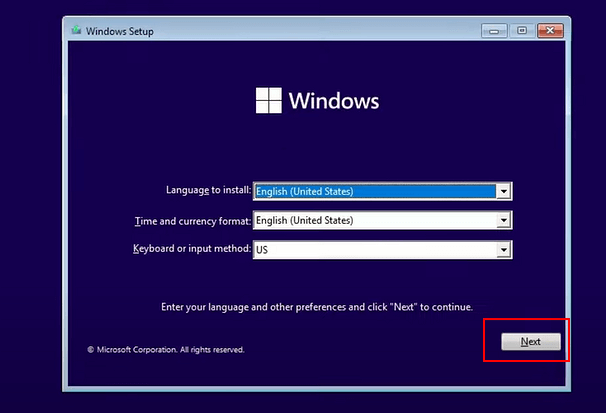
● You need to click the Next button on the "Windows Setup" page.
● Click the Install now button.
● Click on the "I don't have a product key" option to continue. But, if you are installing Windows 11 for the first time, you will be requiring a product key.
● Select the edition of Windows 11 (If applicable).
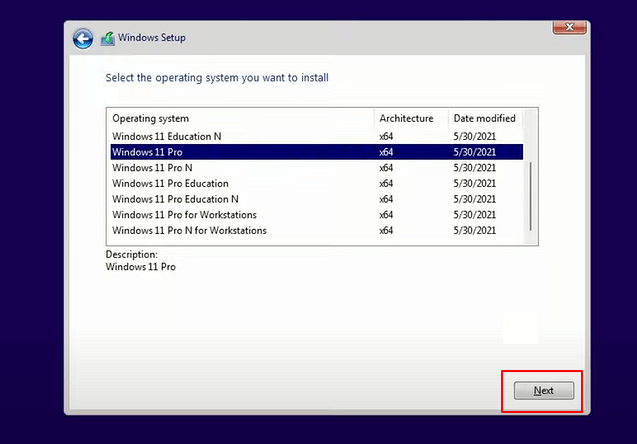
If you're trying to activate Windows 11, make sure to select the correct edition of Windows that the product key is meant to activate. If you choose the wrong edition, the activation process won't work and you'll have to start over.
● Click the Next button.
● Select Select the option- I accept the license terms to continue.
● Click the Next button.
● To proceed with a clean installation of Windows, select the "Custom: Install Windows only (advanced)" option.
● Select the partition with the current installation (normally "Drive 0"), and click on the Delete button.
To set up a new Windows 11 installation, if "Drive 0" has multiple partitions, you'll need to select each partition and delete it to allow the setup to use the entire drive for the new installation. The Windows 11 setup will then create the necessary partitions. However, you don't need to delete partitions on secondary drives. If the device has an empty hard drive, you can select it and proceed with the setup.
● Click on the Yes button.
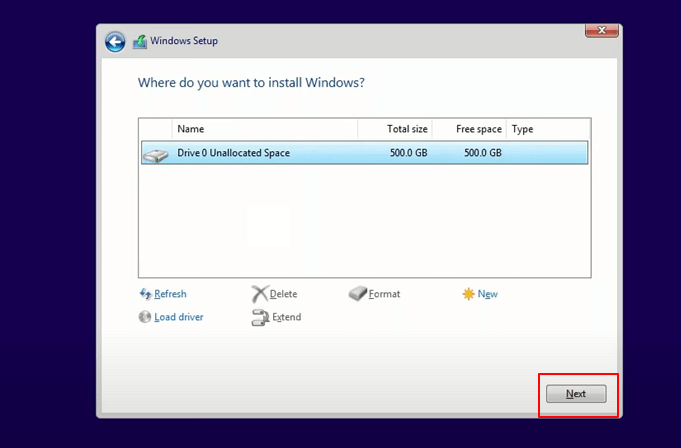
Select the empty drive.
● Select the drive to install Windows 11
● Click on the Next button.
Once the steps are completed, the Windows 11 Setup will install a fresh copy of the new OS on your laptop or desktop computer.
Windows 11 Home and Pro Editions Are All Great, Get and Enjoy Life with It on Your PC Now
Both Windows 11 Home and Pro editions are suitable, with the latter offering additional features. For regular users, Windows 11 Home is a good choice, while business users may prefer the Pro edition, which includes advanced features not typically needed by individual users.
So, choose accordingly and enjoy your life and gather best expresses.
Related Articles
- Fix and Repair EFI Bootloader in Windows 10/8/7
- Hard Drive Partition Not Responding in Windows 10/8/7
- How to Format SD Card on Windows 11? Here Are 4 Ways for You in 2022
- BitLocker Partition: How to Partition A BitLocker Drive on Windows 10
- Upgrade to Windows 11: What You Need to Know?
Can Windows 10 be updated to Windows 11? How to upgrade to Windows 11? Should I upgrade to Windows 11? Refer to the post for answers to those questions. - About Windows 11 22H2 Update--What You Want to Know
Windows 11 22H2 update will become the biggest system update after it's released for 1 year. You can get some details about it and preparer your PC for this update in advance.