Windows Setup Error 0x80300024: Target Disk Not Supported
Quick Navigation:
- What 0x80300024 Actually Means
- Check Firmware Mode and Partition Style
- Back Up, Then Convert or Rebuild
- Prepare the Disk With Qiling Disk Master
- Frequently Asked Questions
Windows setup lists the drives, you select the space you prepared, and the installer refuses with 0x80300024 and a message that the target disk is not supported. Nothing has been written at that point, and the existing system still boots. The code is a mismatch report: the way the machine boots and the way the disk is organized do not agree, or the disk sits in a state that setup will not touch, such as a dynamic disk or one marked offline. This guide separates those causes and puts them in a safe order.
What 0x80300024 Actually Means
0x80300024 appears when setup can see the disk but cannot use it as a target. Because the drive is listed, a missing storage driver is not the cause; that failure produces a different code and an empty drive list. What setup is reporting is that the combination of firmware mode, partition table style, and disk state does not meet its rules, and it stops before it writes anything.
The first rule is firmware mode. A machine started in UEFI mode installs Windows only to a GPT disk, and a machine started in Legacy mode installs only to an MBR disk. Setup can convert a blank disk to the style it needs, but it refuses when the disk already holds partitions it would have to destroy to proceed. That single rule explains most reports on machines that were upgraded rather than bought complete.
The second rule is disk type. A dynamic disk, a disk marked offline or read-only, and a partition table with errors all return the same message. The remedy differs for each, which is why checking the state in Part 2 comes before converting anything, and why a backup comes before the conversion. A conversion cannot repair a disk that the storage stack has already taken out of service.
Check Firmware Mode and Partition Style
Open the firmware settings screen and read the boot mode. It is usually labelled UEFI or Legacy, and on some boards the Legacy option is called CSM support. Write the value down, then look at the target disk in the Windows disk tool and note whether its partition style is GPT or MBR. Those two values decide whether a conversion is needed at all.
The matching pairs are simple. UEFI with GPT and Legacy with MBR install without complaint. UEFI with MBR and Legacy with GPT do not, and that mismatch is the most common source of this code on a machine that was upgraded in stages rather than bought as one system. The two values you wrote down already tell you which case you are in.
Confirm the disk state as well. A disk that another controller has marked offline, or one whose partition table has errors, cannot be repaired by changing the firmware mode. Clear those conditions first, then decide whether the style needs to change, so that a single conversion solves the whole problem. Only after both conditions are clear does a conversion make sense.
Back Up, Then Convert or Rebuild
Conversion rewrites the partition table, so copy the disk to another physical drive before you start. An image of the entire disk, not a copy of selected folders, is what lets you return to the current layout if the conversion or the following installation goes wrong. A machine that has already refused one installation is exactly the machine that needs that image.
When the disk is empty, the simplest fix is to remove every partition from it in the Windows setup screen and let setup build the layout it wants. Windows Setup is a Microsoft tool and is not part of Qiling Disk Master; it will rebuild a clean disk once nothing is left on it, and that route avoids any third-party conversion.
When the disk holds a working system you want to keep, convert the partition style instead of wiping it, then set the firmware to match. Run the conversion from a booted Windows session rather than from the setup screen, because setup cannot convert a disk that still contains partitions. Confirm afterwards that the firmware mode and the new style agree before the installer runs again.
Prepare the Disk With Qiling Disk Master
Qiling Disk Master covers the three jobs that make a conversion safe: reading the real layout of the disk, capturing a full image of it, and changing the partition style. They are separate operations and they stay in this order, because the image has to exist before the conversion edits the table it records. The download below installs on the machine you are repairing; a machine that no longer boots needs the bootable media route instead.
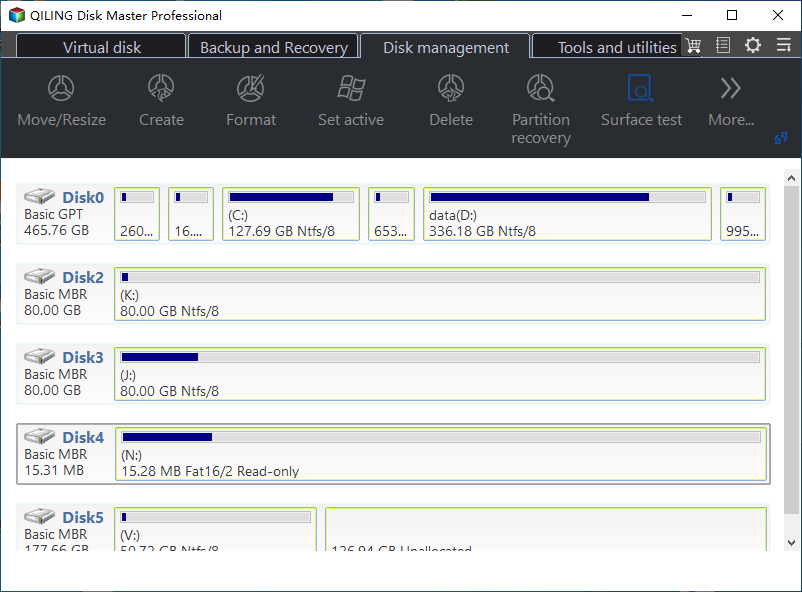
Step 1. Read the Disk Layout
Open the Disk Management tab and read the map before touching anything. Note which disk is the target, whether it is marked GPT or MBR, and whether any partition on it is flagged as dynamic, offline, or read-only. That single screen answers the question Part 2 raised, and it shows whether the disk has room for the partitions setup will create.
Step 2. Back Up the Whole Disk
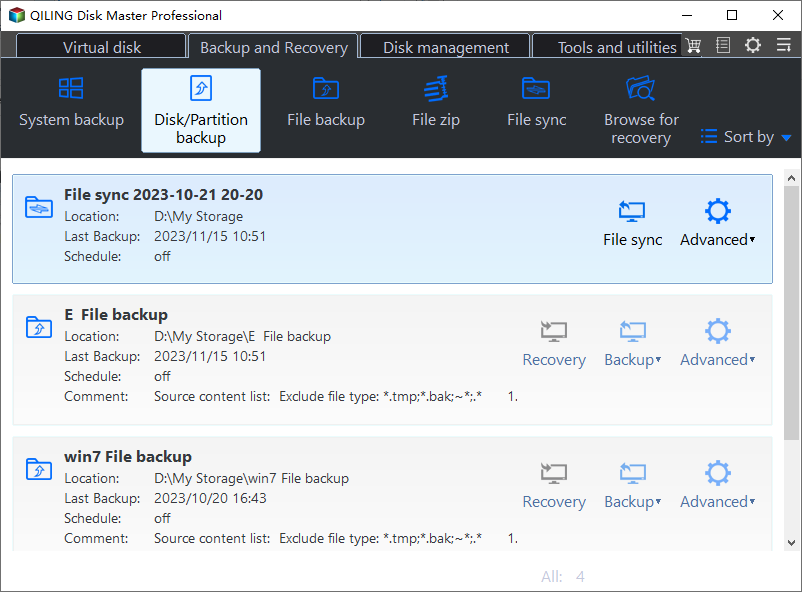
On the Backup and Recovery tab, open Disk/Partition Backup, tick the entire target disk rather than one volume, and choose a destination on a different physical drive. Review the task in the preview, click Proceed, and wait for the completion message. Keep this image until the new installation has booted on its own at least once, and name it with the date so the build it came from is obvious.
Step 3. Convert the Partition Style
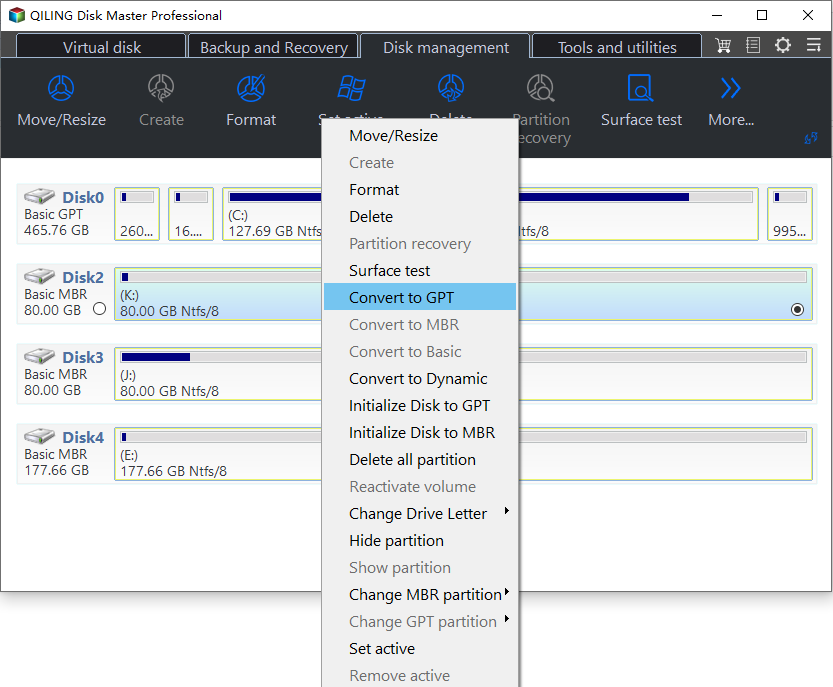
Return to the disk map, right-click the target disk, and choose the conversion that matches the firmware mode you recorded: MBR to GPT for a UEFI machine, GPT to MBR for a Legacy one. Read the preview carefully, confirm that the partition count and sizes are what you expect, then click Proceed. When the operation finishes, restart into firmware settings, set the matching boot mode, and start Windows setup again.
Frequently Asked Questions
Will converting the disk delete my files?
A conversion rewrites the partition table and keeps the partitions in place, but it is still a table-level edit on a disk that matters. That is why the image from Step 2 exists: if the machine does not boot after the conversion, restore that image instead of experimenting on the only copy.
Can Windows setup convert the disk for me?
Only when the disk is empty of partitions. Setup will convert a blank disk to the style it needs, and it refuses when it would have to remove existing partitions first. That refusal is what produces this code on a disk that already holds a system.
Does this error mean the SSD is faulty?
No. The message is about layout and firmware mode, not about failing hardware. Check disk health separately if the drive also disappears from the list between attempts or reports read errors during the backup.
Related Articles
- Windows Cannot Be Installed to This Disk: GPT
- Windows 11 Cannot Be Installed to This Disk: MBR
- Convert MBR to GPT Without Reinstalling Windows
- Change the BIOS Mode From Legacy to UEFI
- Windows 11 26H2 Setup Cannot Create a Partition 0x80070017
Products
Articles & Tutorials
- Data Recovery
- Data Backup
- File Recovery
- File Backup
- System Backup and Restore
- Disk and Partition Clone
- Technical articles
- Mobile articles
- Disk Master Help
- Windows Data Recovery Tutorials
- Windows Secure Delete Tutorials
- Windows Partition Management Tutorials
- Windows File Backup and Restore Tutorials
- Windows System Backup and Restore Tutorials
- Windows Disk Backup and Restore Tutorials
- Windows Clone Tutorials