Data Recovery Software Not Detecting a Hard Drive on Windows
Quick Navigation:
- Understand the Problem
- Check Before Another Recovery Attempt
- Recover With Qiling Deep Data Recovery
- Verify the Recovered Files
- Frequently Asked Questions
A drive missing from a recovery program is not automatically an empty drive. The first question is whether Windows can read the physical device at all. A stable disk with a damaged volume needs a different approach from a USB controller that reports no usable storage.
Understand the Problem
File Explorer lists mounted volumes, not every physical disk. A drive can be absent from Explorer yet still appear in Disk Management at its correct capacity. Conversely, a familiar USB device name can appear even when its controller cannot access the flash memory.
Recovery software needs readable sectors. Changing the drive letter, reinstalling a scanner or buying a license cannot repair a failed controller. An encrypted volume also needs its legitimate unlock method; selecting a different scan mode is not a substitute for the key.
Check Before Another Recovery Attempt
Check 1. Check the physical disk without changing it
Press Windows + X and open Disk Management. Cancel any initialization or formatting prompt. Record the disk capacity, partition layout and status. Do not create a volume simply to give the recovery program something to select.
Check 2. Separate connection failure from file-system damage
For a healthy-looking external device, close disk tasks and try one known-good cable and a direct computer port. Use the enclosure's correct power supply. If capacity stays at zero, No Media persists or the disk clicks, stop rather than repeatedly reconnecting it.
Check 3. Check access and encryption
Use an authorized Windows account and accept the application's permission prompt. Unlock a BitLocker volume with its valid password or recovery key if required. Do not remove organization security settings or bypass access controls.
Check 4. Proceed only when the source is readable
If Windows lists the expected capacity, reopen Qiling and inspect its location screen. Identify the source by capacity and partition layout. If it remains absent, collect the Windows status and software version for support instead of formatting it.
Recover With Qiling Deep Data Recovery
Qiling Deep Data Recovery offers a visual mode chooser, a source-location screen, file results with supported previews and a separate recovery destination dialog. Use this workflow only when Windows can read the source reliably. It does not bypass encryption or guarantee recovery of overwritten data.
The screenshots are examples from the product interface. Their drive letters, file counts and sample selections are not instructions to choose the same disks on your computer. The download is not a promise of unlimited free recovery; check the current edition and license terms.
Step 1. Prepare the Source and a Separate Destination
Stop routine use of the affected device. Check independent backups first, then connect a healthy destination with adequate free space. Download and install Qiling on healthy storage, not the volume holding the missing files. If the system disk is affected, consider another suitable computer or specialist assistance to limit background writes.
Step 2. Choose the Scan Mode for the Original Loss
Use Fast Scan for a readable volume after ordinary deletion. Use USB/SD Scan for removable-media loss, or Disk Scan when a broader hard-disk search is needed. Format Scan is appropriate only when formatting actually occurred.
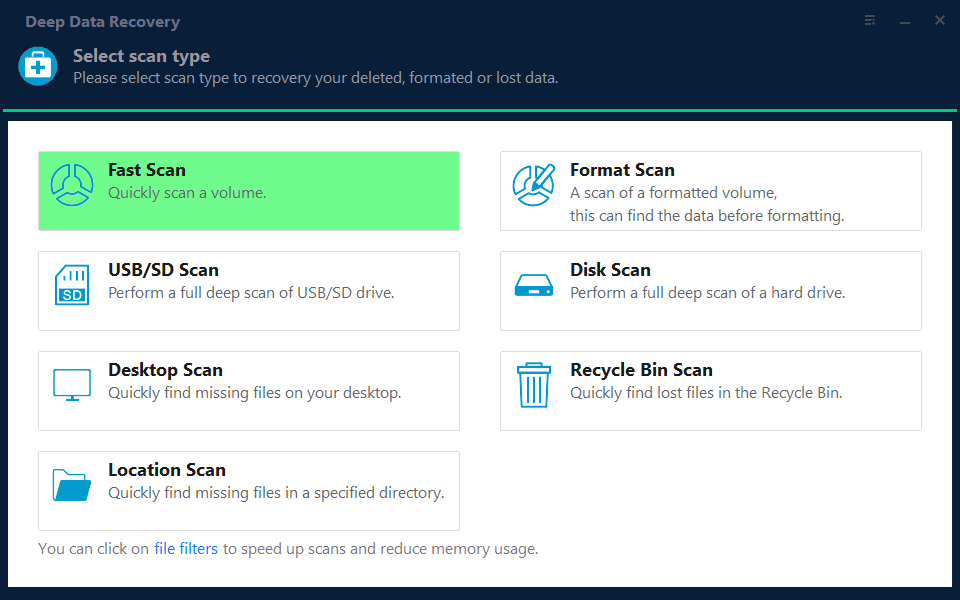
Step 3. Select the Original Source and Start the Scan
Match the location to the disk recorded in Disk Management. Do not select the healthy destination disk. If the source is not listed at its expected capacity, stop here; the following scan steps do not solve missing hardware.
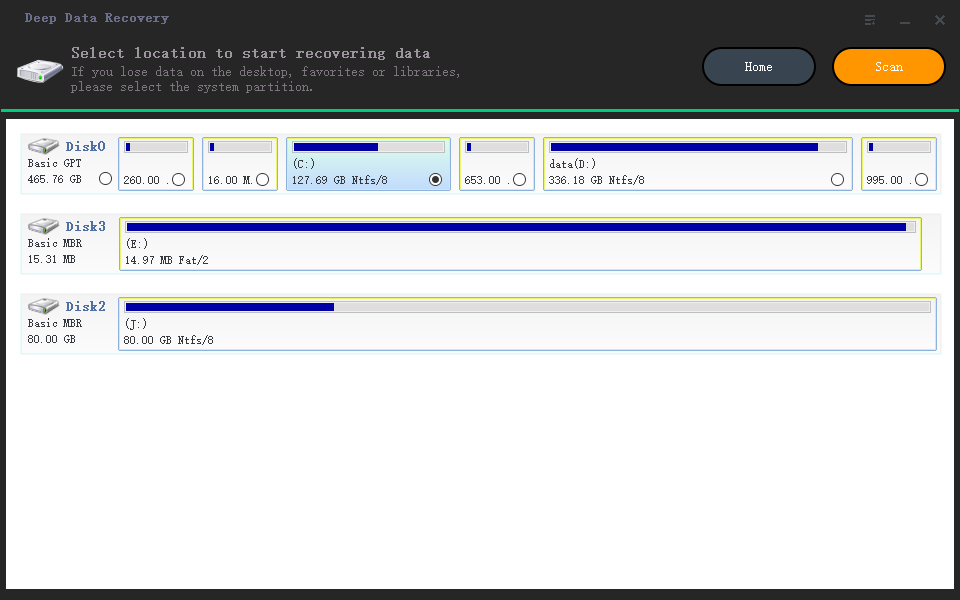
Step 4. Inspect Results and Preview Suitable Candidates
After the scan, inspect Path and Type views for the missing data. Preview a supported photo or document. A file count does not establish that the whole disk was readable.
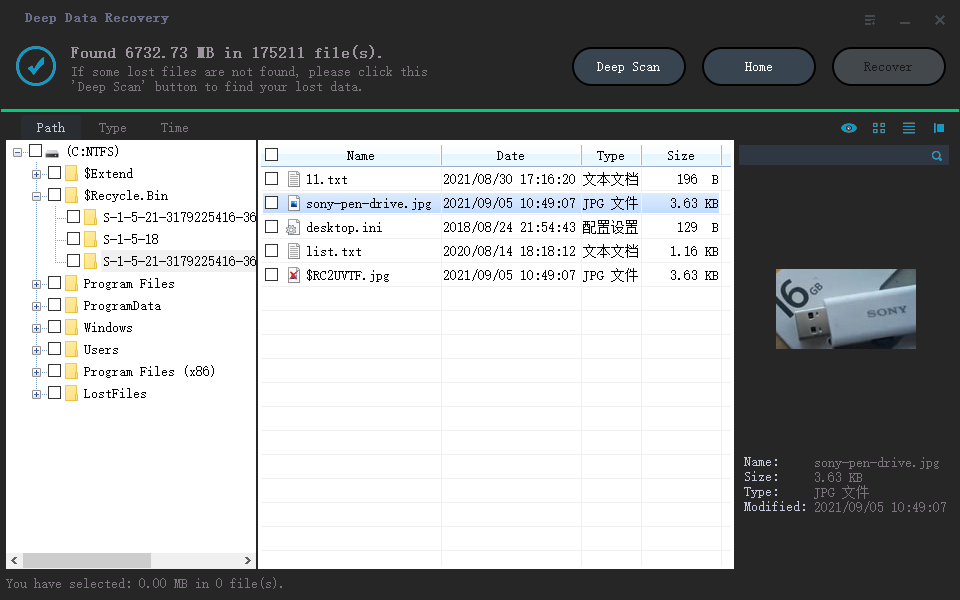
Step 5. Recover to Healthy Independent Storage
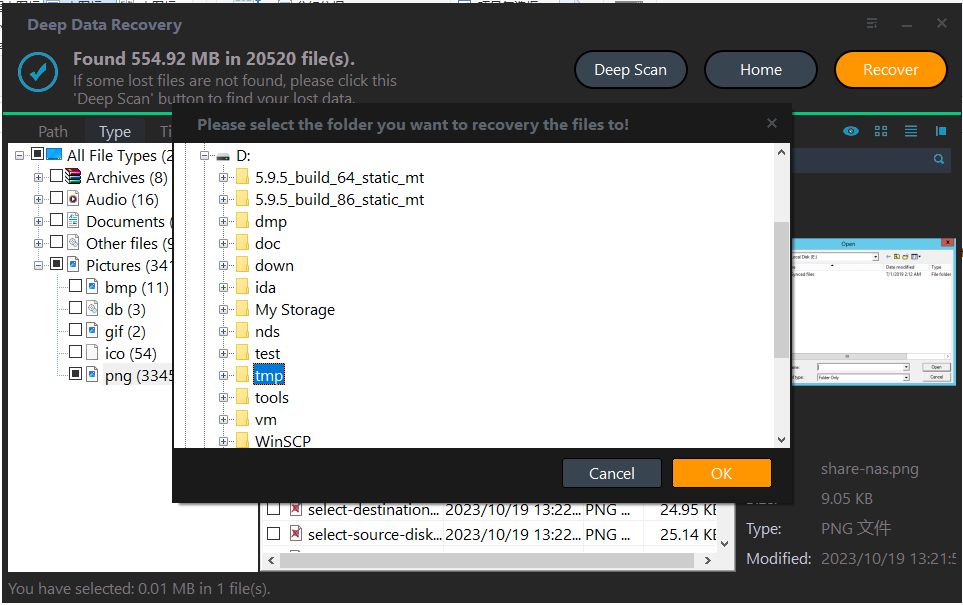
Select a small, important sample first and save it on a different physical disk. If the source disappears during reading, stop and reassess its hardware rather than restarting the scan repeatedly.
In the destination dialog, choose the intended folder and confirm with OK. Wait for the selected export to finish without disconnecting either device. If an error occurs, record it and keep any incomplete output separate rather than assuming the batch succeeded.
Verify the Recovered Files
Open recovered samples in their normal applications and check content, not just filenames. Keep the source unchanged until the important files have been verified.
For a device that still reports No Media, seek hardware recovery advice. A software demonstration on another disk is not evidence that this particular device is recoverable.
Stop condition: Stop if the capacity is wrong, the drive disconnects repeatedly, or there are mechanical noises. Do not initialize, format or run repair commands on the only copy.
Frequently Asked Questions
Will assigning a drive letter make a failed disk recoverable?
No. A letter only provides a Windows path to a usable volume. It does not make inaccessible sectors readable.
Why does Device Manager show the USB device but Qiling does not?
Device Manager can identify a bridge or controller even when the underlying storage is unavailable. Check the capacity and status in Disk Management.
Should I reinstall recovery software on the missing drive?
No. Install on healthy storage. Any writes to the affected device can overwrite data you want to recover.
Related Articles
- External Drive Disconnects During Data Recovery: Safe Checks
Check cables, power and hardware symptoms when an external drive disconnects during recovery. Scan only stable storage and save files elsewhere. - Data Recovery Scan Stuck on Windows: Wait, Stop or Retry?
Diagnose a stalled recovery scan without stressing the source disk. Check progress, read errors and connections before making one controlled retry. - Fix 'USB No Media in Disk Management' Error Without Data Loss – Qiling
Products
Articles & Tutorials
- Data Recovery
- Data Backup
- File Recovery
- File Backup
- System Backup and Restore
- Disk and Partition Clone
- Technical articles
- Mobile articles
- Disk Master Help
- Windows Data Recovery Tutorials
- Windows Secure Delete Tutorials
- Windows Partition Management Tutorials
- Windows File Backup and Restore Tutorials
- Windows System Backup and Restore Tutorials
- Windows Disk Backup and Restore Tutorials
- Windows Clone Tutorials