Data Recovery Scan Stuck on Windows: Wait, Stop or Retry?
Quick Navigation:
- Understand the Problem
- Check Before Another Recovery Attempt
- Recover With Qiling Deep Data Recovery
- Verify the Recovered Files
- Frequently Asked Questions
A recovery scan that stays at one percentage is not always frozen. The program may be reading a difficult area, analyzing results or waiting on a failing device. The safe response depends on disk activity and hardware symptoms, not on a fixed waiting time.
Understand the Problem
Progress bars often estimate work unevenly. Thousands of small file records can take a different amount of time from a large contiguous area. A large deep scan can therefore appear slow even when it is still progressing.
Repeated read retries are different. A disk that clicks, disappears or reports I/O errors may be deteriorating. Repeated full scans can use up its remaining readable time. When the only copy is valuable, professional imaging may be a better next step.
Check Before Another Recovery Attempt
Check 1. Record what is still changing
Note elapsed time, files found and any error message. Open Task Manager to observe disk activity without running a benchmark or health surface test. Activity can help explain a wait, but by itself does not prove the disk is healthy.
Check 2. Check for physical warning signs
Listen for unusual clicking and watch for Windows disconnection alerts. A steady percentage plus repeated device errors calls for stopping, not an overnight retry. Avoid opening the drive or swapping electronics.
Check 3. Stop through the application first
Use the program's stop or cancel control if available and let it release the device. Do not unplug a disk during active reads or while recovered files are being written. If Windows is unresponsive, seek guidance before forcing a power cycle.
Check 4. Retry only after a specific correction
For a stable external drive with a known cable problem, use a direct port and known-good cable after tasks have stopped. Reopen the program, verify the source and make one controlled attempt. Do not assume an earlier session can resume unless the interface explicitly supports it.
Recover With Qiling Deep Data Recovery
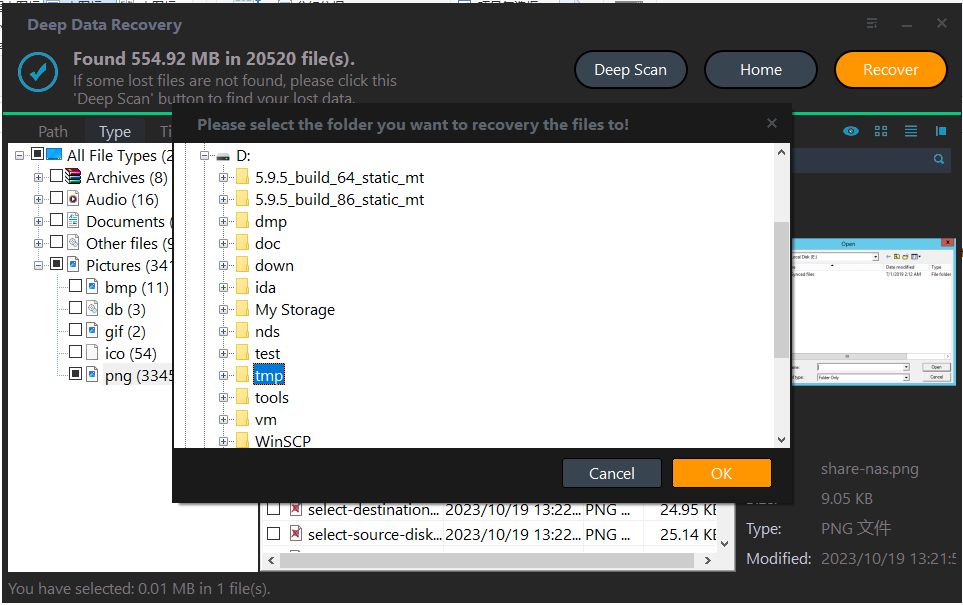
Qiling Deep Data Recovery offers a visual mode chooser, a source-location screen, file results with supported previews and a separate recovery destination dialog. Use this workflow only when Windows can read the source reliably. It does not bypass encryption or guarantee recovery of overwritten data.
The screenshots are examples from the product interface. Their drive letters, file counts and sample selections are not instructions to choose the same disks on your computer. The download is not a promise of unlimited free recovery; check the current edition and license terms.
Step 1. Prepare the Source and a Separate Destination
Stop routine use of the affected device. Check independent backups first, then connect a healthy destination with adequate free space. Download and install Qiling on healthy storage, not the volume holding the missing files. If the system disk is affected, consider another suitable computer or specialist assistance to limit background writes.
Step 2. Choose the Scan Mode for the Original Loss
Choose Fast Scan for a targeted first pass on a healthy deleted-file volume. Use a broader mode only if the loss requires it. A failing drive is not made safer by selecting a different mode.
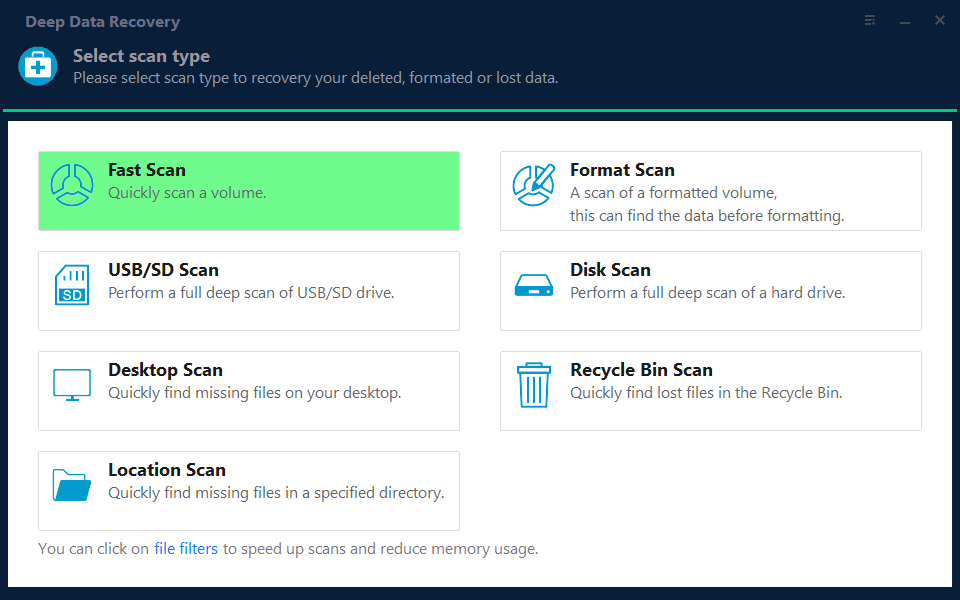
Step 3. Select the Original Source and Start the Scan
Select the confirmed source, not a similarly sized destination. Click Scan, record the initial conditions and keep the computer powered. Avoid running another scanner against the same disk simultaneously.
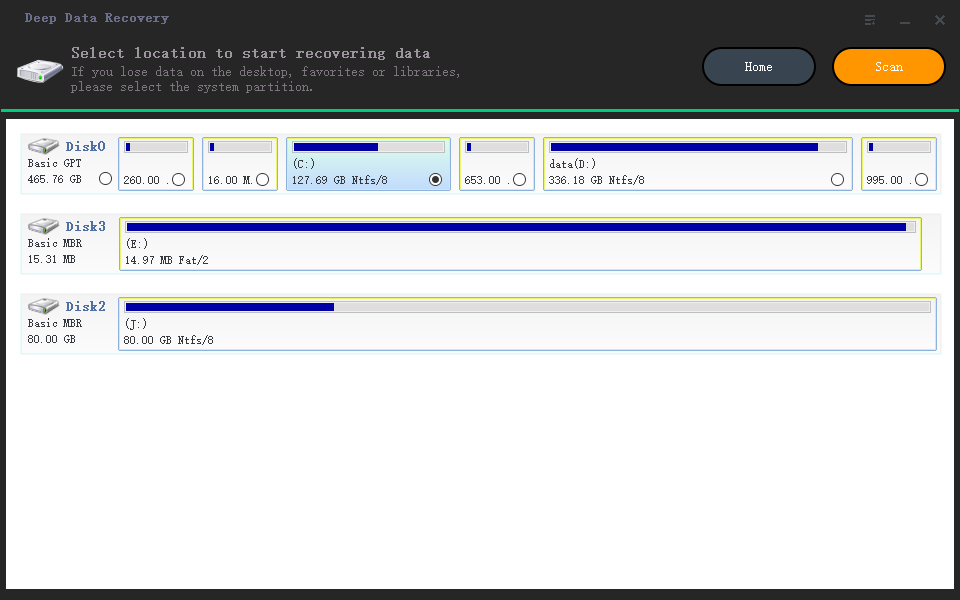
Step 4. Inspect Results and Preview Suitable Candidates
If the pass completes, inspect the important files before considering Deep Scan. Do not launch another full-device read just because the reported total looks smaller than expected.
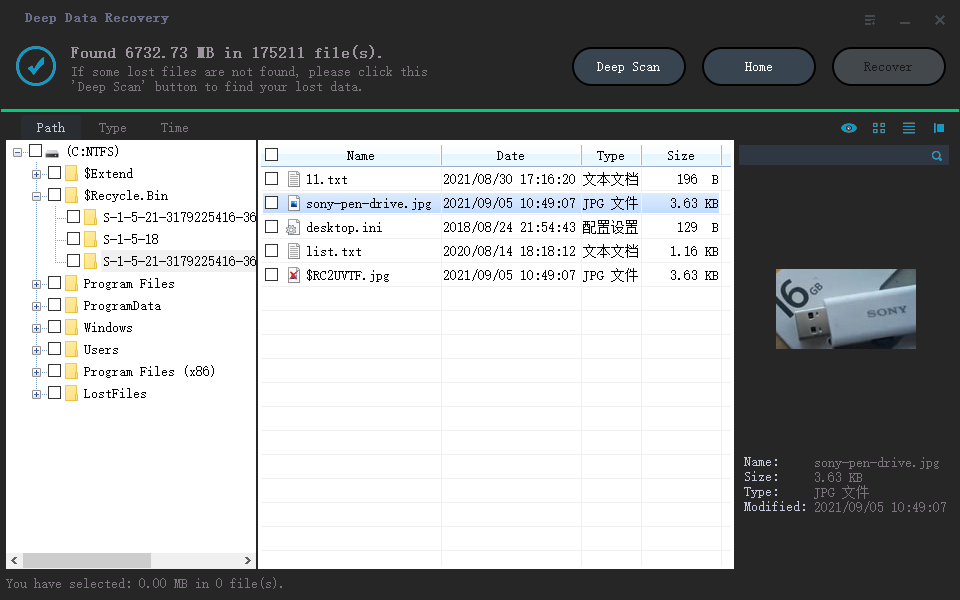
Step 5. Recover to Healthy Independent Storage
Recover the most valuable files first to healthy separate storage. If read errors return during recovery, stop and preserve the disk rather than prioritizing a complete folder tree.
In the destination dialog, choose the intended folder and confirm with OK. Wait for the selected export to finish without disconnecting either device. If an error occurs, record it and keep any incomplete output separate rather than assuming the batch succeeded.
Verify the Recovered Files
Check that recovered files open and contain the required content. A completed progress bar is not a file-integrity test.
Keep notes of the scan stage and hardware errors. They help support distinguish result processing from an unreadable section of the device.
Stop condition: A clicking, repeatedly disconnecting or severely slow disk should not be subjected to repeated scans, benchmarks or repair attempts.
Frequently Asked Questions
How long should I wait at 99 percent?
There is no universal safe interval. Observe changing results and error symptoms. A large stable scan and a failing disk require different decisions.
Will disabling antivirus fix every stalled scan?
No. Do not disable protection broadly. Record any specific security alert and use the vendor's support guidance.
Can Qiling resume the exact same scan after a crash?
Do not assume session persistence. Check the controls and documentation for your installed version before closing or restarting it.
Related Articles
- External Drive Disconnects During Data Recovery: Safe Checks
Check cables, power and hardware symptoms when an external drive disconnects during recovery. Scan only stable storage and save files elsewhere. - Data Recovery Scan Interrupted by Sleep on Windows
Prepare Windows power settings for a recovery scan and check what survived an interruption. Do not assume a lost scan session can resume. - How to Fix Recuva Deep Scan Stuck or Frozen - Qiling
Products
Articles & Tutorials
- Data Recovery
- Data Backup
- File Recovery
- File Backup
- System Backup and Restore
- Disk and Partition Clone
- Technical articles
- Mobile articles
- Disk Master Help
- Windows Data Recovery Tutorials
- Windows Secure Delete Tutorials
- Windows Partition Management Tutorials
- Windows File Backup and Restore Tutorials
- Windows System Backup and Restore Tutorials
- Windows Disk Backup and Restore Tutorials
- Windows Clone Tutorials