External Drive Disconnects During Data Recovery: Safe Checks
Quick Navigation:
- Understand the Problem
- Check Before Another Recovery Attempt
- Recover With Qiling Deep Data Recovery
- Verify the Recovered Files
- Frequently Asked Questions
If an external drive disappears during a recovery scan, the problem is not just a lost progress bar. The source may have lost power, the USB connection may be unreliable, or the storage itself may be failing. Stabilize access before another scan.
Understand the Problem
A removable drive depends on several components: the disk, enclosure, bridge, cable, port and sometimes a separate power supply. A fault anywhere in that chain can interrupt reads. A drive that reconnects under a different letter must be identified again before use.
Repeated disconnects can also indicate an internal fault. Software cannot compensate for a device that cannot stay readable. Important data on a failing disk is a reason to stop and consider professional acquisition, not to cycle power until a scan completes.
Check Before Another Recovery Attempt
Check 1. Stop disk tasks before reconnecting
If the interface still responds, stop the recovery task and allow disk activity to end. Record the error. Avoid pulling the cable while the program is exporting files to the destination.
Check 2. Make one controlled connection check
For a drive without physical warning signs, try a known-good compatible cable and a direct port. Use the correct power adapter for externally powered drives. Do not experiment with unknown adapters or open a sealed disk.
Check 3. Verify identity after reconnection
In Disk Management, inspect model or capacity and partition layout. Cancel any initialize or format prompt. A reappearing drive letter alone is not enough to establish that the original source is accessible.
Check 4. Stop if the failure repeats
If the drive still disappears, has incorrect capacity, becomes unusually hot or clicks, do not keep rescanning it. Preserve the source and consult a recovery specialist. Enclosure changes can also introduce compatibility or encryption issues.
Recover With Qiling Deep Data Recovery
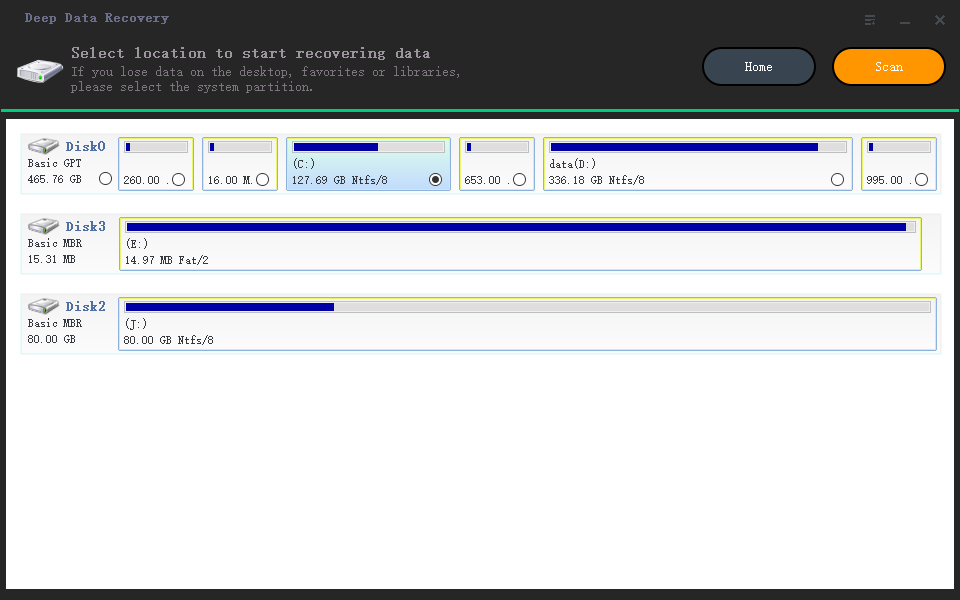
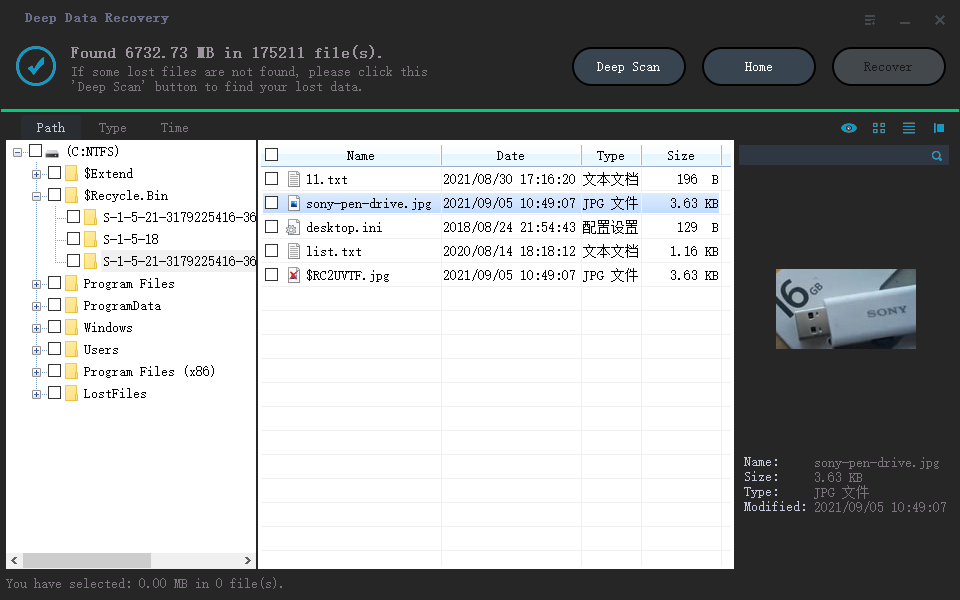
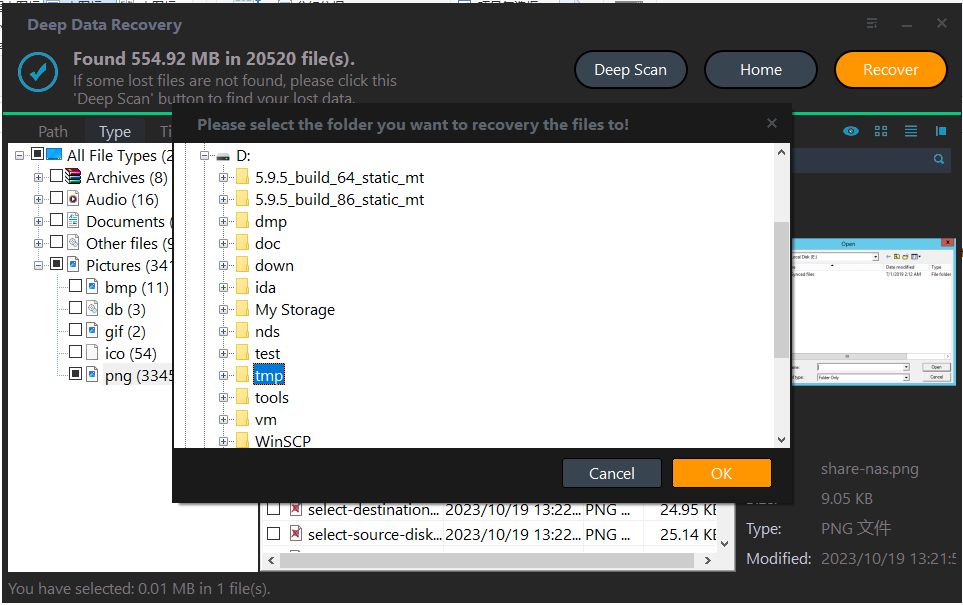
Qiling Deep Data Recovery offers a visual mode chooser, a source-location screen, file results with supported previews and a separate recovery destination dialog. Use this workflow only when Windows can read the source reliably. It does not bypass encryption or guarantee recovery of overwritten data.
The screenshots are examples from the product interface. Their drive letters, file counts and sample selections are not instructions to choose the same disks on your computer. The download is not a promise of unlimited free recovery; check the current edition and license terms.
Step 1. Prepare the Source and a Separate Destination
Stop routine use of the affected device. Check independent backups first, then connect a healthy destination with adequate free space. Download and install Qiling on healthy storage, not the volume holding the missing files. If the system disk is affected, consider another suitable computer or specialist assistance to limit background writes.
Step 2. Choose the Scan Mode for the Original Loss
Only scan after the connection is stable. Use USB/SD Scan for removable-media loss or Fast Scan for a healthy deleted-file volume. A broader scan is not a fix for a disconnecting source.
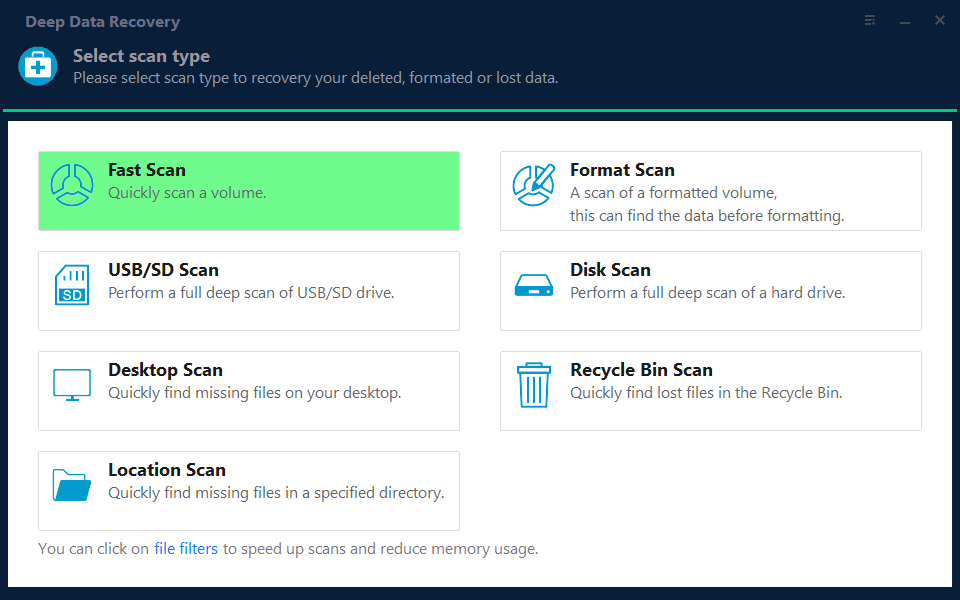
Step 3. Select the Original Source and Start the Scan
Reidentify the original drive by capacity and layout, select it and click Scan. Do not select a new empty device that has inherited the old letter.
Step 4. Inspect Results and Preview Suitable Candidates
If the scan completes without errors, inspect important candidates first. Do not treat an interrupted result list as a complete inventory.
Step 5. Recover to Healthy Independent Storage
Recover a small priority set onto another physical disk. Verify that both the source and destination remain connected throughout the export.
In the destination dialog, choose the intended folder and confirm with OK. Wait for the selected export to finish without disconnecting either device. If an error occurs, record it and keep any incomplete output separate rather than assuming the batch succeeded.
Verify the Recovered Files
Open exported files and check for incomplete documents or truncated video near the time of a disconnection. Keep questionable output separate.
Document the cable and port used for a successful pass. After recovery, replace or investigate the unreliable hardware before using it for storage again.
Stop condition: Stop after repeated disconnects or any mechanical warning sign. Do not run repeated full scans as a stability test.
Frequently Asked Questions
Can a USB hub cause scan interruptions?
It can contribute through power or connection problems. A direct port is a useful controlled check for an otherwise healthy device.
Will the scan continue automatically after reconnection?
Do not assume it. Check the installed software's actual state and reverify the source before starting another task.
Should I remove the disk from its enclosure?
Not as a generic first step. Some enclosures affect encryption or sector presentation, and opening hardware can add risk.
Technical References
Related Articles
- Data Recovery Scan Stuck on Windows: Wait, Stop or Retry?
Diagnose a stalled recovery scan without stressing the source disk. Check progress, read errors and connections before making one controlled retry. - Data Recovery Scan Interrupted by Sleep on Windows
Prepare Windows power settings for a recovery scan and check what survived an interruption. Do not assume a lost scan session can resume. - Recover Files From a Drive With Bad Sectors on Windows
Products
Articles & Tutorials
- Data Recovery
- Data Backup
- File Recovery
- File Backup
- System Backup and Restore
- Disk and Partition Clone
- Technical articles
- Mobile articles
- Disk Master Help
- Windows Data Recovery Tutorials
- Windows Secure Delete Tutorials
- Windows Partition Management Tutorials
- Windows File Backup and Restore Tutorials
- Windows System Backup and Restore Tutorials
- Windows Disk Backup and Restore Tutorials
- Windows Clone Tutorials