Data Recovery Scan Interrupted by Sleep on Windows
Quick Navigation:
- Understand the Problem
- Check Before Another Recovery Attempt
- Recover With Qiling Deep Data Recovery
- Verify the Recovered Files
- Frequently Asked Questions
A laptop going to sleep can interrupt access to an external disk or leave a recovery task in an uncertain state. Before restarting the scan, check whether the program is still running, whether the same source is present and whether any exported files were completed.
Understand the Problem
Screen timeout and system sleep are different. A dark display does not necessarily stop a scan, but sleep can suspend the computer and change device availability on wake. The effect depends on Windows power settings, hardware and the recovery program.
Scan results and recovered files are also different. Results may exist only in the application's current session, whereas exported files are stored on the destination. An interrupted task does not prove either that all work was lost or that every listed output is complete.
Check Before Another Recovery Attempt
Check 1. Inspect the current session first
After waking the PC, read any application message and check whether counters are still changing. Do not start a second scanner against the same source. If it is unresponsive, note its state before closing it.
Check 2. Recheck both devices
Verify the original disk and the destination are still present at their expected capacities. A USB drive may reconnect under another letter. Cancel repair, initialize or format prompts.
Check 3. Prepare power settings for the next attempt
Connect a laptop to reliable AC power. In Windows Settings, open System and the power or battery section, then review the plugged-in sleep timeout. Temporarily prevent sleep for the task if policy permits; do not change managed settings or unrelated advanced controls.
Check 4. Separate completed and partial output
Open destination files that were saved before the interruption. Use a new folder for a retry so uncertain partial files are not silently overwritten. Restore ordinary power-saving settings when recovery is finished.
Recover With Qiling Deep Data Recovery
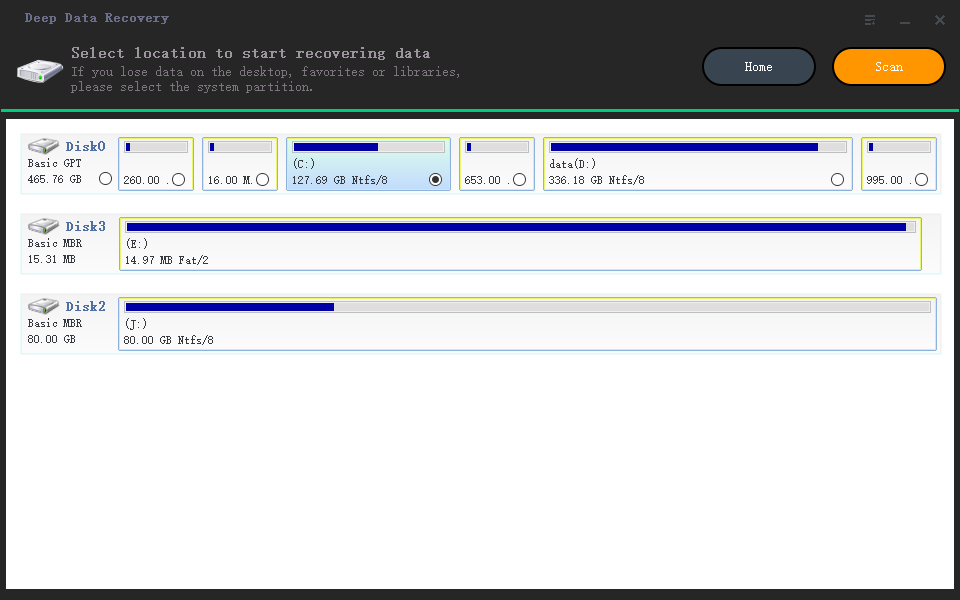
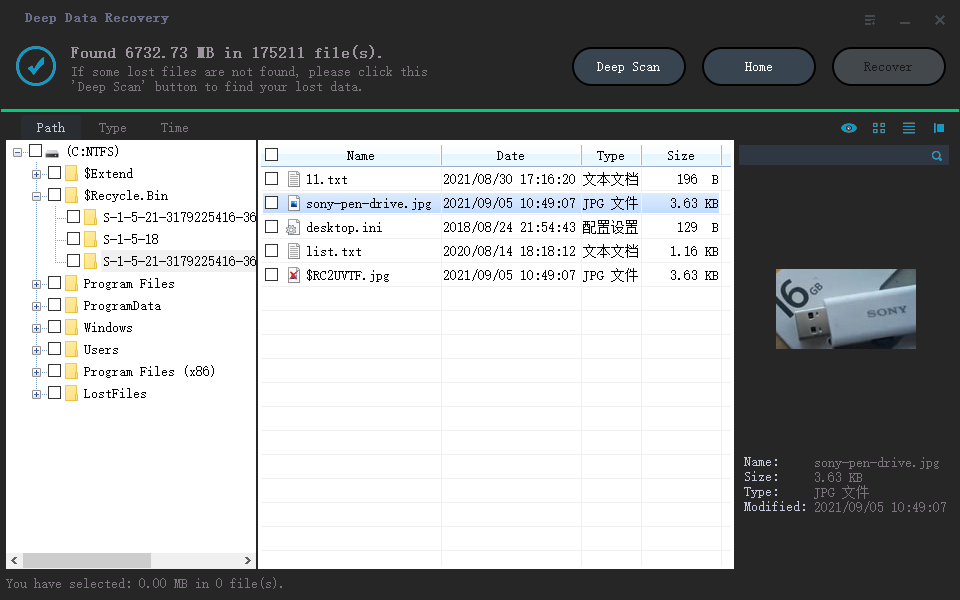
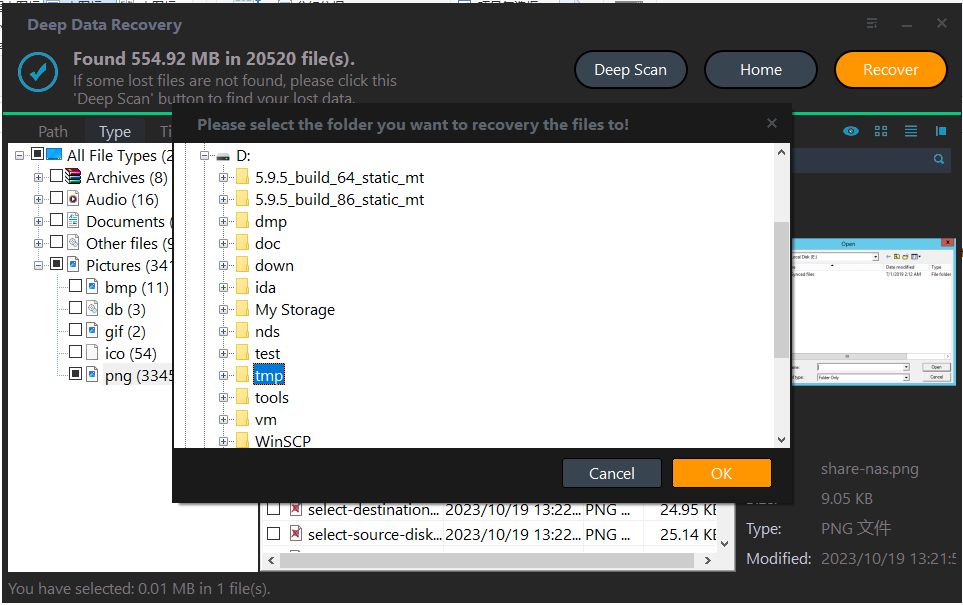
Qiling Deep Data Recovery offers a visual mode chooser, a source-location screen, file results with supported previews and a separate recovery destination dialog. Use this workflow only when Windows can read the source reliably. It does not bypass encryption or guarantee recovery of overwritten data.
The screenshots are examples from the product interface. Their drive letters, file counts and sample selections are not instructions to choose the same disks on your computer. The download is not a promise of unlimited free recovery; check the current edition and license terms.
Step 1. Prepare the Source and a Separate Destination
Stop routine use of the affected device. Check independent backups first, then connect a healthy destination with adequate free space. Download and install Qiling on healthy storage, not the volume holding the missing files. If the system disk is affected, consider another suitable computer or specialist assistance to limit background writes.
Step 2. Choose the Scan Mode for the Original Loss
If a new scan is needed, select the mode for the loss, not for the power interruption. Fast Scan fits ordinary deletion on a stable volume; USB/SD Scan or Format Scan may fit other source histories.
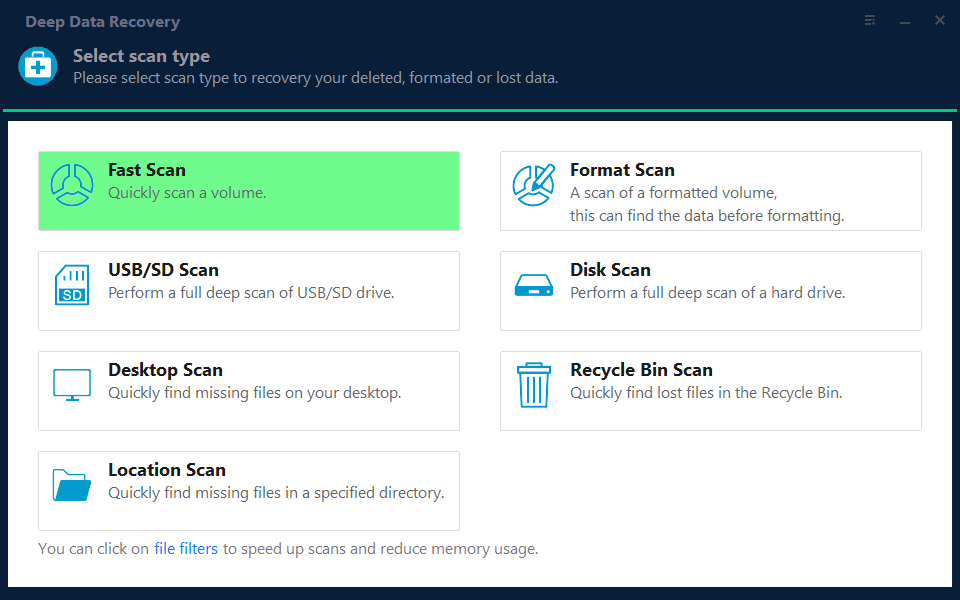
Step 3. Select the Original Source and Start the Scan
Reconfirm the source's capacity and layout, select it and click Scan. Keep the lid open unless your known power policy allows closed-lid operation without sleep.
Step 4. Inspect Results and Preview Suitable Candidates
Inspect completed results and preview important candidates. Only use a session-resume feature if it is explicitly present and supported by your installed version.
Step 5. Recover to Healthy Independent Storage
Click Recover and select a separate physical destination disk. Keep power stable until the export completes and verify the last files in the batch.
In the destination dialog, choose the intended folder and confirm with OK. Wait for the selected export to finish without disconnecting either device. If an error occurs, record it and keep any incomplete output separate rather than assuming the batch succeeded.
Verify the Recovered Files
Check large files beyond their opening section. A file created just before sleep may be only partially written even if Explorer shows a plausible name.
Keep a short record of the completed batch, then restore your usual sleep policy. Do not leave the source connected for routine use before you have secured the data.
Stop condition: If the disk itself now disconnects or reports read errors, address that problem separately. Power settings do not repair failing hardware.
Frequently Asked Questions
Does turning off the screen stop recovery?
Not necessarily. Display timeout and system sleep are separate settings. Check the actual sleep behavior.
Can I count on resuming after reboot?
No. Session recovery is version-dependent. Do not close the program assuming its results have been saved.
Should I change every USB power setting?
No. Start with clear sleep and connection checks. Broad driver or power changes add complexity and may not address the cause.
Related Articles
- External Drive Disconnects During Data Recovery: Safe Checks
Check cables, power and hardware symptoms when an external drive disconnects during recovery. Scan only stable storage and save files elsewhere. - Data Recovery Scan Stuck on Windows: Wait, Stop or Retry?
Diagnose a stalled recovery scan without stressing the source disk. Check progress, read errors and connections before making one controlled retry. - How Long Does It Take | 1 TB Data Recovery (3 Steps) - Qiling
Products
Articles & Tutorials
- Data Recovery
- Data Backup
- File Recovery
- File Backup
- System Backup and Restore
- Disk and Partition Clone
- Technical articles
- Mobile articles
- Disk Master Help
- Windows Data Recovery Tutorials
- Windows Secure Delete Tutorials
- Windows Partition Management Tutorials
- Windows File Backup and Restore Tutorials
- Windows System Backup and Restore Tutorials
- Windows Disk Backup and Restore Tutorials
- Windows Clone Tutorials