Deep Data Recovery Software: Which Scan Mode Should You Choose?
Quick Navigation:
- Match the Mode to the Problem
- Before You Scan
- Use a Mode and Review the Results
- Choosing the Next Mode
- Frequently Asked Questions
Choosing the wrong scan mode wastes time and can make results harder to interpret. Deep Data Recovery provides different entry points for local deletion, Recycle Bin loss, formatted volumes, and removable drives.
Match the Mode to the Problem
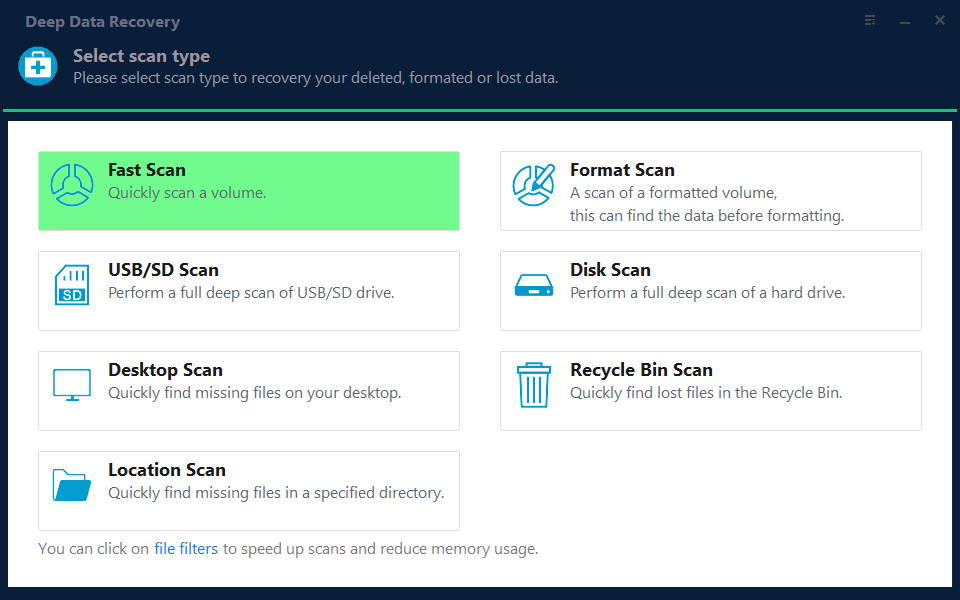
Fast Scan is the first option for a recently deleted file on a healthy volume. Recycle Bin Scan targets files removed from the bin; Desktop Scan and Location Scan narrow the search when the missing file's previous location is known.
Format Scan is intended for a formatted volume. USB/SD Scan is for a flash drive or memory card, while Disk Scan searches a hard drive more broadly. These choices do not guarantee recovery; they decide where and how the search begins.
Before You Scan
Identify the original device and make sure it is still detectable in Windows. For RAW or unallocated media, do not initialize or format it merely to make the device appear in File Explorer.
Check backups first and reserve another physical drive for recovered output. If the source is making clicking sounds or disconnecting, avoid a long software scan and seek hardware assistance.
Use a Mode and Review the Results
Qiling Deep Data Recovery provides the scan modes shown below. The mode in Step 2 is chosen for this specific loss scenario; it does not change the need for a separate recovery destination.
Step 1. Install the Recovery Tool Safely
Download Deep Data Recovery to a healthy disk that is not the source of the loss. Connect a second disk to store results.
Step 2. Choose the Matching Mode
Read the mode labels on the first screen. Select Fast Scan for recent local deletion, Recycle Bin Scan for emptied-bin files, Format Scan for formatting, USB/SD Scan for removable media, or Disk Scan for a broad disk search.
Step 3. Check the Source Location
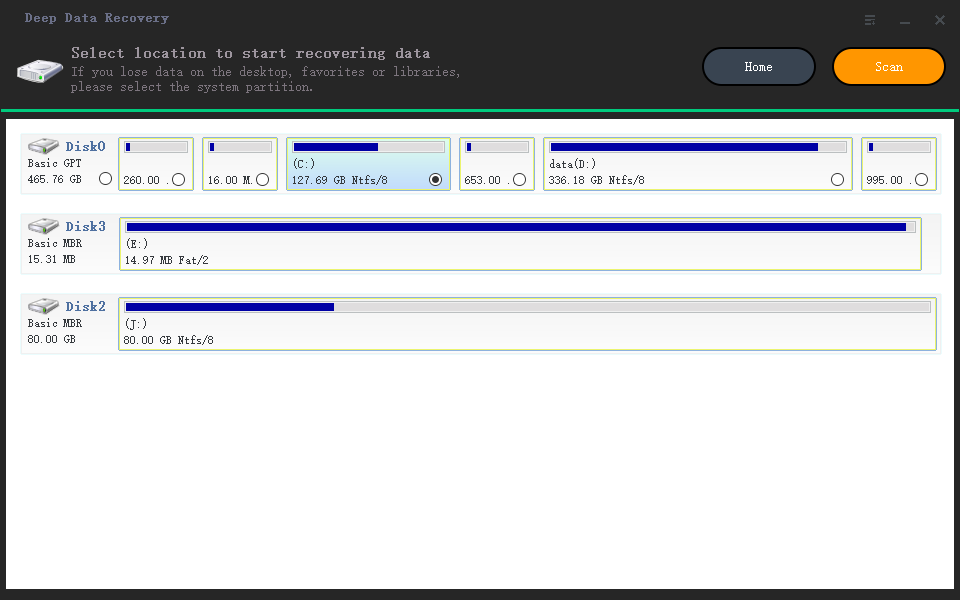
If a location screen appears, choose the original device by capacity and label. Confirm that the selected device is not your recovery destination, then click Scan.
Step 4. Preview Before Recovering
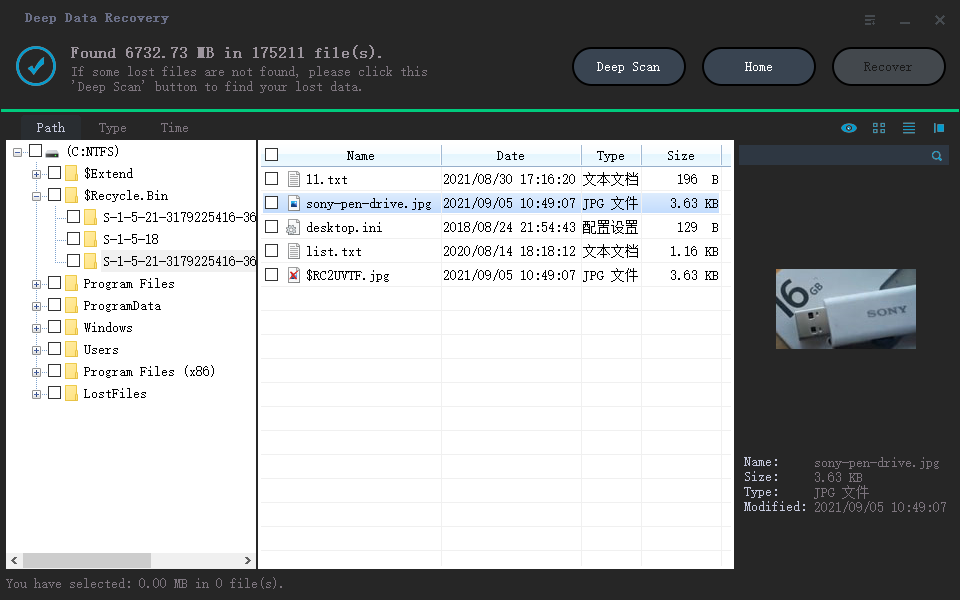
Review names, folders, file types, and previews. The Deep Scan option in the results view can be tried if the initial scan missed files, but it may take longer and show more unnamed items.
Step 5. Save Outside the Source
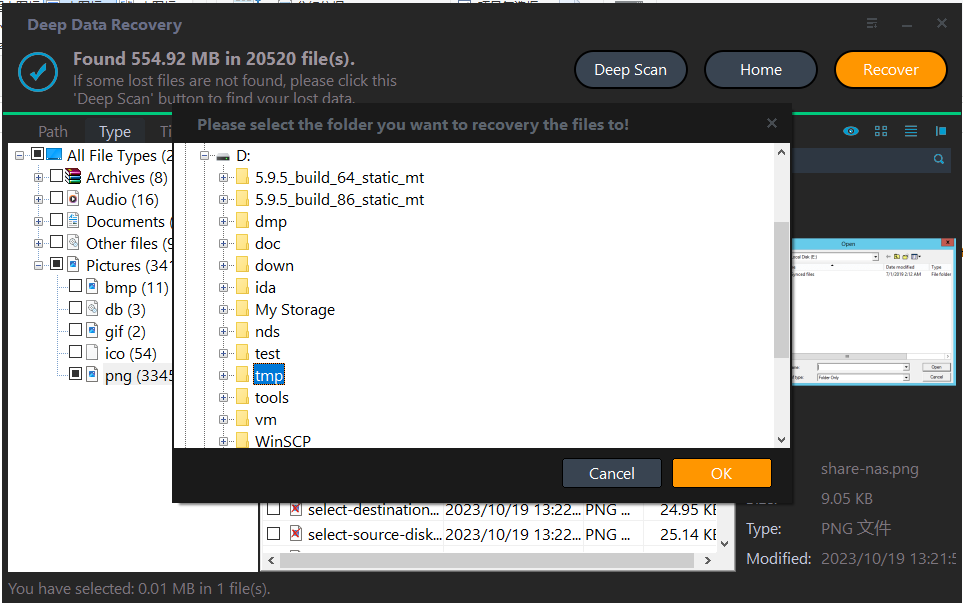
Select only the relevant files, click Recover, and browse to a folder on the separate disk. Open a sample of saved files to check quality.
Choosing the Next Mode
If you scanned the wrong location, go back and select the original physical device before trying another mode. If a quick scan was incomplete, a deeper scan is reasonable; repeated identical scans without changing the condition will not recover overwritten data.
Keep recovery files organized by device and date. Do not repair the file system or reuse a formatted card until you have checked the recovered copies.
Frequently Asked Questions
Should I run every scan mode?
No. Start with the mode that matches the loss, then use a deeper scan if the first results are incomplete.
Can a mode repair a physically damaged disk?
No. Recovery software scans readable media; clicking or unstable hardware needs a different approach.
Related Articles
- Recover an NTFS Partition
- RAW USB Drive Recovery
- Recover Files After Emptying Recycle Bin
An emptied bin calls for a different starting point than a formatted USB drive.
Products
Articles & Tutorials
- Data Recovery
- Data Backup
- File Recovery
- File Backup
- System Backup and Restore
- Disk and Partition Clone
- Technical articles
- Mobile articles
- Disk Master Help
- Windows Data Recovery Tutorials
- Windows Secure Delete Tutorials
- Windows Partition Management Tutorials
- Windows File Backup and Restore Tutorials
- Windows System Backup and Restore Tutorials
- Windows Disk Backup and Restore Tutorials
- Windows Clone Tutorials