Duplicate Files in Data Recovery Results: Which Copy to Keep
Quick Navigation:
- Understand the Problem
- Check Before Another Recovery Attempt
- Recover With Qiling Deep Data Recovery
- Verify the Recovered Files
- Frequently Asked Questions
Two recovery results with the same name are not necessarily the same file. They may be different revisions, a thumbnail and a full-size photo, or two methods identifying the same content. Compare recovered copies before discarding anything.
Understand the Problem
A damaged disk can retain traces of several versions of a file. A scan may also present candidates through both surviving folder information and content-based detection. Those paths describe how a result was found, not which version you should trust.
Photos deserve special care: an embedded thumbnail can resemble the original while containing far fewer pixels. A quick glance at a preview is not enough. For working documents, an older version can be valid but still miss the latest edits.
Check Before Another Recovery Attempt
Check 1. Preserve candidate identity
Make a note of the result path, size and any date for each candidate. Recover groups into separate folders named for the scan or result category. Do not choose overwrite when comparing versions with the same filename.
Check 2. Compare the useful content
Check image dimensions and inspect detail at full resolution. Open documents and look for the latest known edits. For video, compare duration and play sections near the end, not just the opening frame.
Check 3. Use hashes for byte-identical copies
On recovered copies stored on a healthy disk, PowerShell Get-FileHash can calculate SHA256 values. Matching hashes are strong evidence that the compared files contain the same bytes, but do not prove either copy is undamaged without a known-good reference.
Check 4. Delay cleanup until the recovery is secure
Keep distinct working revisions until the owner chooses the desired one. Back up the verified set before removing redundant destination copies. Do not run a duplicate cleaner on the affected source during recovery.
Recover With Qiling Deep Data Recovery
Qiling Deep Data Recovery offers a visual mode chooser, a source-location screen, file results with supported previews and a separate recovery destination dialog. Use this workflow only when Windows can read the source reliably. It does not bypass encryption or guarantee recovery of overwritten data.
The screenshots are examples from the product interface. Their drive letters, file counts and sample selections are not instructions to choose the same disks on your computer. The download is not a promise of unlimited free recovery; check the current edition and license terms.
Step 1. Prepare the Source and a Separate Destination
Stop routine use of the affected device. Check independent backups first, then connect a healthy destination with adequate free space. Download and install Qiling on healthy storage, not the volume holding the missing files. If the system disk is affected, consider another suitable computer or specialist assistance to limit background writes.
Step 2. Choose the Scan Mode for the Original Loss
Choose the mode appropriate to the loss. Multiple candidates can appear after either a fast or deeper search; there is no need to rescan just to make the list shorter.
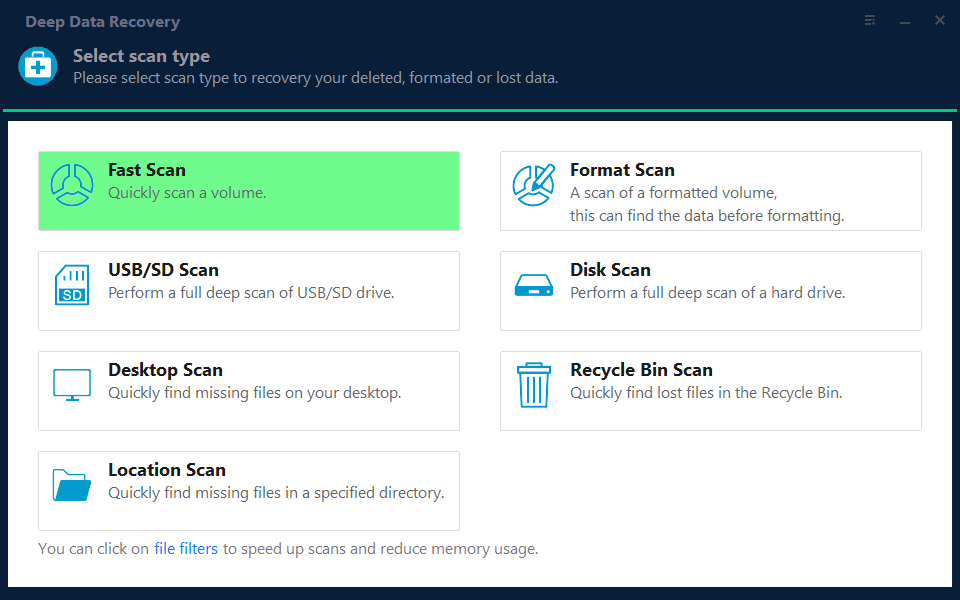
Step 3. Select the Original Source and Start the Scan
Choose the original storage location and click Scan. Avoid scanning the recovery destination, which would mix exported copies with the source results.
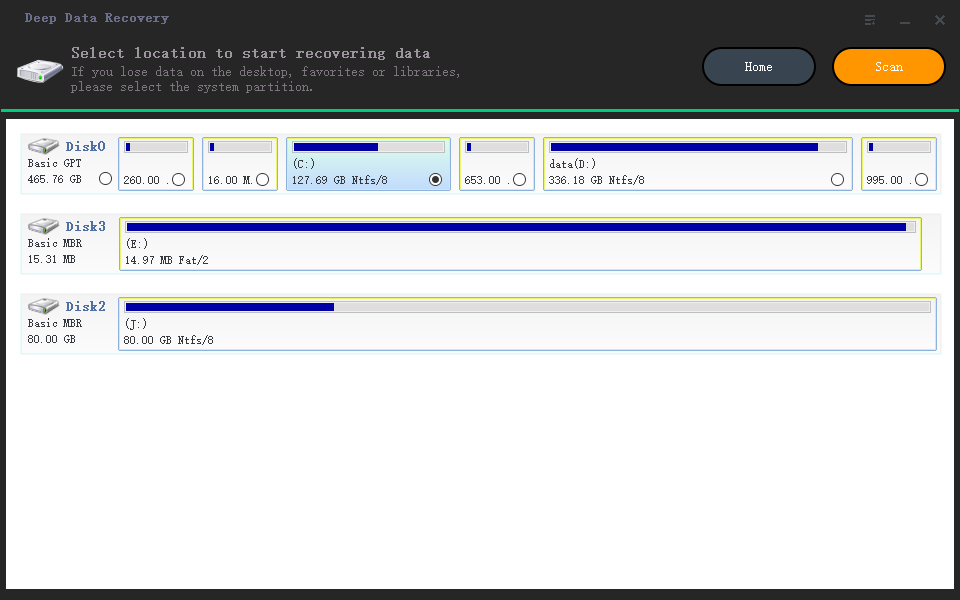
Step 4. Inspect Results and Preview Suitable Candidates
Inspect Path and Type views. Note candidates that look alike but have different sizes or dates. Tick a manageable comparison set instead of relying on a filename-only decision.
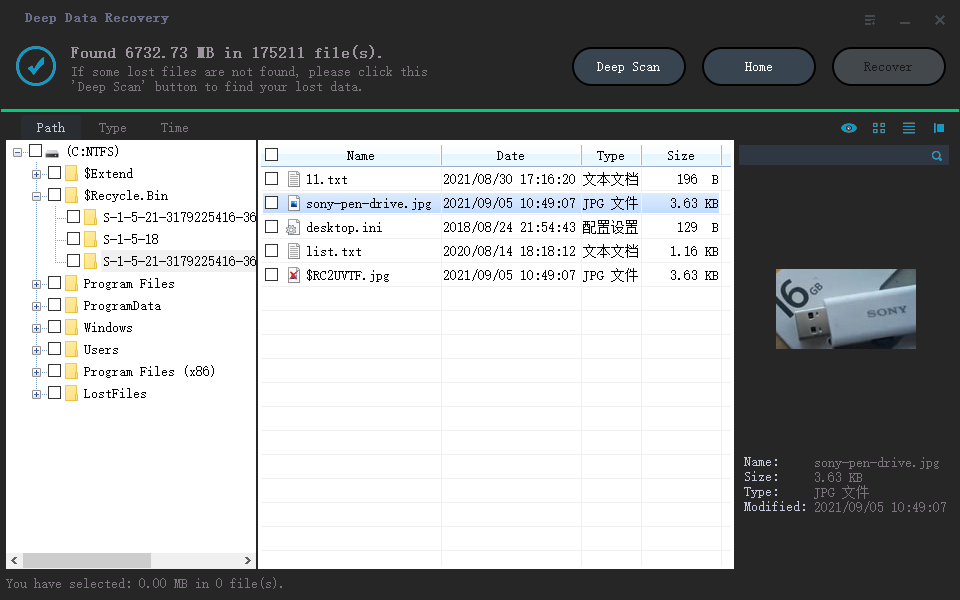
Step 5. Recover to Healthy Independent Storage
Click Recover and save each comparison group on a separate physical disk. Use separate folders to preserve equal names until their content has been checked.
In the destination dialog, choose the intended folder and confirm with OK. Wait for the selected export to finish without disconnecting either device. If an error occurs, record it and keep any incomplete output separate rather than assuming the batch succeeded.
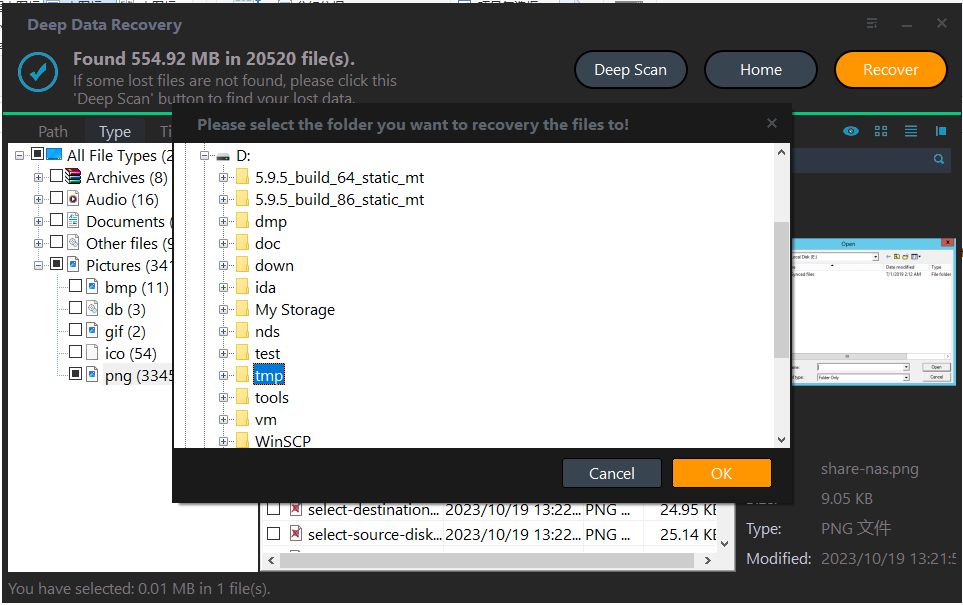
Verify the Recovered Files
After comparing copies, keep a verified master set and at least one backup. Do not discard a large original merely because a smaller preview opens faster.
If two hashes differ, inspect the content. A harmless metadata change and a damaged byte both produce different hashes.
Stop condition: Do not delete candidates automatically by name, date or thumbnail. A cleanup tool can remove the only usable revision.
Frequently Asked Questions
Are two matching filenames enough to declare a duplicate?
No. Files with the same name can be different versions or different content from separate folders.
Is the biggest recovered image always best?
No. Compare dimensions and visual detail. An oversized corrupt candidate can be less useful than a smaller intact original.
Should I scan again to remove duplicates?
No. Duplication in results is a selection problem. Compare safely exported files before deciding whether more scanning is necessary.
Technical References
Related Articles
- Recovered Files Have the Wrong Date: Check Content First
Understand changed timestamps after file recovery. Compare content, document revisions and photo metadata before sorting or rejecting recovered files. - Recovered Files Have the Wrong Size: How to Check Them
Learn why recovery results can show zero-byte, oversized or truncated files. Compare candidates and validate safe copies before trusting a size label. - 2022 Tips| Full Recovery of Files And Folder Structure - Qiling
Products
Articles & Tutorials
- Data Recovery
- Data Backup
- File Recovery
- File Backup
- System Backup and Restore
- Disk and Partition Clone
- Technical articles
- Mobile articles
- Disk Master Help
- Windows Data Recovery Tutorials
- Windows Secure Delete Tutorials
- Windows Partition Management Tutorials
- Windows File Backup and Restore Tutorials
- Windows System Backup and Restore Tutorials
- Windows Disk Backup and Restore Tutorials
- Windows Clone Tutorials