Recover Deleted Obsidian Vault Notes on Windows
Quick Navigation:
- Understand What Is Missing
- Check Existing Copies First
- Recover Readable Local Files
- Validate the Result
- Frequently Asked Questions
A vault can contain Markdown notes, attachments and configuration files. Restoring only text can leave image links and other references unresolved.
Stop unnecessary writes to the affected storage. Do not reinstall applications, clear caches or create replacement files before checking existing copies. This guide concerns recovery you are authorized to perform, and does not promise access to someone else's account or unavailable cloud data.
Understand What Is Missing
Identify the exact missing item, its last known location and whether it was ever saved locally. Record the approximate name, extension and last usable version. A shortcut, project reference or online listing may point to content stored somewhere else.
Distinguish content recovery from repairing a damaged application or restoring its account. A local scanner reads available storage; it does not reconstruct bytes that were never written, decrypt data without valid credentials or reverse confirmed overwriting.
Check Existing Copies First
Check the vault's trash location, any sync history and the File recovery core plugin if it was enabled. Copy useful snapshot content to healthy storage before changing the vault.
Compare any available copy before returning it to active use. Save valuable recovered or downloaded versions on healthy independent storage while the original disk is being preserved. If several candidates exist, keep them in separate folders rather than overwriting one with another.
If the device clicks, reports zero capacity, repeatedly disconnects or produces worsening read errors, stop DIY scanning. Professional recovery may be more appropriate for the only valuable copy. Do not initialize, format or run source-changing repair commands as a prerequisite.
Recover Readable Local Files
Qiling Deep Data Recovery can be used to attempt recovery of readable local files on supported storage. The workflow below uses the actual mode, location, result and destination screens. It is not a claim of dedicated support for every application format, database or cloud service.
Step 1. Prepare Healthy Storage and Install Away From the Source
Connect another physical disk with sufficient free space. Download and install the software on healthy storage, not the volume holding the missing files. If the Windows system volume is affected, consider another suitable computer or specialist help to reduce background writes. Check current license terms; a free download does not imply unlimited free recovery.
Step 2. Choose the Mode That Matches the Loss
For an ordinary deleted file on a healthy Windows volume, start with Fast Scan. Use Format Scan only if formatting occurred, or USB/SD Scan for relevant removable-device loss. Selecting a different mode cannot create a missing application session or retrieve cloud-only content.
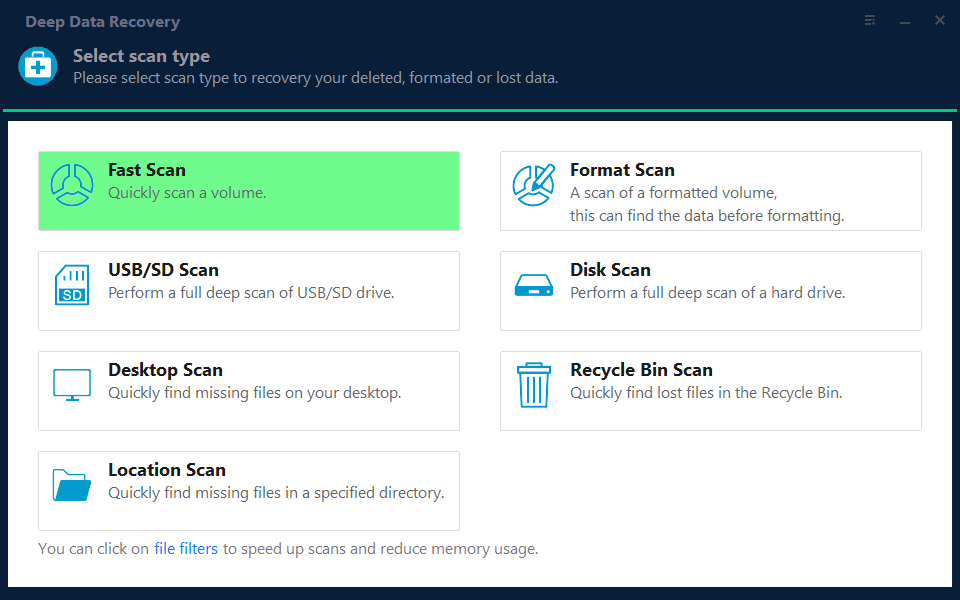
Step 3. Select the Original Disk or Volume and Click Scan
Match the source by capacity, label and partition layout, not solely by its current drive letter. Select the location that actually held the missing content, then click Scan. Do not select the separate recovery destination. Cancel initialization or formatting prompts if the source is unreadable.
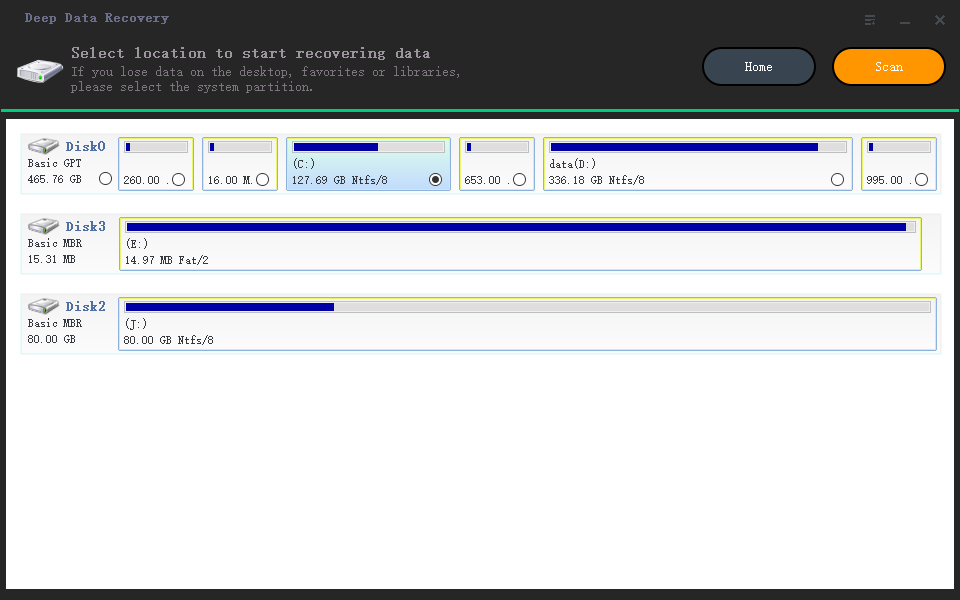
Step 4. Inspect Candidates Before Exporting Them
Review Path and Type views, clear overly narrow filters and compare plausible sizes. Preview supported formats, but do not expect every project or container to render in the preview pane. On stable storage, the visible Deep Scan control can provide a broader search when the first pass is insufficient. A longer scan still cannot reverse overwriting.
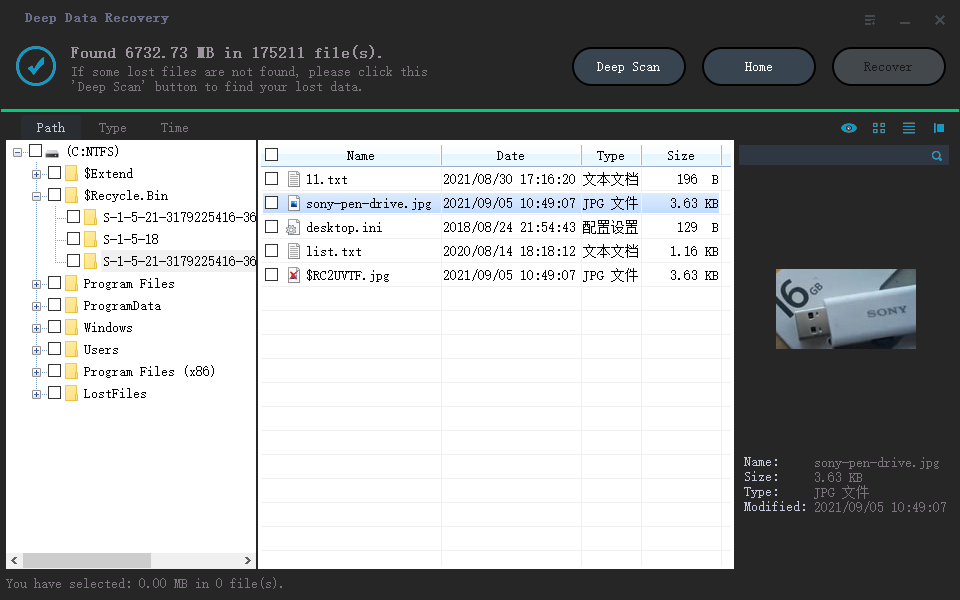
Step 5. Recover to the Independent Disk
Tick the important candidates and click Recover. In the destination dialog, choose a new folder on the healthy separate physical disk and confirm with OK. Keep alternate versions separate. Wait for the selected export to finish without disconnecting either device, and record any error instead of assuming every output is complete.
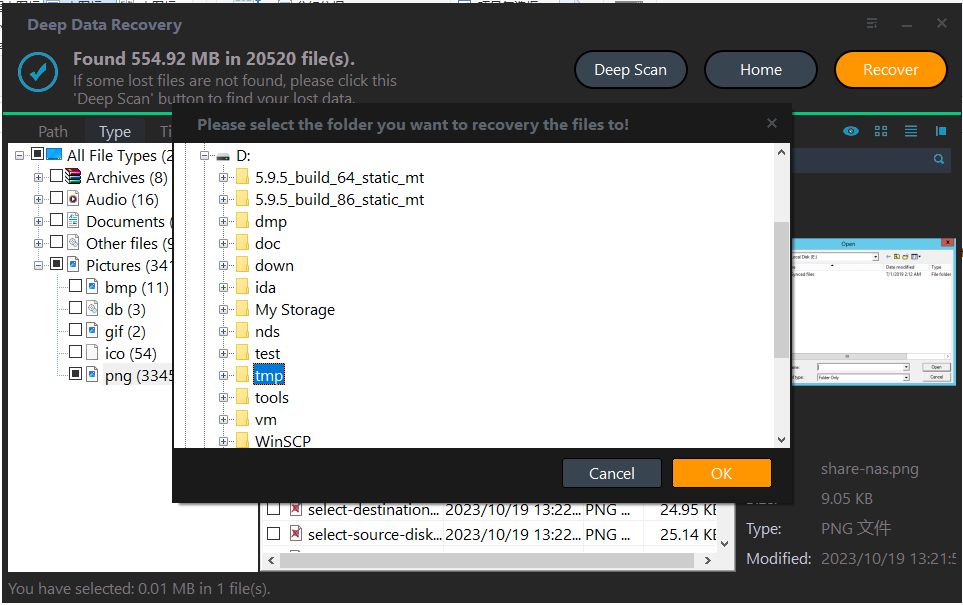
The screenshots contain example disks and files, not selections to copy on your computer. Device letters, capacities and file totals will differ.
Validate the Result
Recover notes with their attachments and preserve relative folder names where possible. Open a recovered vault copy separately and test links, embedded images and the latest edits.
Open a duplicate with the appropriate application and inspect the content you need, not merely the filename. For documents, check later sections; for media, check duration and later frames; for projects, inspect referenced files. Keep the unmodified recovery output and back up the verified set before editing or reorganizing it.
Frequently Asked Questions
Does finding the vault folder prove every note is intact?
No. Inspect the important notes and their referenced attachments individually.
Should I save recovered candidates back to their original folder?
No. Export to a separate physical disk first. New writes to the affected volume can overwrite data that is still recoverable. A different folder on that same volume is not a safe substitute.
Does a listed file prove the recovery succeeded?
No. A result is a candidate until its exported contents are verified. Missing dependencies, partial data and old versions can all produce plausible names without the required usable content.
Technical Reference
Related Articles
Products
Articles & Tutorials
- Data Recovery
- Data Backup
- File Recovery
- File Backup
- System Backup and Restore
- Disk and Partition Clone
- Technical articles
- Mobile articles
- Disk Master Help
- Windows Data Recovery Tutorials
- Windows Secure Delete Tutorials
- Windows Partition Management Tutorials
- Windows File Backup and Restore Tutorials
- Windows System Backup and Restore Tutorials
- Windows Disk Backup and Restore Tutorials
- Windows Clone Tutorials