Cannot Preview Files in Data Recovery Software: Next Steps
Quick Navigation:
- Understand the Problem
- Check Before Another Recovery Attempt
- Recover With Qiling Deep Data Recovery
- Verify the Recovered Files
- Frequently Asked Questions
A blank preview is useful evidence, but it is not a final verdict. Some formats need their original application, while other candidates really are incomplete. Recovering a small sample to safe storage is the practical way to tell those situations apart.
Understand the Problem
A recovery program's preview window is not a replacement for every specialist application. An archive, database or CAD project may not render like a JPEG even when its bytes are intact. Password-protected files also need their original credentials.
The reverse is also true: a thumbnail or first page may work even when later content is damaged. Recovery success means the required content is usable in its normal workflow, not merely that a preview appears.
Check Before Another Recovery Attempt
Check 1. Identify the exact format
Show filename extensions in File Explorer for healthy comparison files. Confirm whether the candidate is a document, an archive, a project or just a thumbnail. Do not change an extension merely to force a preview.
Check 2. Inspect the candidate before selecting it
Compare its size, visible path and likely date with what you remember. A tiny image may be an embedded preview rather than the full photograph. Keep different plausible candidates instead of assuming the first result is correct.
Check 3. Recover one sample outside the source
Choose a healthy physical destination disk and recover the candidate there. Do not export it onto the affected volume. Work on a copy when testing an unfamiliar format.
Check 4. Test with the appropriate application
Open the recovered copy using a compatible version of the original program. Supply legitimate passwords when required. If the application reports corruption, preserve the untouched recovered file before attempting format-specific repair.
Recover With Qiling Deep Data Recovery
Qiling Deep Data Recovery offers a visual mode chooser, a source-location screen, file results with supported previews and a separate recovery destination dialog. Use this workflow only when Windows can read the source reliably. It does not bypass encryption or guarantee recovery of overwritten data.
The screenshots are examples from the product interface. Their drive letters, file counts and sample selections are not instructions to choose the same disks on your computer. The download is not a promise of unlimited free recovery; check the current edition and license terms.
Step 1. Prepare the Source and a Separate Destination
Stop routine use of the affected device. Check independent backups first, then connect a healthy destination with adequate free space. Download and install Qiling on healthy storage, not the volume holding the missing files. If the system disk is affected, consider another suitable computer or specialist assistance to limit background writes.
Step 2. Choose the Scan Mode for the Original Loss
Select the mode for the original loss: Fast Scan for ordinary deletion, Format Scan after formatting, or USB/SD Scan for removable media. There is no special mode that guarantees every file type will preview.
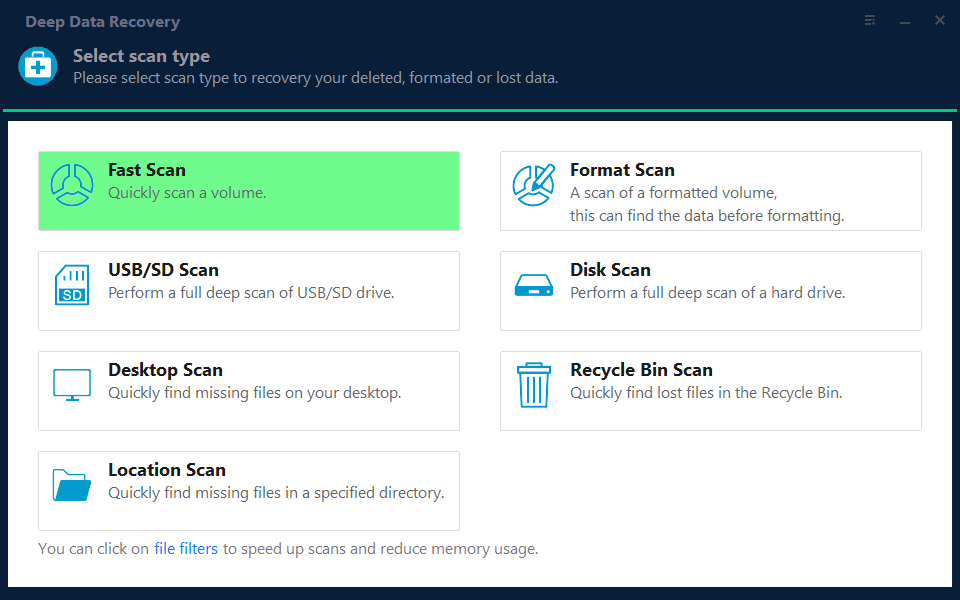
Step 3. Select the Original Source and Start the Scan
Select the disk where the original file was stored and click Scan. A cloud-only placeholder or a project reference may not contain the content you expect on that device.
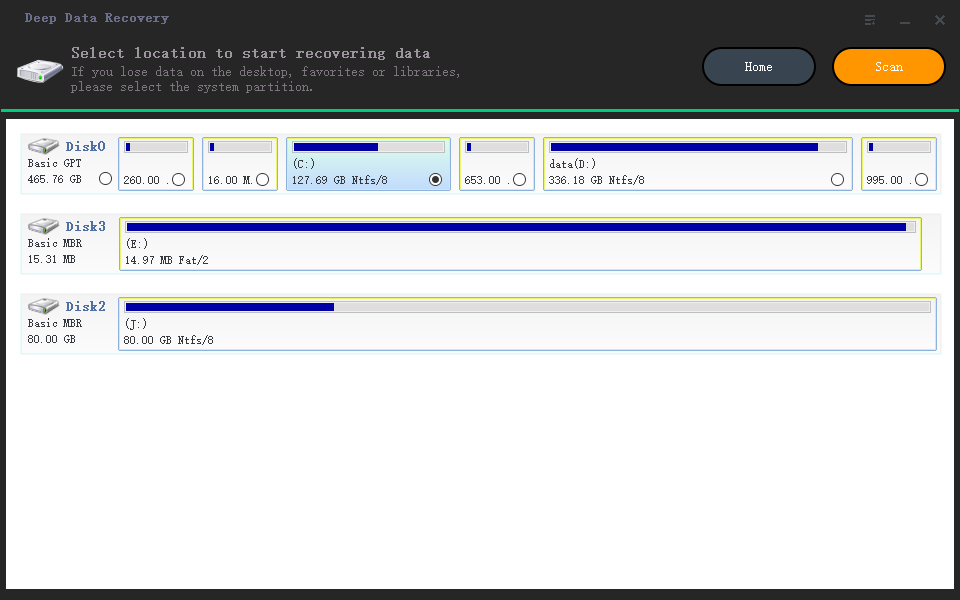
Step 4. Inspect Results and Preview Suitable Candidates
Click a candidate in the results and inspect any available preview. If a format has no preview, use size and path to select a small test set rather than dismissing the entire scan.
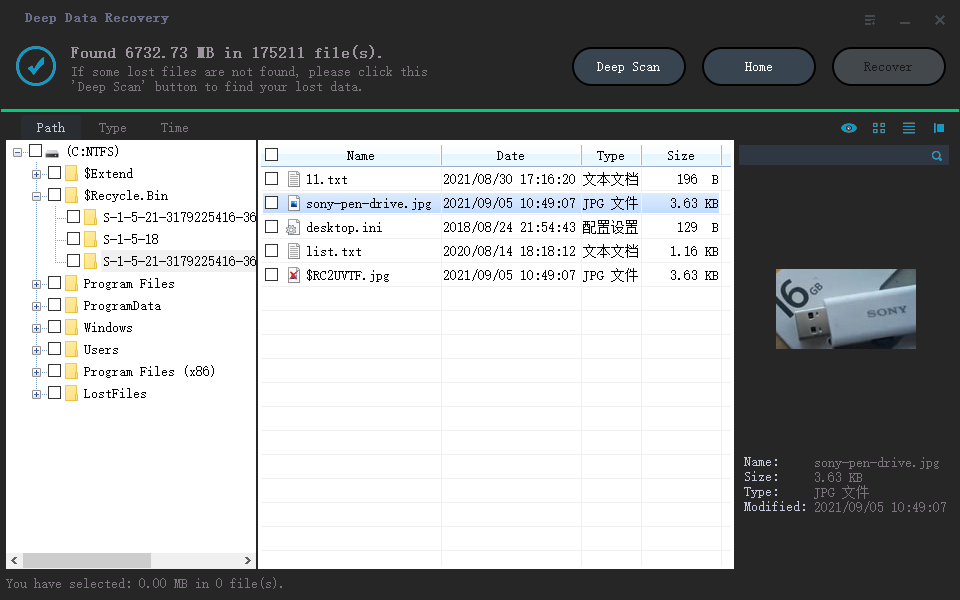
Step 5. Recover to Healthy Independent Storage
Tick the sample candidates, click Recover, choose a folder on a different physical disk and confirm with OK. Keep alternate versions in different folders for comparison.
In the destination dialog, choose the intended folder and confirm with OK. Wait for the selected export to finish without disconnecting either device. If an error occurs, record it and keep any incomplete output separate rather than assuming the batch succeeded.
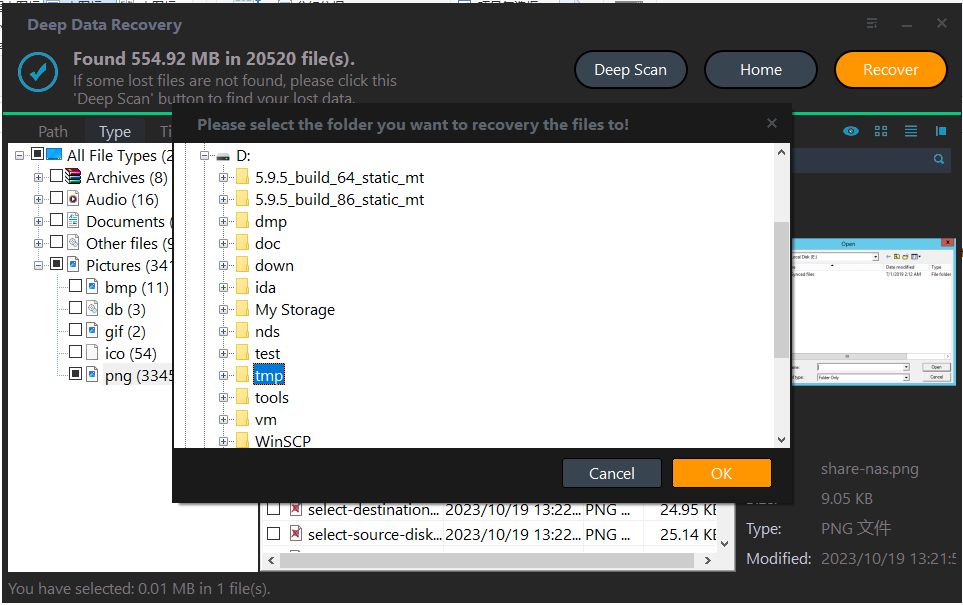
Verify the Recovered Files
Open a document beyond its first page, examine full-resolution photos, and check that a project resolves its dependencies. Test recovered archives rather than relying only on their member lists.
If no candidate opens correctly, check backups or another intact version. Do not describe recovery software as a guaranteed repair tool for overwritten or missing content.
Stop condition: Stop repeated scans if the source develops physical errors. Never repair the only recovered copy in place.
Frequently Asked Questions
Does no preview mean I must buy a license first?
Not necessarily. Check the edition's current preview and recovery terms. A missing preview can reflect a format limitation or damaged data.
Can an image preview hide missing detail?
Yes. A preview may show only a thumbnail or a readable part. Check the recovered full-resolution file.
Should I rename a recovered file until it opens?
No. Changing a name does not rebuild its contents. Identify the actual format and test a copy with suitable software.
Related Articles
- Recovered Files Have the Wrong Size: How to Check Them
Learn why recovery results can show zero-byte, oversized or truncated files. Compare candidates and validate safe copies before trusting a size label. - Recovered Video Only Plays a Few Seconds: What It Means
A recovered video may open yet be incomplete. Check duration, later scenes and alternate candidates before attempting repairs on a separate copy. - Solutions to Recovered Files Not Opening - Qiling
Products
Articles & Tutorials
- Data Recovery
- Data Backup
- File Recovery
- File Backup
- System Backup and Restore
- Disk and Partition Clone
- Technical articles
- Mobile articles
- Disk Master Help
- Windows Data Recovery Tutorials
- Windows Secure Delete Tutorials
- Windows Partition Management Tutorials
- Windows File Backup and Restore Tutorials
- Windows System Backup and Restore Tutorials
- Windows Disk Backup and Restore Tutorials
- Windows Clone Tutorials