Recover Files From a $RECYCLE.BIN SID Folder on Windows
Quick Navigation:
- Understand the Problem
- Check Before Another Recovery Attempt
- Recover With Qiling Deep Data Recovery
- Verify the Recovered Files
- Frequently Asked Questions
Recovery results sometimes show $RECYCLE.BIN followed by a long S-1-5-style folder name instead of the original folder. This is not automatically malware or a useless result. It can be part of Windows' per-user Recycle Bin storage.
Understand the Problem
A security identifier, or SID, identifies a Windows account. Recycle Bin storage can contain separate account subfolders on a volume. The friendly Recycle Bin view normally hides that implementation detail.
The stored filename and the original filename may differ. A recovery scan can locate content without enough metadata to reconstruct its original label. Inspect candidates carefully rather than deleting the folder or taking ownership of everything on the source.
Check Before Another Recovery Attempt
Check 1. Try the normal Recycle Bin first
Sign in to the authorized account that deleted the item and open the Windows Recycle Bin. Check Original location and deletion information if available. If the intact item is there and this is an ordinary deletion, use Restore without running a disk scan unnecessarily.
Check 2. Distinguish normal restore from damaged-source recovery
If you are recovering other deleted files from a damaged source, avoid writing normal restores back onto that source. Prefer recovery to independent storage. For another person's account, obtain permission rather than bypassing its access controls.
Check 3. Inspect the correct original volume
A computer can have Recycle Bin storage on multiple volumes. Identify the physical drive that originally held the missing file. Scanning C: alone may not find a file deleted from another disk.
Check 4. Preserve unfamiliar candidate names
Recover plausible files to a separate destination before renaming anything. Keep the scan path in a note, compare sizes and open copies in their normal applications. Do not remove $RECYCLE.BIN as a recovery tactic.
Recover With Qiling Deep Data Recovery
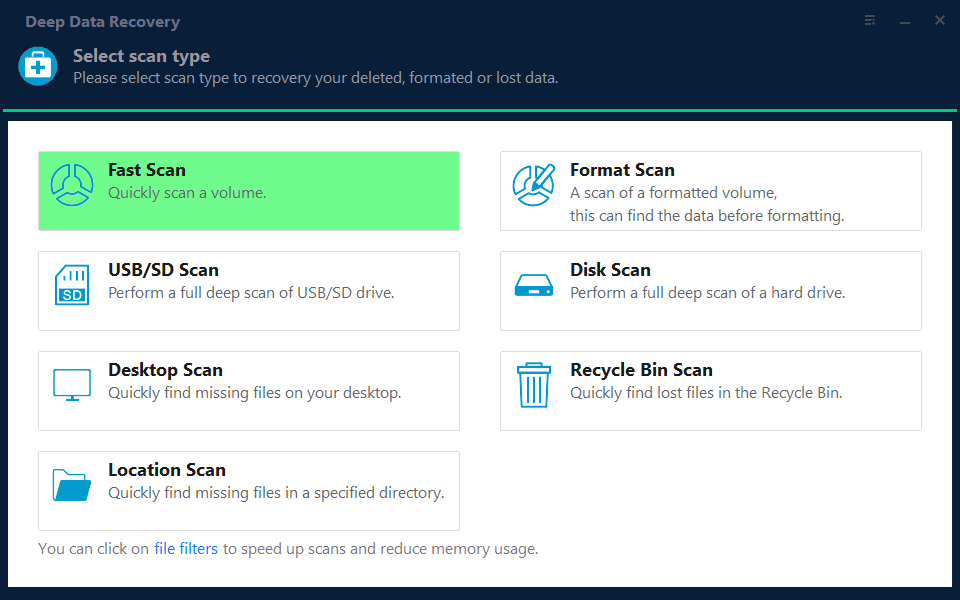
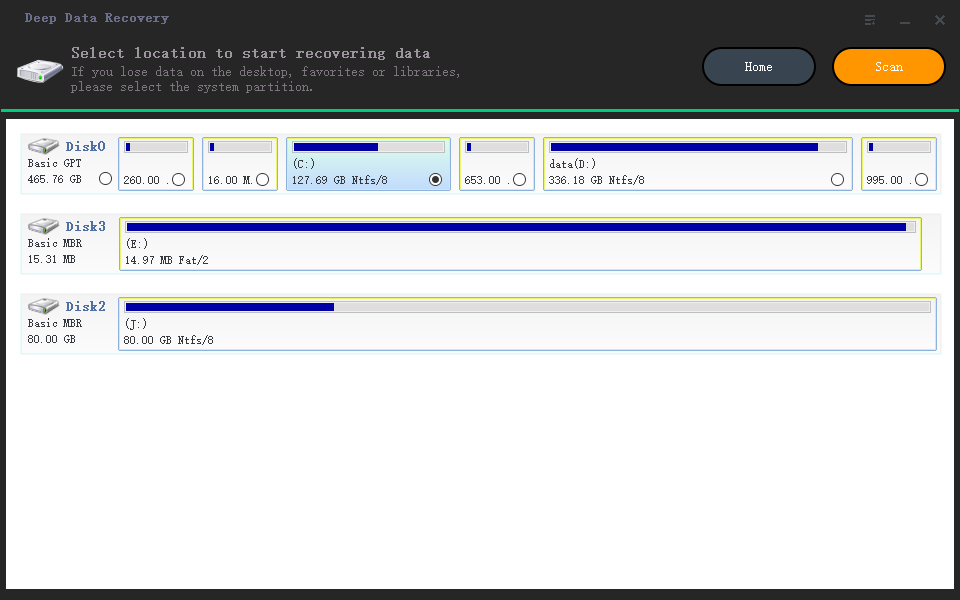
Qiling Deep Data Recovery offers a visual mode chooser, a source-location screen, file results with supported previews and a separate recovery destination dialog. Use this workflow only when Windows can read the source reliably. It does not bypass encryption or guarantee recovery of overwritten data.
The screenshots are examples from the product interface. Their drive letters, file counts and sample selections are not instructions to choose the same disks on your computer. The download is not a promise of unlimited free recovery; check the current edition and license terms.
Step 1. Prepare the Source and a Separate Destination
Stop routine use of the affected device. Check independent backups first, then connect a healthy destination with adequate free space. Download and install Qiling on healthy storage, not the volume holding the missing files. If the system disk is affected, consider another suitable computer or specialist assistance to limit background writes.
Step 2. Choose the Scan Mode for the Original Loss
Choose Recycle Bin Scan for Recycle Bin loss. If the underlying volume was formatted or damaged, select a mode that reflects that separate event rather than assuming all files still have normal bin records.
Step 3. Select the Original Source and Start the Scan
When the selected mode presents a location chooser, identify the original volume and click Scan. If it targets the bin directly, verify the result path belongs to the intended source before exporting.
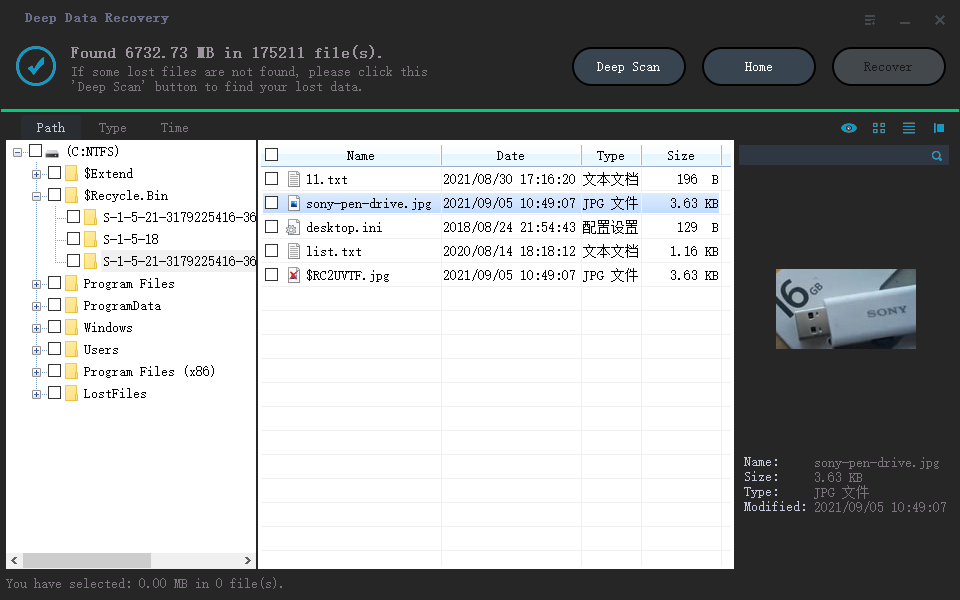
Step 4. Inspect Results and Preview Suitable Candidates
Expand relevant account folders in Path view and inspect Type view when names are unfamiliar. Preview supported files and select content, not merely metadata entries with convincing names.
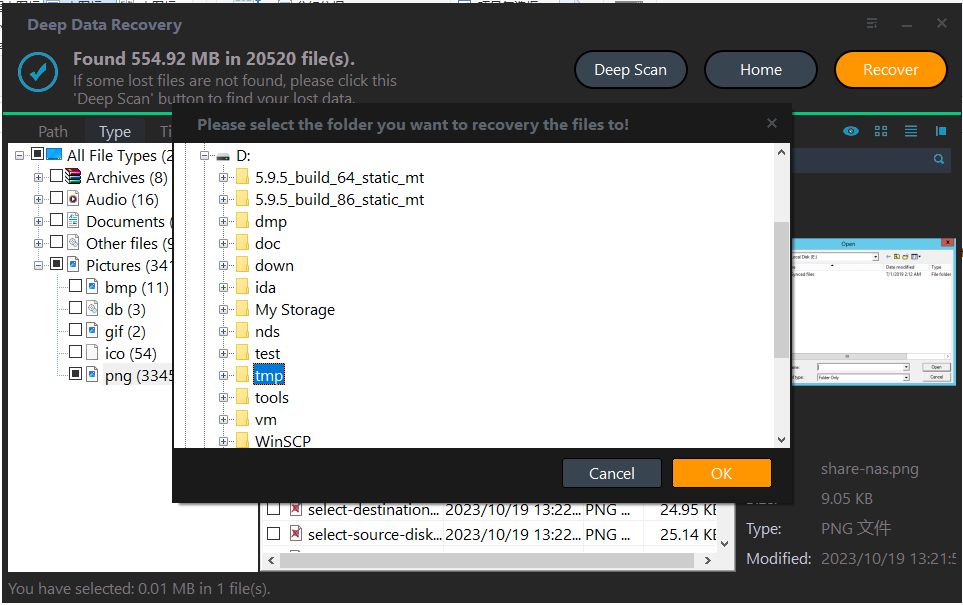
Step 5. Recover to Healthy Independent Storage
Click Recover and choose a new folder on a separate physical disk. Keep differently named candidates separate until their contents and original identities are established.
In the destination dialog, choose the intended folder and confirm with OK. Wait for the selected export to finish without disconnecting either device. If an error occurs, record it and keep any incomplete output separate rather than assuming the batch succeeded.
Verify the Recovered Files
Check the recovered document or media itself. A renamed bin entry may be usable, while an original-looking name may refer to incomplete content.
Keep an inventory of recovered names and identified originals before organizing the final set. This is especially useful when several accounts used the same device.
Stop condition: Do not delete system bin folders, bulk-change permissions or modify another account's data just to simplify a recovery result list.
Frequently Asked Questions
Is an S-1-5 folder necessarily suspicious?
No. Windows uses security identifiers for accounts. The folder name alone does not establish a threat.
Can an unfamiliar filename still contain my document?
Yes. Storage names can differ from original labels. Compare recovered content and plausible size.
Will deleting $RECYCLE.BIN restore its contents?
No. That is not a file-recovery method and can remove useful information.
Related Articles
- No Files Found After a Data Recovery Scan: What to Check
Check the source, scan mode and hidden filters when a recovery scan finds no files. Learn when a deeper Qiling scan is useful and when to stop. - Recovered Files Have the Wrong Date: Check Content First
Understand changed timestamps after file recovery. Compare content, document revisions and photo metadata before sorting or rejecting recovered files. - $RECYCLE. BIN Folder | All About $RECYCLE. BIN Folder Is Here
Products
Articles & Tutorials
- Data Recovery
- Data Backup
- File Recovery
- File Backup
- System Backup and Restore
- Disk and Partition Clone
- Technical articles
- Mobile articles
- Disk Master Help
- Windows Data Recovery Tutorials
- Windows Secure Delete Tutorials
- Windows Partition Management Tutorials
- Windows File Backup and Restore Tutorials
- Windows System Backup and Restore Tutorials
- Windows Disk Backup and Restore Tutorials
- Windows Clone Tutorials