No Files Found After a Data Recovery Scan: What to Check
Quick Navigation:
- Understand the Problem
- Check Before Another Recovery Attempt
- Recover With Qiling Deep Data Recovery
- Verify the Recovered Files
- Frequently Asked Questions
An empty recovery list can mean the wrong location was scanned, results were filtered out, or the original data is no longer available. Check those possibilities in order before spending hours repeating the same scan.
Understand the Problem
Scanning the current Windows system partition will not find a document that existed only on an external disk. Similarly, a newly created partition may not represent the area where the old files lived. Start with the history of the missing files, not the drive letter that happens to be available now.
A scanner can only examine the data still readable on the selected storage. Overwriting, SSD TRIM, encryption and physical read failures can leave nothing usable. A deeper search changes the search method; it does not reverse those events.
Check Before Another Recovery Attempt
Check 1. Write down the original storage location
Identify the physical drive, old folder and approximate file types. Check the application history, cloud account and backups for an existing copy. A file never downloaded from cloud storage was not necessarily present on this disk.
Check 2. Remove filters before judging the result
Clear name, extension, size and date restrictions. Search for one known file type without requiring its full original name. A lost name or incorrect timestamp can hide a candidate from an overly strict filter.
Check 3. Match the mode to the loss
Recent deletion on a healthy volume is different from formatting a USB stick. Choose the mode that reflects what happened, and select the correct original device rather than the drive receiving recovered files.
Check 4. Make one justified deeper attempt
If the first pass completes on stable storage, inspect the results screen for Deep Scan. Use it when useful data is still missing. If nothing changes or the disk develops read failures, preserve the source and seek advice instead of endlessly rescanning.
Recover With Qiling Deep Data Recovery
Qiling Deep Data Recovery offers a visual mode chooser, a source-location screen, file results with supported previews and a separate recovery destination dialog. Use this workflow only when Windows can read the source reliably. It does not bypass encryption or guarantee recovery of overwritten data.
The screenshots are examples from the product interface. Their drive letters, file counts and sample selections are not instructions to choose the same disks on your computer. The download is not a promise of unlimited free recovery; check the current edition and license terms.
Step 1. Prepare the Source and a Separate Destination
Stop routine use of the affected device. Check independent backups first, then connect a healthy destination with adequate free space. Download and install Qiling on healthy storage, not the volume holding the missing files. If the system disk is affected, consider another suitable computer or specialist assistance to limit background writes.
Step 2. Choose the Scan Mode for the Original Loss
Start with Fast Scan for ordinary deletion on a healthy volume. Choose Format Scan after formatting or USB/SD Scan for a removable device. Do not keep changing modes without a reason tied to the loss.
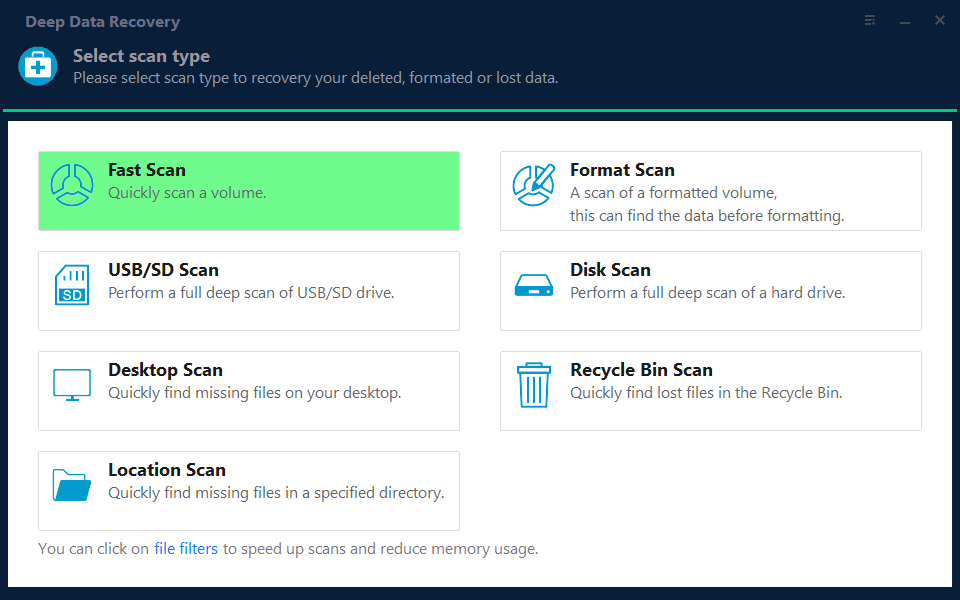
Step 3. Select the Original Source and Start the Scan
Compare capacity and partition layout with the original device. Select that source and click Scan. If the original partition is gone, inspect the available disk-level choices rather than creating a replacement partition.
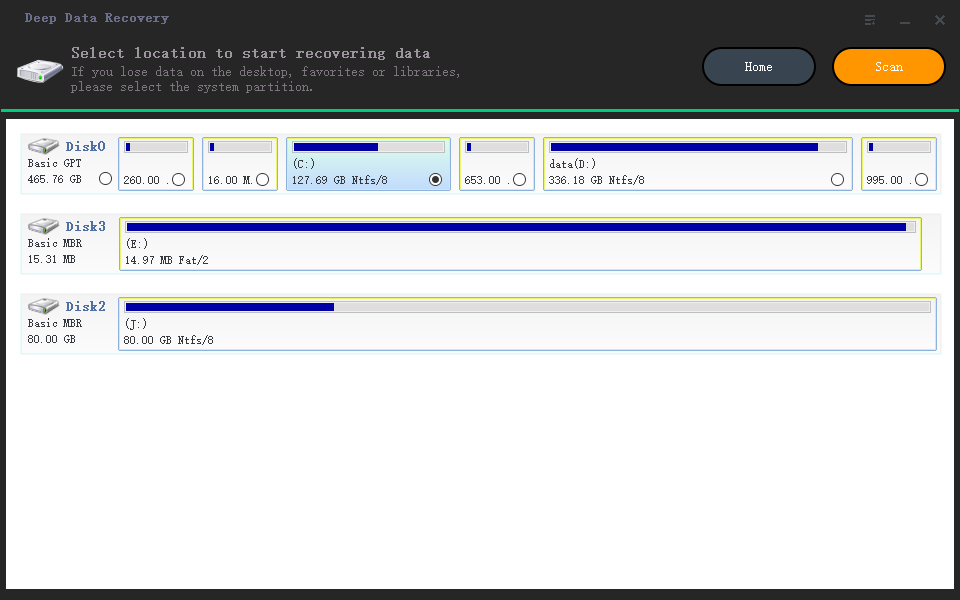
Step 4. Inspect Results and Preview Suitable Candidates
Clear result filters and inspect both Path and Type views. If the initial pass misses the target on a stable disk, use the visible Deep Scan button and review the new results without assuming all names will survive.
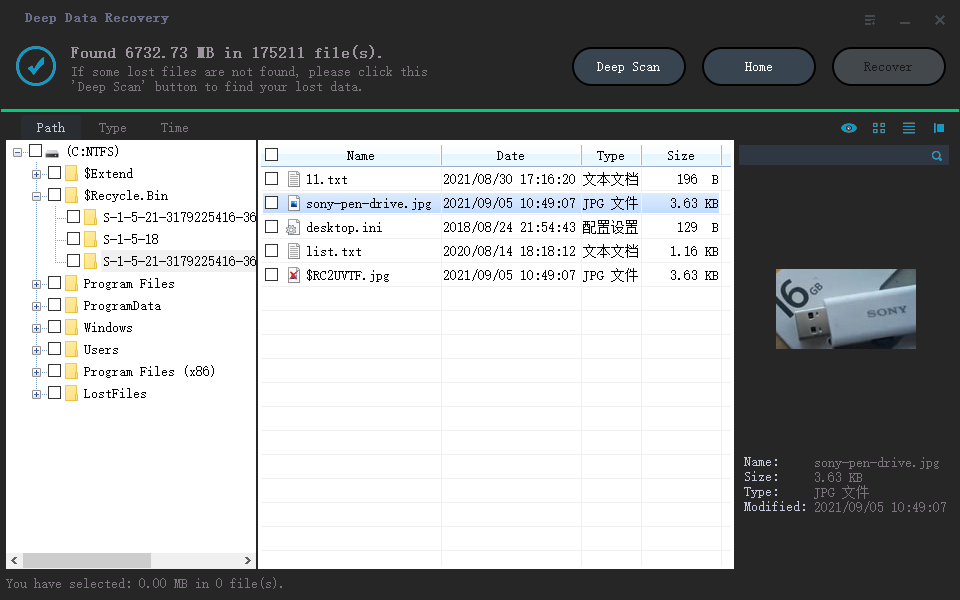
Step 5. Recover to Healthy Independent Storage
Recover a few plausible candidates to a separate physical disk. Keep alternate candidates in separate folders so one version does not overwrite another.
In the destination dialog, choose the intended folder and confirm with OK. Wait for the selected export to finish without disconnecting either device. If an error occurs, record it and keep any incomplete output separate rather than assuming the batch succeeded.
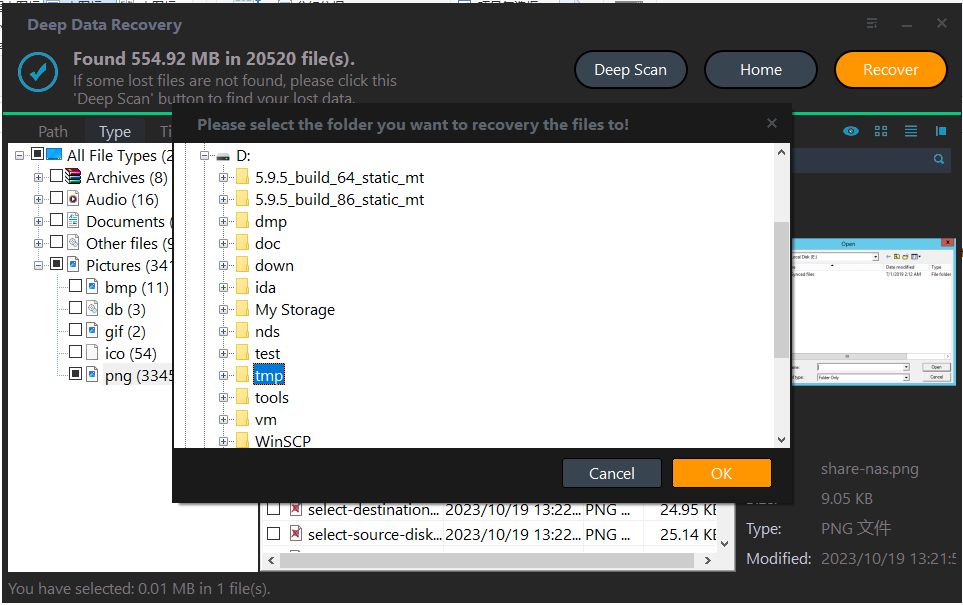
Verify the Recovered Files
Open the recovered samples and compare their contents with what is actually missing. A similarly named file from an old project may not be the desired version.
If both targeted and broader scans find nothing usable, look for backups, cloud history or professional assessment. Do not create test files on the source to see whether it still works.
Stop condition: Do not format, initialize or repair the source to make an empty scan produce results. Stop DIY scanning if the hardware is unstable.
Frequently Asked Questions
Does an empty scan prove the file was securely erased?
No. It only describes that scan under its selected source, mode and filters. It does not prove why the file was not found.
Should I search only by the old filename?
Not always. Directory information can be lost while content remains, so inspect likely file types and sizes as well.
Will paying always reveal additional files?
Do not assume that. Check the current edition terms and the actual scan results before purchasing. A license cannot restore overwritten bytes.
Related Articles
- Windows File Recovery Found No Files: Filters, Modes and Next Steps
Review Winfr's source and filters before another attempt. Use a Qiling visual scan when appropriate, while preserving the original disk. - Cannot Preview Files in Data Recovery Software: Next Steps
A missing preview does not always mean a file is lost. Check file type, size and a recovered sample before judging Qiling recovery results. - What Is Deep Data Recovery? Deep Scan Explained for Windows
Products
Articles & Tutorials
- Data Recovery
- Data Backup
- File Recovery
- File Backup
- System Backup and Restore
- Disk and Partition Clone
- Technical articles
- Mobile articles
- Disk Master Help
- Windows Data Recovery Tutorials
- Windows Secure Delete Tutorials
- Windows Partition Management Tutorials
- Windows File Backup and Restore Tutorials
- Windows System Backup and Restore Tutorials
- Windows Disk Backup and Restore Tutorials
- Windows Clone Tutorials