Winfr Is Not Recognized on Windows 11: Check the App First
Quick Navigation:
- Understand the Problem
- Check Before Another Recovery Attempt
- Recover With Qiling Deep Data Recovery
- Verify the Recovered Files
- Frequently Asked Questions
A message that winfr is not recognized usually means Windows did not launch the recovery command. It is not a scan result and does not show that your deleted files are gone. Resolve the launch problem without adding unnecessary writes to the affected disk.
Understand the Problem
Windows File Recovery is a separate Microsoft application, not a command guaranteed to be installed on every PC. A copied command can fail before any source or destination is examined.
Installation location matters after data loss. If the missing files were on the Windows system disk, downloading applications and updates to that same disk creates additional activity. For important data, plan recovery from another suitable computer or ask a specialist before installing more software.
Check Before Another Recovery Attempt
Check 1. Check the application, not just a command window
Search Start for Windows File Recovery and check the installed-app list. If it is present, launch the official app entry and read its help. A name pasted into an unrelated shell is not a substitute for verifying installation.
Check 2. Use an official source if installation is needed
Use Microsoft's official Store listing through its support guide. Avoid third-party installers claiming to unlock recovery features. Consider the effect of installation writes if the affected data is on the system disk.
Check 3. Reopen the proper command environment
After a valid installation, open a fresh session through the app and check its usage instructions. Do not make broad PATH, registry or permission changes based solely on one command-not-found message.
Check 4. Choose a supported alternative deliberately
If a graphical workflow is easier, use Qiling Deep Data Recovery on healthy storage. Confirm that the original disk is readable first. A different interface does not bypass encryption, hardware failure or overwriting.
Recover With Qiling Deep Data Recovery
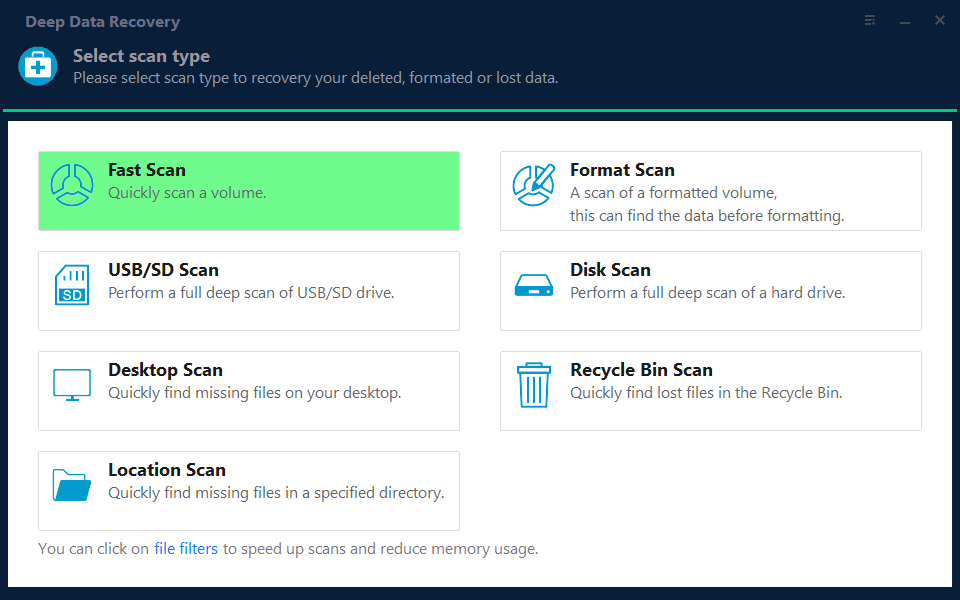
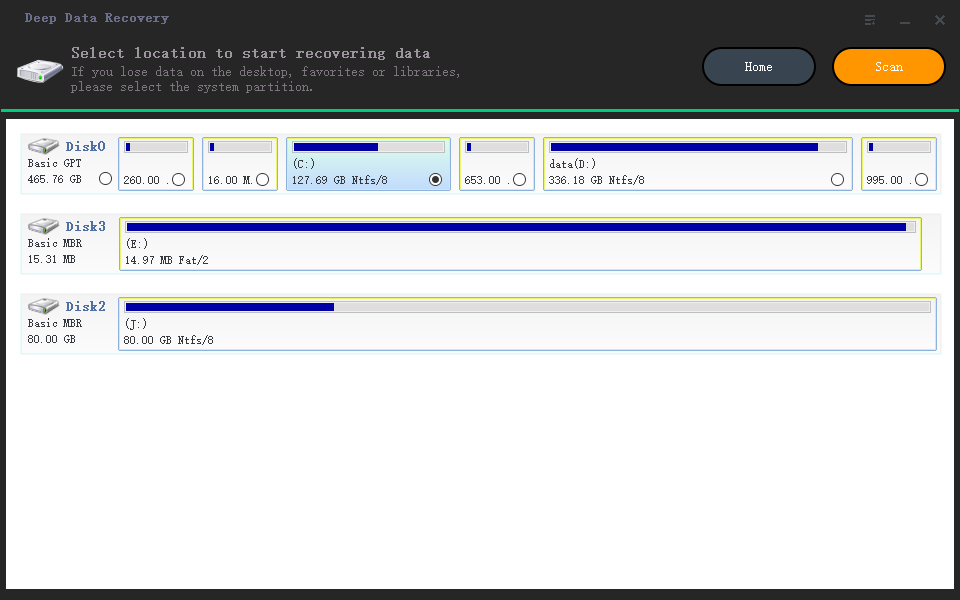
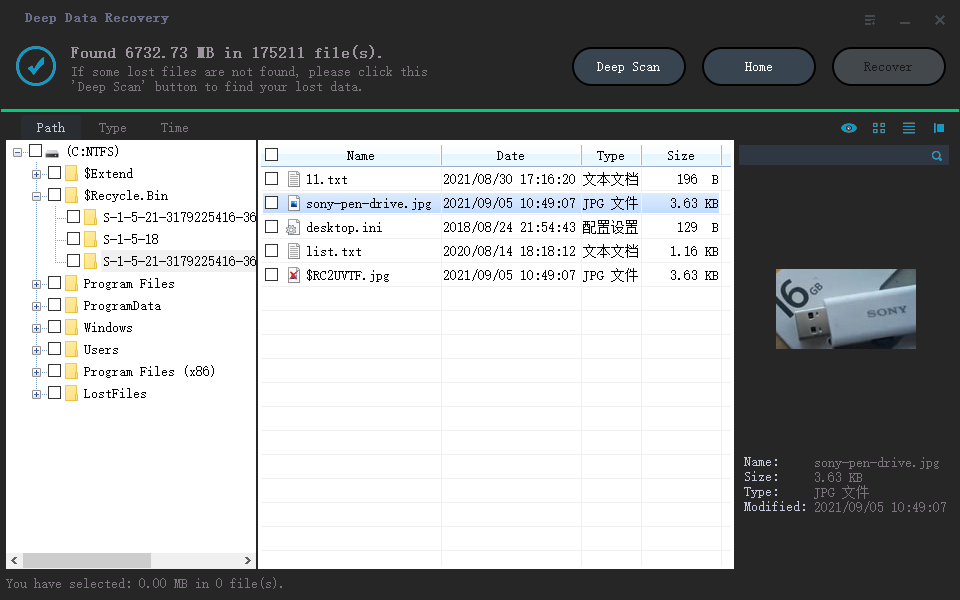
Qiling Deep Data Recovery offers a visual mode chooser, a source-location screen, file results with supported previews and a separate recovery destination dialog. Use this workflow only when Windows can read the source reliably. It does not bypass encryption or guarantee recovery of overwritten data.
The screenshots are examples from the product interface. Their drive letters, file counts and sample selections are not instructions to choose the same disks on your computer. The download is not a promise of unlimited free recovery; check the current edition and license terms.
Step 1. Prepare the Source and a Separate Destination
Stop routine use of the affected device. Check independent backups first, then connect a healthy destination with adequate free space. Download and install Qiling on healthy storage, not the volume holding the missing files. If the system disk is affected, consider another suitable computer or specialist assistance to limit background writes.
Step 2. Choose the Scan Mode for the Original Loss
Choose Fast Scan for a healthy deleted-file source, Format Scan for a formatting event or USB/SD Scan for removable-media loss. These Qiling labels are not Winfr command switches.
Step 3. Select the Original Source and Start the Scan
Select the physical storage that originally held the missing file and click Scan. Do not select the installation disk automatically if the data was on another device.
Step 4. Inspect Results and Preview Suitable Candidates
Inspect the result list and preview supported file types. Use a deeper pass only when appropriate on stable storage; the old Winfr launch error says nothing about what this scan should find.
Step 5. Recover to Healthy Independent Storage
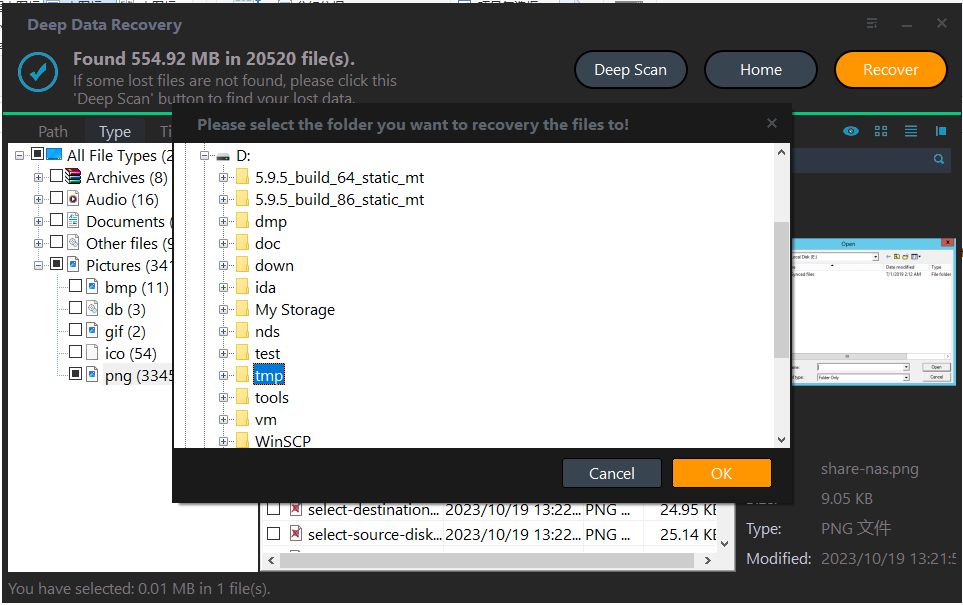
Tick a priority sample, click Recover and choose a folder on another physical disk. Confirm with OK and check the saved copy before a larger batch.
In the destination dialog, choose the intended folder and confirm with OK. Wait for the selected export to finish without disconnecting either device. If an error occurs, record it and keep any incomplete output separate rather than assuming the batch succeeded.
Verify the Recovered Files
Open the recovered copy with its original application. Check required content, not just the presence of an output filename.
If using Winfr instead, follow the installed help and keep the correct source and destination distinct. Do not run several scanners simultaneously against an unstable source.
Stop condition: Do not download unofficial Winfr executables, disable protection broadly or repeatedly install programs onto the affected source.
Frequently Asked Questions
Is Winfr built into every Windows installation?
No. Check whether the Windows File Recovery app is installed before assuming its command is available.
Does command not found mean the hard drive failed?
No. It is a launch or command-resolution issue, not a hardware diagnosis.
Can I use Qiling without knowing Winfr commands?
Yes. Its visual mode and location screens provide another workflow, subject to the same source-readability and recovery limits.
Technical References
Related Articles
- Windows File Recovery Cannot Create a Destination Folder
Check the recovery destination's path, free space and write access before retrying Winfr, or use Qiling's visual destination chooser. - Windows File Recovery Found No Files: Filters, Modes and Next Steps
Review Winfr's source and filters before another attempt. Use a Qiling visual scan when appropriate, while preserving the original disk. - Microsoft's Windows File Recovery Tool Full Review - Qiling
Products
Articles & Tutorials
- Data Recovery
- Data Backup
- File Recovery
- File Backup
- System Backup and Restore
- Disk and Partition Clone
- Technical articles
- Mobile articles
- Disk Master Help
- Windows Data Recovery Tutorials
- Windows Secure Delete Tutorials
- Windows Partition Management Tutorials
- Windows File Backup and Restore Tutorials
- Windows System Backup and Restore Tutorials
- Windows Disk Backup and Restore Tutorials
- Windows Clone Tutorials