Files Automatically Encrypted, How to Remove Encryption from Files
Quick Navigation for Solutions to Remove File Encryption:
| Workable Solutions | Step-by-step Troubleshooting |
|---|---|
| Remove Encrypt Contents | Right-click encrypted file/folder > "Properties" > "Advanced" > "Encrypt Contents to Secure Data"...Full steps |
| Remove Encryption from PDF | Open encrypted PDF in Adobe Acrobat > "Advanced" > "Security" > "Remove Security"...Full steps |
| Remove Encryption from Excel | Open encrypted Excel > "Review" > "Unprotected Sheet" > Enter password...Full steps |
| Remove Ransomware Encrypted File | Launch Qiling file recovery software > Scan device > Restore lost files deleted by ransomware...Full steps |
How to Decrypt a File
Your files on the desktop are being encrypted and the "Encrypt contents to secure data" option is being checked automatically when you move them to other locations. This is likely due to the Encrypting File System (EFS) feature in Windows that is enabled by default. To remove encryption and decrypt files, you can try the following: go to the file properties, click on the "Advanced" button, and uncheck the "Encrypt contents to secure data" option. You can also try using a third-party file decryption tool or seeking assistance from a Windows support professional.
Overview of File Encryption
Windows Encrypting File System (EFS) and BitLocker are two encryption features that protect confidential data from unauthorized access. EFS encrypts individual files and folders, making the file name appear green, while BitLocker encrypts entire drives, providing an additional layer of protection. Both features ensure that sensitive information remains secure, even if an attacker gains physical access to the computer.
Enabling encryption on your drives automatically secures new or existing files and folders with a certificate and private key. This means that any files copied to an encrypted folder will also be encrypted, making it impossible for unauthorized users to access or edit the data.
How to Remove Encrypt Contents to Secure Data
To remove file system encryption, uncheck the "Encrypt Contents to Secure Data" feature. This only works for the entire file system, not individual files. If you need to decrypt files, a certificate or password is required. For recovering encrypted files without passwords, refer to the linked article.
Step 1. Find the file or folder you wish to encrypt.
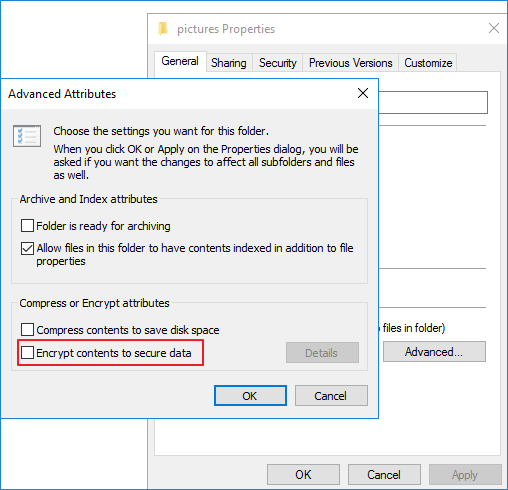
Step 2. Right-click the file/folder and click "Properties." Then, click the "Advanced..." button on the General screen.
Step 3. To encrypt the contents of a zip file, go to the "Compress or Encrypt attributes" section and select the box next to "Encrypt Contents to Secure Data". Then, click the "OK" button.
Step 4. An encryption warning box will appear after clicking the "OK" button multiple times.
Step 5. To encrypt the individual file, check the "Encrypt the File Only" box and click "OK".
How to Decrypt a File in Windows 10/8/7
If you have encrypted PDF and Excel files, you can first recover deleted data if they are lost. Then, you can use the methods provided to decrypt and decode them.
How to Remove Encryption from a PDF File
To decrypt a PDF file in Adobe Acrobat, follow these steps. First, you must know the password that was used to encrypt the document. Once you have the password, you can open the PDF file in Adobe Acrobat and click on "File" > "Properties" to access the document's security settings. From there, you can click on "Security" and then "Remove Security" to decrypt the PDF file. This will remove the password protection and allow others to read the document without needing to enter the password. However, keep in mind that removing the encryption will also remove any security features that were applied to the document, such as digital signatures and permissions.
Step 1. Open Adobe Acrobat on your computer.
Step 2. To access the protected PDF file, open it and enter the password when prompted. This will allow you to view and interact with the contents of the file.
Step 3. Click "Advanced" at the top of the Acrobat window. Select "Security" and then click "Remove Security."
Step 4. To confirm the action and remove the encryption, click "OK". Then, press "Ctrl+S" to save the unencrypted PDF file.
How to Remove Encryption from Excel
The Excel worksheet and document appear different when the encryption is removed. Check them separately.
Decrypt an Excel Worksheet
Step 1. To unprotect a protected Excel sheet, click the "Review" tab on the toolbar and select "Unprotect Sheet". You will then be prompted to enter the password that was used to protect the sheet.
Step 2. To remove the password from an Excel worksheet, enter the password and click "OK", allowing you to start editing without the password protection.

Unencrypt an Excel Document
Step 1. Open the Excel document you want to remove encryption.
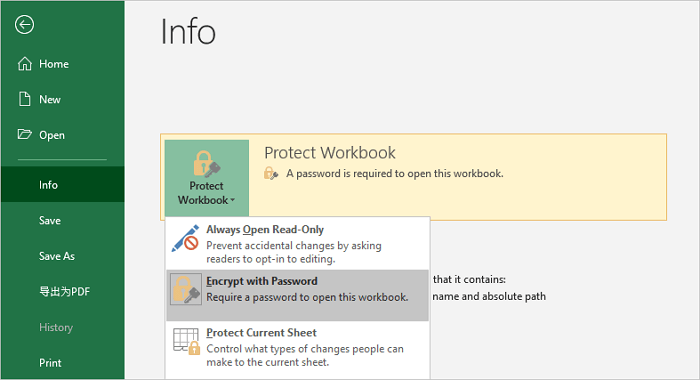
Step 2. To protect a workbook with a password, go to the "File" tab, click on "Info", and then select "Protect Workbook". From the drop-down menu, choose "Encrypt with Password" to open the password entry box.
Step 3. To remove the password from the document, delete the password in the box, leaving it empty, and then click "OK". After that, click "Save" to save the changes before closing the document.
How to Remove Encryption from Ransomware Infected Files
If your files are encrypted by a ransomware virus, it's not necessary to pay the ransom. Instead, you can use data recovery software to recover the original, unencrypted files that were deleted by the ransomware, effectively removing the encryption.
Computer viruses typically encrypt files in a three-step process. First, they create a complete copy of all files. Second, they delete the original files. Third, they encrypt the copied files.

How to Restore Ransomware Encrypted File
All you need to do is find reliable data recovery software and try the steps below:
Let Qiling File Recovery Software Help: To recover ransomware-encrypted files, you can use Deep Data Recovery. This software enables the recovery of data from various scenarios, including virus attacks, accidental deletion, hard drive formatting, partition loss, and emptying the recycle bin.
Step 1. Select file types and click "Next" to start
Run Qiling virus file recovery software on your Windows PC. Select file types and click "Next" to start the recovery process.

Step 2. Select the virus infected drive to scan
To scan for lost or hidden files, select the disk attacked by the virus and run a scan. Note that this process may not be able to recover all lost files, and some may be permanently deleted. It's also important to be cautious when scanning for lost files, as some viruses may be designed to make it difficult to recover files, and in some cases, running a scan may make the problem worse.
- If a virus has hidden or deleted files on an HDD, it's safer to install recovery software on a separate volume or an external USB drive to prevent overwriting of existing data.
- If the infected device is an external hard drive, flash drive, or memory card, you can install the software on the local drive of the computer instead.
Step 3. Check all scanned results
Deep Data Recovery starts a scan process to find deleted or hidden files on a virus-infected hard drive. To quickly locate wanted files, you can use the Filter or type grouping feature to display specific file types, such as pictures, videos, documents, or emails.

Step 4. Preview and recover deleted/hidden files
Once the scanning process is complete, you can preview the recovered files, select the ones you want to recover, and then click the "Recover" button. It's essential to save the recovered files to a different location on your computer or storage device, not the original one where they were lost, to ensure their safety and integrity.
After recovering your data, use antivirus software to completely remove the virus, and then regularly back up your important files using Windows scheduled backup software to prevent unexpected data loss.
Related Articles
- Recover Files Infected by the Shortcut Virus
- Full and Free Solutions for CHK File Recovery
- 5 Genius Ways to Fix Powerpoint Found a Problem with Content
- [Sovled] Lost or Missing Desktop Files After Windows 10 Update
- NVMe SSD Data Recovery - Recover Data from NVMe SSD
If you have lost files on your NVMe SSD, this guide shows you how to recover data from NVMe SSD with the best NVMe Data Recovery software. Free get this tool to restore deleted or lost files from NVMe SSD on Mac or Windows. - Pen Drive Recovery CMD: How to Recover Data from Pen Drive Using CMD
If you're experiencing issues with your pen drive and want to try a more technical approach, you can attempt to recover data using the Command Prompt (CMD). While this method may not always be successful, it's worth a try.