How to Show Hidden Images in Word and How to Unhide a Word
| Workable Solutions | Step-by-step Troubleshooting |
|---|---|
| Fix 1. Show hidden images in a Word | Click "File" > "Options" in Word. Click "Advanced" on the left pane, uncheck "Show picture placeholders"...Full steps |
| Fix 2. View hidden texts in Word | Click "File" > "Options" in Word 2013/2010 (for Word 2007, click Office button > "Word Options")...Full steps |
| Fix 3. Recover hidden Word/photos | Unhide a Word Document in File Explorer. Or recover hidden Word with data recovery software...Full steps |
Q: "I have a four-page Word document with images and text, but some of the images and text are not showing up. How can I find and display the hidden images and text in my Word document?"
Hidden images and text in a Word document can occur intentionally or unintentionally, and this guide provides a detailed step-by-step process to show them. Additionally, if you are looking to recover hidden Word documents and photos on your Windows PC or laptop, a data recovery tool can help you achieve this effortlessly.
How to Find Hidden Images/Pictures in Word
When you can't see a picture or image in a Word document, try checking the image's properties to see if it's hidden, or look for a small icon in the top-right corner of the document that indicates the image is hidden. You can also try adjusting the zoom level or using the "Show/Hide" button in the ribbon to reveal the image.
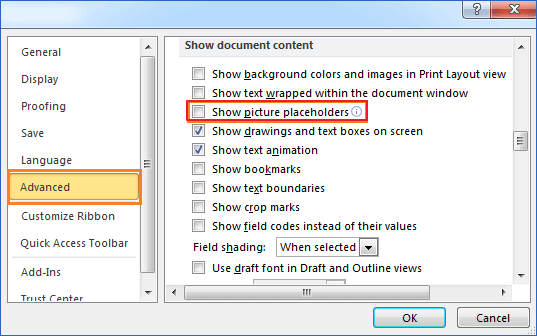
Step 1: To access Word Options in Microsoft Office Word, click on the "File" tab and select "Options" in versions 2016/2013/2010, or click on the "Word" button and select "Word Options" in version 2007.
Step 2: To view hidden images or pictures in a Word document, navigate to the "Advanced" section on the left pane, deselect the option "Show picture placeholders" under "Show document content". This will allow you to see the hidden images or pictures again.
How to hide images in a Word document?
You can hide pictures in your Word document by using the "Show picture placeholders" feature, which allows you to insert pictures without them being displayed, making it easier to quickly scroll and read text.
How to View Hidden Text in Word Document
If you've hidden text lines in a Word document, you can show the hidden text content by going to the "Home" tab, clicking on the "Paragraph" group, and selecting "Show/No Hidden Text" or by pressing Ctrl+Shift+9. Alternatively, you can also use the "Review" tab, click on the "Protect Document" group, and select "Hidden Text" to toggle the visibility of hidden text. These options allow you to quickly reveal any hidden content within your Word document.
Method 1. Show Hidden Text in Word 2016
To view the hidden text from Print settings, you can follow the steps to access the Print settings, which may vary depending on the device or software being used. Once in the Print settings, look for the option to view hidden text, which may be labeled as "Show hidden text" or "View hidden text".
Step 1. Open the Word document in Word 2016 in which you have hidden text.
Step 2. Go to "Print" settings and select "Page Setup".

Step 3. Go to "Paper" settings, click "Print Options...".

Step 4. In Display, check "Print hidden text" and click "OK" to save changes.

To make hidden text visible only in the Print preview window and not in the actual Word document, you can use the "Hidden Area" feature. This will allow the hidden text to be visible in the Print preview, but still be hidden in the document. If you want to unhide text that has been hidden using this feature, you can follow the provided tips.
Step 1. Press Ctrl + A to select all content in Word document.
Step 2. Right-click on content and select "Font...".

Step 3. To make the desired change, click the "Hidden" box twice, then uncheck it, and finally click "OK" to save the changes.

Now you can see all hidden content displaying in your Word document again.
Method 2. Display Hidden Text in Word 2013/2010/2007
Step 1. To access the "Options" menu in Word 2013/2010, click on "File" and then select "Options". For Word 2007, click the "Office" button and then choose "Word Options".
Step 2. To view and edit the hidden text box, click on "Display" at the left pane, then toggle the "Hidden" checkbox, making sure it is left blank.
Step 3. Click "OK" to save all changes.

How to Recover Hidden Word Document/Photos in Windows 10/8/7
To recover hidden Word documents, you can use two reliable methods. First, you can try using a data recovery software to scan your Windows computer or external storage devices for deleted or hidden files, including Word documents. Alternatively, you can try checking the "Hidden Items" folder in your computer's file explorer, as hidden files are often stored there.
Method 1. Unhide a Word Document in File Explorer
For Windows 10/8/8.1 users:
Step 1. To open File Explorer, type "file explorer" in the Search box and select the "File Explorer" result.

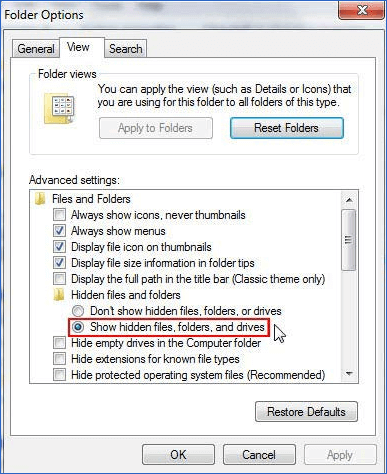
Step 2. Select "View" > "Options" > "Change folder and search options".

Step 3. In the "Folder Options" window, select the "View" tab and check the box next to "Show hidden files, folders, and drives" under the "Hidden files and folders" section. Additionally, uncheck the box next to "Hide extensions for known file types" to display file extensions. Click the "Apply" button to save the changes.

For Windows 7 users:
Step 1. Open Windows Explorer by clicking "Start" > "Computer".
Step 2. Click "Tools" > "Folder Options" > "View".
Step 3. To view all file extensions and locate hidden Word documents or pictures, go to the View tab, select "Show hidden files, folders, and drives" below Hidden Files and Folders, and uncheck Hidden extensions for known file types. This will allow you to see all file extensions and quickly identify hidden files.
Method 2. Recover Hidden Word Documents and Photos with Data Recovery Software
If you can't view hidden files in File Explorer, you can still try to recover them using professional file recovery software like Deep Data Recovery. This program allows you to scan your computer or storage devices and find lost, formatted, and hidden files, including pictures, audios, videos, and Word documents, using two scanning modes - Quick Scan and Deep Scan.
Qiling file recovery software not only restores normally deleted files but also enables you to recover permanently deleted files from various storage devices such as HDD, SSD, USB flash drive, SD card, pen drive, and external hard drive. To recover your hidden Word document or pictures, simply download and install the software on your PC, and follow the three-step guidelines provided to successfully restore your lost files.
Step 1. Select file types and click "Next" to start
Run Qiling virus file recovery software on your Windows PC. Select the file types you want to recover and click "Next" to start the recovery process.

Step 2. Select the virus infected drive to scan
Select the disk attacked by the virus to scan for lost or hidden files. Note that:
- If a virus has hidden or deleted files on an HDD, it's best to install software to recover them on a separate volume or external USB drive to prevent overwriting of existing data.
- If the infected device is an external hard drive, flash drive, or memory card, it's not necessary to install the software on the local drive of the computer.

Step 3. Check all scanned results
Deep Data Recovery will immediately start a scan process to find deleted or hidden files on a virus-infected hard drive, using features like Filter or type grouping to quickly locate wanted files.

Step 4. Preview and recover deleted/hidden files
After the scanning process is complete, you can preview the recovered files. Select the desired files and click the "Recover" button to save them to a safe location on your computer or storage device, avoiding the original lost location.
Related Articles
- Fix Cannot Open JPG Files on Windows 10
- JPEG Repair Tool Free Download | Repair Corrupted JPEG Files
- How to Restore Lost AI Files After Adobe Illustrator CC Crashes
- Inkscape Recovery: How to Recover Lost/Unsaved Inkscape Files
- Excel Recovery Mac - How to Recover Deleted Excel on Mac
Accidentally deleted Excel files on Mac, want to Excel recovery on mac? this article will introduce to easily and quickly recover deleted Excel on Mac. - How to Recover Deleted Files from Dell Laptop/Desktop
If your photos, videos, documents, music, and other files were lost from your Dell laptop or desktop, you can recover them using a Dell data recovery tool. This tool can help you retrieve deleted files from your Dell laptop or desktop.