Fix External Hard Drive Not Showing Full Capacity on Windows & Mac
If your external hard drive is not showing its full capacity, the discrepancy is likely due to the way Windows handles formatting. When you reformatted the drive, Windows may have created a new partition that only uses a small portion of the drive's total capacity, hence the lower capacity display. To access the full capacity, you may need to reformat the drive as a single partition, which might involve using a third-party tool or reformatting the drive in a different operating system. This will ensure that the drive is recognized with its full capacity, allowing you to utilize it properly.
You're experiencing a common issue where your external hard drive is not showing its full capacity on your Windows PC or Mac. This problem affects many hard drives over 2TB, including those from Seagate, Lacie, Western Digital, and Sandisk, but can also occur with smaller drives. The issue often results in the drive showing only a fraction of its actual capacity, such as 500GB, 200GB, 127GB, or 32GB. Fortunately, the full capacity can often be reclaimed.
Why does external hard drive not show full capacity?
Most cases of missing hard drive space are due to a wrong partition table, specifically MBR (Master Boot Record) which can't support disk volumes over 2TB. This is why owners of 3TB and 4TB hard drives often see less hard drive space than they should. To resolve this, you need to convert the MBR to GPT (GUID Partition Table).
Hard drives less than 2TB are not affected by the MBR limitation, but they may still display incorrect size information, which can be resolved by checking the hard drive for errors.
Any driver or firmware issues, computer viruses, or a hidden recovery partition can cause Windows to improperly recognize the drive.
How to fix wrong capacity issues in Windows [3 fixes]
If your external hard drive is not showing the correct capacity on your Windows PC, the likely culprit is an outdated driver or firmware. To resolve this issue, updating the drive driver and firmware using Method 1 and Method 2 is highly recommended, as this should restore the full capacity display on your computer.
Fix 1. Convert MBR to GPT
There are two free ways to convert MBR to GPT: you can use either Windows Disk Management or Qiling, a free partition manager. This video tutorial will guide you through the process using both tools.
NOTE: To convert a disk from MBR to GPT, you must first delete the partition, then initialize it to GPT in Windows Disk Management. Alternatively, you can use Qiling Partition Master, which can convert MBR to GPT without data loss, but requires a separate download and installation in Windows 10/8.1/8/7.
Fix 2. Update external hard drive driver
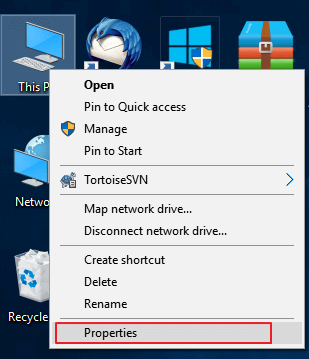
Step 1. Keep your external hard drive connected to your PC, right-click on This PC/My Computer and choose Properties.
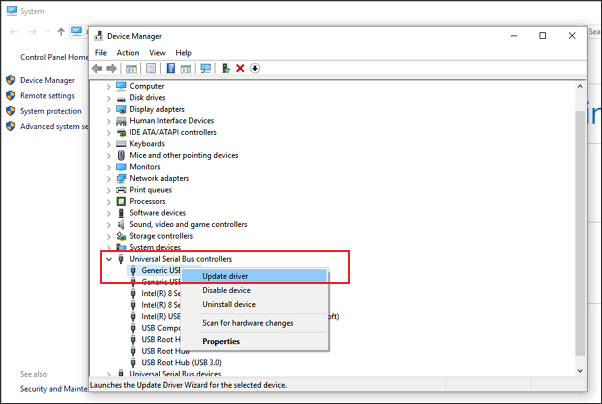
Step 2. Click "device manager" in the left pane and expand "Universal USB Serial Bus controllers".
To update the driver for a malfunctioning controller, right-click on the yellow exclamation mark next to it, then select "Update driver" or "Update driver software".
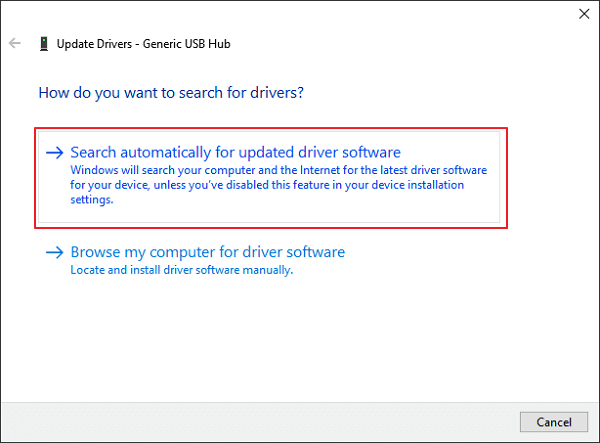
Step 3. Click "Search automatically for updated driver software".
Fix 3. Update firmware of external hard drive
Step 1. Check the firmware version of your external hard drive
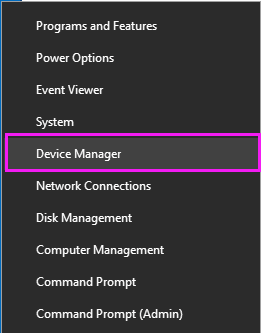
1. Connect your external hard drive to your PC, then right-click on the Windows icon and select Device Manager.
2. To access the properties of your external hard drive, go to Disk Management, select the external drive, expand it, right-click on it, and choose Properties.
3. To view the Hardware IDs of the device, click "Details" and then select "Hardware IDs" from the Properties drop-down menu.
The manufacturer and firmware version information will be displayed in the Value box.

Step 2. Download the firmware update of your external hard drive
1. To update the drivers for your external hard drive, go to the website of the manufacturer, navigate to the support page or search for driver downloads, where you can find the latest drivers for your specific model, and follow the instructions to download and install them.
2. Click on Support, Download or Drivers.
3. To find the correct drivers for your external hard drive or hard drive, enter the model number in the Search Knowledgebase field, and then search for either "Downloads" or "Model / Parts ID" to find the appropriate drivers.
4. Check for firmware updates.
If new firmware of your drive is available, click Download, Install or Download Firmware to download and install it to a portable USB drive.
Step 3. Burn downloaded ISO and upgrade the firmware
1. Right-click on the ISO file of the external hard drive's firmware, then select "Burn Disk Image" from the context menu on the portable USB.
2. To burn a CD or DVD, insert a writable disk or USB to your PC, select the optical drive from the Drive Burner, and click Burn.
3. Restart your PC with the burned disk or USB drive, press F2, F10, F12, or Esc to bring up BIOS.
4. To continue, select your optical or USB drive using the arrow keys and hit Enter.
5. Follow the firmware upgrade instructions to upgrade the external hard drive, and once complete, it should be working with full capacity. To further protect against hardware bugs, consider using reliable cloud storage on secure hosting for data backups.
How to recover data after restoring hard drive to its full size (Windows & Mac)
If you lose your data while fixing a problem and don't have a backup, you can use Deep Data Recovery to recover lost, deleted, or formatted data on your hard drive for free. It has versions for both Windows and Mac OS X/macOS, so download the correct one for your device.
Step 1. Select file types and click "Next" to start
- To recover lost data, download and install Qiling Data Recovery software on your PC or laptop.
- Connect the external hard drive to your computer.
- Launch Deep Data Recovery on your PC, select the desired file types, and click "Next" to initiate the recovery process.

Step 1. Choose and scan the external hard drive
- To recover data from an external drive, select the drive from the list of external drives, and then click on "Scan for lost data" to initiate the recovery process.

Step 2. Check the scan results
- Qiling data recovery software scans the selected drive for all data, including deleted, corrupted, and existing data, immediately.
- You can use the Filter feature to quickly locate files of a specific type, such as Pictures, Word documents, Excel files, PDFs, videos, emails, and more.

Step 3. Preview and recover data
- Double-clicking a file from the scanned results to preview.
- Choose the files you want and click "Recover".
- To prevent overwriting the original files, save the recovered files to a different drive, such as an external hard drive, a USB drive, or a different partition on your computer. This will ensure that the recovered files are kept safe and separate from the original ones.
Related Articles
- [5 Ways] How to Remove Write Protection from USB in Windows 11/10/8/7
- Fix The Parameter Is Incorrect on External Hard Drive in Windows
- Recover Data from RAID 5 with 2 Failed Drives
- How to Recover Photos from Corrupted SD Card in 2022 (5+ Fixes)
- How to Recover Files from Formatted or Re-partitioned External Hard Drive
Accidentally formatting or re-partitioning external hard drive, how to recover these files? The article will list reasons makes data loss and how to avoid, and how to recover files from formatted or re-partitioned external hard drive. - Sandisk Recovery Online | Sandisk Pen Drive Data Recovery Online
Get this SanDisk recovery online tool – conveniently restore deleted, formatted or lost data from SanDisk SD card, pen drive, and USB flash drive on Windows or Mac.