Fix Hard Disk Not Detected/Recognized on Windows 10
Hard Disk Not Detected on Windows 10
A hard drive is a crucial computer component that stores data, files, and the operating system, making it essential for a computer's functionality. However, it is also prone to errors and issues.
A common issue with external hard drives is when they are not detected by the computer. This can be due to a faulty USB port, a malfunctioning hard drive, or a driver issue. In such cases, the computer may not recognize the external hard drive, making it impossible to access its contents.
- Hard Drive Not Detected in BIOS
- Hard Drive Not Detected in Disk Management
- Hard Drive Not Detected in This PC
Hard Drive Not Detected in BIOS
The BIOS, or Basic Input Output System, is a software stored on a chip on the computer's motherboard that is responsible for booting the computer and ensuring all hardware components are working properly. When the computer is turned on, the BIOS loads the operating system from the hard drive and then hands over control to it, providing a set of utilities to configure system settings such as time and date, and change the boot order of drives.
The role of the BIOS has been largely taken over by UEFI, which offers more advanced features and is easier to use. However, it's still essential to be familiar with BIOS, especially when troubleshooting issues. Unfortunately, there are instances where the BIOS fails to recognize a hard disk or USB drive, making it necessary to take alternative steps.
If your hard drive doesn't appear in BIOS boot options, it won't be visible to Windows either. To fix this, you'll need to take some manual steps to resolve the issue.
Hard Drive Not Detected in Disk Management
The hard drive may not show up in Disk Management, a system utility in Windows that manages storage drives and partitions, in addition to not showing up in BIOS. In Disk Management, you can format drives, create and delete partitions, assign drive letters, convert storage drive types, resize partitions, and change file systems.
To access Disk Management in Windows, type "disk management" into the search box on the taskbar, select the "Create and format hard disk partitions" result, and check if your hard disk is recognized.
Hard Drive Not Detected in This PC
The This PC shortcut provides quick access to your computer's main folders and drives, allowing you to view, manage, and create files. It can be found in the Windows Start menu or by searching for it, and includes personal and system folders by default.
If your hard drive is recognized in the BIOS but not in Windows, don't worry, it's an issue that can be fixed. To troubleshoot the problem, first, identify the reasons behind it, and then follow the solutions to resolve the issue.
Full Guide
If your Windows 10 won't detect a hard drive that the BIOS can see, you can try troubleshooting the issue by checking the disk management, updating the drivers, and running a disk check to see if the problem can be resolved.
Why Is Internal/External Hard Disk Not Detected/Recognized
In Windows 10, there are several reasons why an internal or external hard disk might not be detected or recognized. Some common causes include:
Connection problems: First, ensure that the power supply and data cables are correctly connected to the drive.
Incompatible file system: To ensure the hard drive file system is compatible with your computer or laptop, check the operating system (OS) of your device and match it with the file system of the external hard drive. For example, if your computer has Windows, the external hard drive should also have a Windows-compatible file system such as NTFS.
Drive letter conflict:If the drive letter of your HDD conflicts with other drives, it won't be recognized.
Outdated hard drive driver: You can try updating the drivers from the Device Manager, or you may need to reinstall them.
Unallocated or not initialized drive:If your drive is uninitialized or showing as unallocated, it won't appear in your drive list, making it impossible to access or use.
Damaged or corrupted hard drive:In some cases, the hard drive may be damaged or corrupted, potentially due to a virus, physical damage, or a bad sector on the disk.
If issues with accessing the hard disk contents persist, troubleshoot each potential problem separately, such as hardware failure, software glitches, or file system corruption, to identify and resolve the root cause and regain access to the hard disk.
How to Fix Hard Disk Not Detected on Windows 10
If your hard drive isn't showing up in Windows 10, try checking the connection, formatting it to NTFS, changing the drive letter, updating the disk driver, or initializing the drive if none of the above work.
- Change Disk Connection
- Format Hard Drive to NTFS
- Change Drive Letter
- Update Hard Disk Driver
- Initialize Hard Drive
- Enable Hard Drive in BIOS
Fix 1. Change Disk Connection
If your hard drive can't be recognized due to a loose connection or a rat bite, check that all connections to the hard drive are secure and there are no cuts in the wires.
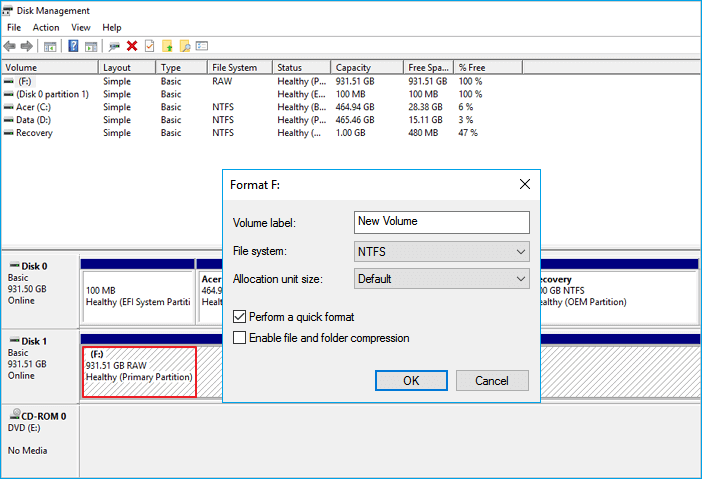
Fix 2. Format Hard Drive to NTFS
If the hard drive isn't showing up due to an unsupported, RAW, or corrupted file system, you can resolve the issue by changing the file system to NTFS.
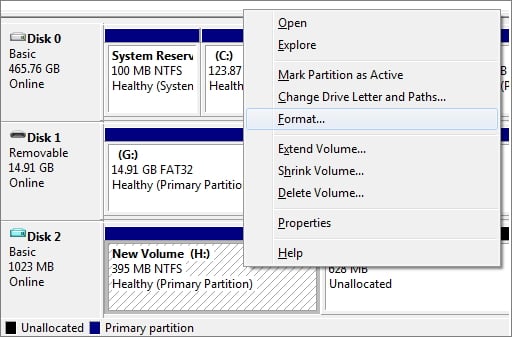
Step 1. To access the Disk Management feature in Windows 10 or 8, press the Windows key + X keys on your keyboard, and then click on "Disk Management" from the menu that appears. This will open the Disk Management window, where you can view and manage your disks, partitions, and volumes.
Step 2. Find and right-click on your hard drive, and select "Format".
Step 3. To format the drive, set the file system to NTFS, check the box for "Perform a quick format", and click "OK" to initiate the formatting process.
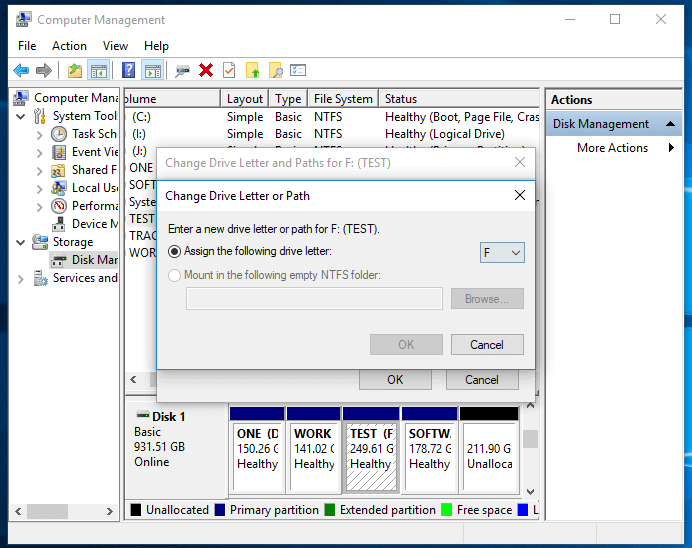
Fix 3. Change Drive Letter
The hard drive may not be detected if there is another drive in the system with the same letter, so changing the drive letter in Windows 10 can make it show up.
Step 1. Open Disk Management, right-click the hard drive marked as New Volume or the partition doesn't have a drive letter.
Step 2. To change the drive letter and paths, select the option "Change Drive Letter and Paths" from the context menu. Then, in the new window that appears, click on the "Change" button.
Step 3. Assign a new drive letter to your external or internal hard drive and click "OK".
Fix 4. Update Hard Disk Driver
This method applies to hard drives that are visible in Disk Management but not in File Explorer.
Step 1. Right-click "This PC" and choose "Manage".
Step 2. Click "Device Manager" then expand "Disk drives".
Step 3. To resolve the issue with the external or internal drive, right-click on it and select the option to update the driver. This will allow Windows to check for any available updates and install the latest drivers for the drive.
Step 4. Click "Search automatically search for driver software online".
Fix 5. Initialize Hard Drive
When dealing with a brand new hard drive or an unallocated disk, the first step is to initialize the disk, which prepares it for use, and then create a volume on the new hard drive. This process typically involves opening the Disk Management tool, selecting the unallocated disk, and following the prompts to initialize and format the disk, ultimately creating a new volume.
Step 1. Right-click "This PC" (in Windows 10) and choose "Manage".
Step 2. To initialize a new hard disk, go to Disk Management, right-click the new hard disk, and select "Initialize Disk".
Step 3. Select the disk you want to convert, then choose MBR or GPT as its partition style, and click "OK" to initiate the process.
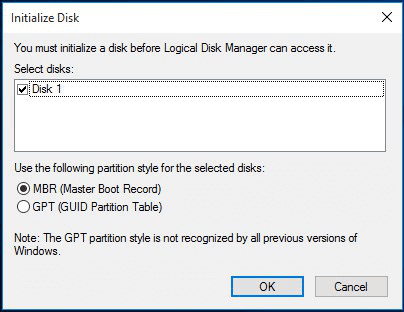
Then, follow the on-screen instructions.
Fix 6. Enable Hard Drive in BIOS
If your hard drive can't be detected, try enabling it in your BIOS settings. This might resolve the issue.

Step 1. To access the BIOS settings on your computer, you need to restart it and press a specific key, usually F2 or Del, depending on the computer's manufacturer, until you enter the BIOS setup screen.
Step 2. To configure the integrated peripherals, follow these steps: Use the arrow keys on your keyboard to navigate to the "Integrated Peripherals" option and press "Enter" to select it. This will allow you to configure the integrated peripherals on your system.
Step 3. To enable the USB controller, select the "USB Controller" option and change it to "Enabled".
Full Guide
Here, we've collected effective fixes to help you. Follow along to fix the hard drive not showing up in Windows 10.
How to Fix External Hard Disk Not Detected
If your external hard drive is not showing up, it may have stopped working, but other potential causes include compatibility issues with your computer, the drive not being turned on or properly connected, or a different problem altogether. If you're still having trouble, it's best to consult with a professional to troubleshoot the issue, but in the meantime, you can try checking the usual places and ensuring the drive is properly connected and powered on.
Case 1. External Hard Drive Not Showing Up
Symptom: The external hard drive is not showing up in "This PC" but is visible in Disk Management, indicating a potential issue with the drive's visibility in the operating system, possibly due to driver or connection problems.
To make your external hard drive visible and accessible on your computer, try the following methods. First, ensure the drive is properly connected and powered on. If it's still not visible, try unplugging and replugging the drive.
Method 1. Connect to a Different Port
If you're having trouble connecting your external hard drive to a different port, there are a few things you can try. You can start by checking the cable and making sure it's securely connected to both the hard drive and the computer. If that doesn't work, try using a different cable or port on the computer to rule out any issues with the original cable or port.
- The external hard drive should be unplugged from its current port and then plugged into the desired port.
- If the external hard drive still isn't being detected, try restarting your computer.
- Once your computer is back up and running, simply replug the external hard drive into the new port, and you should be good to go.
Method 2. Update the Driver
You may also need to update your external hard drive's drivers. This can usually be done through your computer's Device Manager.
Method 3. Run a Troubleshooter
Windows has a built-in troubleshooter that can help resolve issues with the hard drive, making it a useful tool to have when problems arise.
- To start, search for Command Prompt on your computer. Right-click on the first result and select "Run as administrator" from the context menu.
- Type the command: msdt.exe -id DeviceDiagnostic
- Click "Advanced" and select "Apply repairs automatically".
- The scan was conducted on [date] and took [duration] to complete. It found [number] issues and [number] vulnerabilities.
If you're still having trouble, try contacting the external hard drive's manufacturer for more support. If you're still having trouble, try contacting the external hard drive's manufacturer for more support.
Full Guide
If your external hard drive can be detected but not opened, it's likely due to a corrupted file system, firmware issue, or a hardware problem. To troubleshoot, try running a disk check on the drive in your computer's disk management tool.
Case 2. WD External Hard Drive Not Recognized
Symptom: The WD external hard drive not being recognized despite the light being on can be caused by a faulty USB port, a corrupted driver, or a hardware issue with the drive itself. Try using a different USB port or a USB hub to rule out the port issue.
If your WD external hard drive is not recognized, don't worry - it's a common issue that can be easily resolved. Simply unplug the drive, wait for 10-15 seconds, and plug it back in.
Step 1. Check the Connection
First, check to see if the WD external hard drive is properly plugged into the computer. If it is, then unplug it and plug it back in to resolve the issue.
Step 2. Check the WD Hard Drive
If you're experiencing issues with your WD external hard drive, first check for any physical damage. If there is physical damage, the drive will need to be replaced.
Step 3. Format the WD Hard Drive
To troubleshoot the WD external hard drive not detected error, first, check the power cord and ensure it's properly connected. Next, restart the computer and reseat the WD external hard drive. If the issue persists, try using the WD external hard drive on a different computer to rule out any hardware issues.
Formatting a WD external hard drive will erase all data, so back up important data before formatting it. This will ensure that your files are safe and can be easily restored to the drive after formatting.
Full Guide
If your Western Digital (WD) external hard drive is not showing up or working, try these fixes with the light on: Check the power cord and USB connection, ensure the drive is properly seated and the light is on, run a disk check and repair any errors, update the WD external hard drive firmware, and if still not working, try a different USB port or computer. If the light is on but the drive is not showing up, try running a disk check and repair any errors, or try a different computer.
Case 3. Seagate External Hard Drive Not Working
Symptom: If your Seagate external hard drive is not showing up or being detected, try restarting your computer, checking the USB port and cable, and ensuring the drive is properly formatted and recognized by the operating system. If the light is blinking but not working, try checking the drive's power source and cable, and running a diagnostic test on the drive.
Seagate external hard drives can stop working correctly, but trying a few troubleshooting steps can fix the issue, such as checking the drive's power cord and USB connection, running a virus scan, and updating the drive's firmware. If these steps don't work, it may be necessary to contact Seagate support or consider replacing the drive.
- Try a different USB port on the computer.
- Connect the drive to a different computer.
- If the current cable is damaged, it's best to replace it with a new one to ensure the system's safety and functionality. This will prevent any potential electrical hazards and maintain the overall performance of the device.
- Try a different power outlet. (Desktop Drives)
- If the drive's light is off, it means the power adapter is not connected to power, therefore, the drive will not function.
Full Guide
If your Seagate external hard drive is not working, try resetting it by unplugging it from your computer and pressing the power button for 30 seconds. Then, plug it back in and check if it's recognized by your computer.
How to Fix SSD Not Detected/Showing Up
If you're using a solid-state drive (SSD), things might be slightly different. An SSD uses flash memory to store data and has no moving parts, making it more durable and increasing performance. It's available in various form factors, including 2.5-inch drives and M.2 drives, and can be used as boot drives or data drives. While most modern laptops and PCs come with an SSD, they can be more expensive than traditional hard drives. If your SSD isn't showing up in Windows 10, follow the solutions below.
Case 1. SSD Not Detected/Showing Up in BIOS
If your SSD isn't showing up in BIOS or Windows, it's likely due to one of several issues, including a faulty SSD, incorrect BIOS settings, a loose connection, or a driver problem. To resolve the issue, try checking the SSD's connection, updating your BIOS, or reinstalling your SSD drivers in Windows.
- The SSD is not properly connected to the motherboard.
- Check your SATA cables and make sure they're plugged in securely. If that doesn't work, try resetting your router or modem.
- The SATA mode in the BIOS is set to the wrong setting, which is causing the issue. The correct setting should be changed to AHCI or IDE, depending on the system configuration.
- To resolve the issue, check your BIOS settings and ensure the SATA mode is set to AHCI (not IDE) to allow the operating system to recognize the SSD.
- There's a problem with the motherboard itself.
If the SSD still doesn't show up after trying all the above steps, it's possible that there's a problem with the motherboard. You might need to reset the BIOS or replace the motherboard altogether.
Full Guide
If your SSD is not showing up in Windows 11/10, you can try to fix it by checking the SATA cable connection, updating the BIOS, and running the built-in disk management tool. You can also try to reset the SSD to its factory settings or replace it if it's faulty. Additionally, you can try to run the built-in disk check tool to scan for any errors or issues with the SSD.
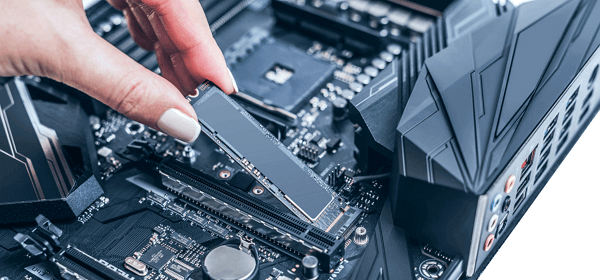
Case 2. M.2 Not Showing Up
M.2 is a type of SSD (solid-M.2 drives are newer and faster than traditional SATA SSDs, offering improved performance and storage capacity. However, they may not be compatible with all motherboards, and installation can be tricky. If you're experiencing issues with your M.2 drive not showing up in BIOS or Windows, try checking the drive's compatibility with your motherboard, ensuring it's properly seated, and updating your BIOS or driver software.
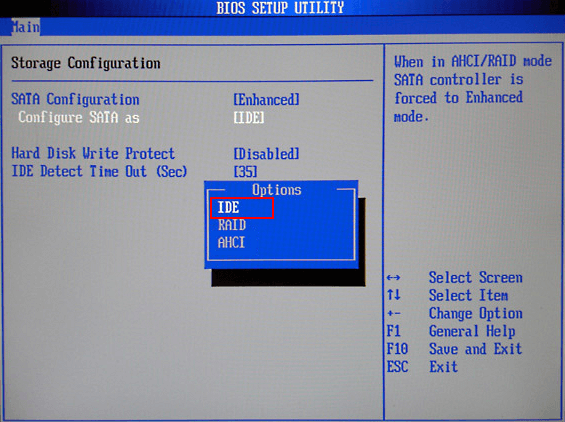
Configure Your M.2 SSD
To resolve the issue with the M.2 drive not being recognized, ensure the drive is properly installed in the motherboard. Restart the PC and enter the BIOS settings by pressing F2/Delete. In the BIOS, navigate to the "SATA Configuration" section and select the option to configure the SATA configuration as IDE. Save the changes and exit the BIOS settings. This should allow the M.
Use a Different Motherboard
If your M.2 drive is not showing up, you can try using a different M.2 drive or motherboard to see if the issue is with the specific drive or the system as a whole. This can help you determine if the problem is with the drive itself or with the system's ability to recognize it. If the issue persists, you may need to troubleshoot further or seek additional support.
If your M.2 SSD isn't appearing in Disk Management, try updating your driver, running the Hardware and Device Troubleshooter, and assigning a drive letter.
Full Guide
You can learn the details about how to fix M.2 SSD not showing up in BIOS or Disk Management.
Case 3. NVME Drive Not Showing Up
NVME (Non-NVMe is a newer interface for connecting SSDs to computers, offering several advantages over the older SATA interface, including lower latency, higher data transfer rates, and more efficient use of CPU resources.
NVME drives are not yet compatible with all computers, and may not be detected by the BIOS or may appear as a generic storage device. To get an NVME drive working properly, a few things can be tried, such as checking the motherboard manual for NVME support, enabling NVME in the BIOS settings, and installing the NVME driver from the manufacturer's website.
- Before installing an NVMe drive, ensure that your motherboard supports NVMe technology and that the correct BIOS settings are enabled to take advantage of its performance capabilities.
- Installing an NVMe drive may require special drivers or firmware to be installed on the computer to properly detect and use the drive, in addition to the standard operating system installation.
With a little bit of effort, it's usually possible to get an NVMe to drive up and running on most modern computers.
Full Guide
If your NVME SSD is not being detected, this guide offers reliable solutions to help you resolve the issue. Keep reading to find out how to fix the problem.
How to Recover Files from a Hard Drive That's Not Showing Up
When a file is deleted, it's not actually removed from the hard drive, but rather marked as available space for new data. This means the original file is still present on the drive, albeit in a fragmented state, making it sometimes possible to recover lost data.
1 - Recover Files from a Hard Drive with Data Recovery Software
With the right software, it's often possible to recover lost data from fragmented files, but acting quickly is key, as new data may overwrite the missing file and make recovery impossible.
Qiling hard disk data recovery software makes it possible to recover data from a hard drive, external drive, SSD, USB, SD card, and more, with simple steps, allowing you to restore data from any device.
Step 1. Launch Deep Data Recovery, select the desired file types, and click "Next" to initiate the recovery process.

Step 2. To recover lost data, select the hard drive where the data was lost and click "Scan".
Step 3. When the scan completes, you can use the "Filter" or "Search" feature to find the lost files. This allows you to quickly locate and recover the files that were found during the scan.

Step 4. Select the desired HDD files and click "Recover" to save them to a secure location.
2 - Recover Files from a Hard Drive with Data Recovery Services
Data recovery software can be helpful, but a data recovery service can provide a more comprehensive solution, especially when data loss is caused by physical damage or software corruption, offering expert assistance and minimizing frustration and expense.
Consult with Qiling data recovery experts for a one-on-one manual recovery service, which includes a FREE diagnosis, followed by the option to receive the following services.
- To repair a corrupted RAID structure, unbootable Windows OS, and corrupted virtual disk file, you can try the following steps: First, try to boot from a Windows installation media and run a System File Checker (SFC) scan to check for any corrupted system files. If the SFC scan fails, you can try running a DISM scan to repair any corrupted system files.
- Recover/repair lost partition and re-partitioned drive
- Unformat hard drive and repair raw drive (BitLocker encrypted drive)
- Fix disks that become GPT-protected partitions
How to Monitor Your Hard Drive's Health
Regularly monitoring your hard drive's health can help prevent unexpected failures and data loss. By keeping an eye on your hard drive, you can identify potential issues before they become major problems, ensuring that your files remain safe and accessible.
Option 1. Run a Regular Scan
Running regular scans with an anti-virus program is crucial to identify and remove potential threats to your hard drive's health, preventing damage and ensuring its longevity.
Option 2. Use the SMART Tool
SMART stands for Self-SMART is a technology that monitors and analyzes the health of a hard drive, tracking factors like disk temperature and error rates. If issues are detected, SMART provides a warning, allowing users to back up data before a potential hard drive failure.
Option 3. Turn to the Manufacturer
The manufacturer provides an expected lifetime for the disk based on usage, and frequent large file copying or small file additions/deletions can decrease the passes/fails count faster than normal.
Conclusion
A computer may not detect a hard disk due to improper connection, disk damage, or BIOS settings issues, but often a simple reboot resolves the issue, and if not, seeking professional help is recommended.
Related Articles
- Everything You Need to Know About Shortcut Virus
- Word Recovery for Unsaved, Deleted, and Corrupted Word Documents [Professional Guide]
- (July 2022) Ultimate Guide to Mac Time Machine Backup
- How to Recover Unsaved Excel Files (2022 Tips)
- Repair Corrupt Excel File on Windows 10/11 [Top 4️⃣Methods]
In this guide, you'll learn multiple ways to fix a corrupt Excel file on Windows PCs. The best and easiest solution is to apply Qiling Fixo Document Repair to repair the damaged Excel files. - The Top 10 Data Recovery Services in Bay Area, CA Near Me
In the Bay Area, there are many data recovery services available. These nearby companies can assist you in recovering almost any type of mistakenly lost, deleted, or damaged digital material. We provide a list of recovery services and their contact information for your convenience.