(Guide) Ultimate Guide to Mac Time Machine Backup
Ⅰ. Does Time Machine Back up Everything?
Time Machine is the built-in backup feature of macOS, which allows you to back up your files and their different versions over time. Once set up, it can automatically back up your data, including apps, music, photos, email, and documents.
If you're new to Mac Time Machine, you might be wondering if it's enough to create a full backup. The good news is that Time Machine does back up everything on your Mac, including your files, applications, and system settings. This means you don't necessarily need other backup software in addition to Time Machine. However, it's always a good idea to have a backup of your backups, so consider using a separate backup solution to store your Time Machine backups offsite. This way, you'll have a complete and redundant backup of your Mac's data.
Time Machine saves most of the personal data, but has limitations, such as not backing up system files, kernel extensions, and certain system logs. It also won't back up the System, VMWare, or Parallels virtual machines, and some other system-specific data. However, it will back up most user data, including documents, photos, music, and other files. Additionally, Time Machine can be configured to exclude certain files or folders from backups, allowing for more control over what is backed up.
- Your iOS devices
- Your iCloud content
- Your email messages or accounts
- Your network settings
- Certain system files and applications
Ⅱ. How to Setup and Use Time Machine on Mac
To use Time Machine on your Mac, you'll need to set it up for the first time, which involves preparing a backup disk. This can be an external hard drive, a USB drive, or a network-attached storage (NAS) device. Simply connect the backup disk to your Mac, open Time Machine preferences, and follow the on-screen instructions to select the backup disk and set up the backup process. Once set up, Time Machine will automatically back up your Mac data, including files, folders, and system information, at regular intervals, which you can customize to suit your needs.
#1. Prepare a Backup Disk: What Disk Can You Use?
For Mac users, backing up data is a must, and experts recommend using an external hard drive for safety. However, there are other options available, including USB drives, FireWire drives, NAS devices, a shared Mac computer, and AirPort Time Capsule. Most users opt for external hard drives or USB drives as a backup disk, but for more information on other storage device choices, Apple's support page is a good resource.
To prepare for the task, you should have an external hard drive that is compatible with your computer's operating system and has sufficient storage capacity to hold your data. This will allow you to easily transfer and store your data for later use.
1. The external hard drive should be large enough to hold the data you wish to backup.
2. If the drive has been formatted before, ensure the file format is compatible with macOS, which includes APFS, Mac OS Extended, MS-DOS (FAT), and exFAT.
3. If the disk isn't using the correct format, you can format it first on your Mac. To do this, go to Disk Utility, select the disk you want to format, and click "Erase.
4. There is no brand limitation to the disk you choose, you can use whichever you want.
#2. Set up Mac Time Machine & Start Automatic Backup
To set up Time Machine backup on your Mac, connect your external backup disk to the computer. Then, go to System Preferences > Time Machine and select the backup disk from the list of available disks.
Step 1. To set up Time Machine, go to System Preferences from the Apple menu, then click the Time Machine icon.
Step 2. When opening the Time Machine window, select the connected backup drive by clicking "Select Disk".
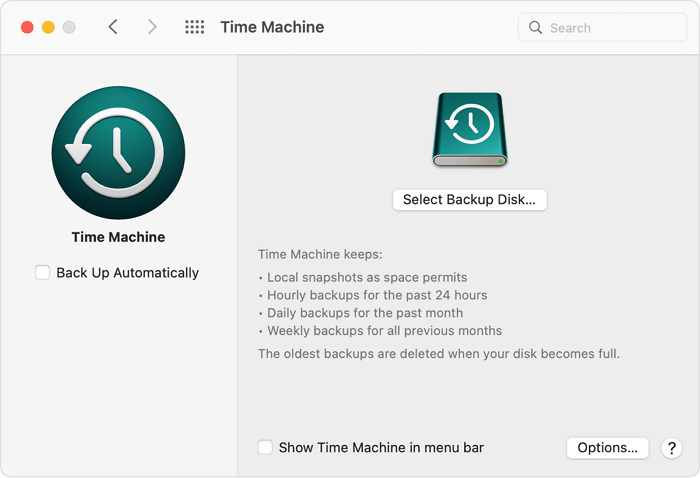
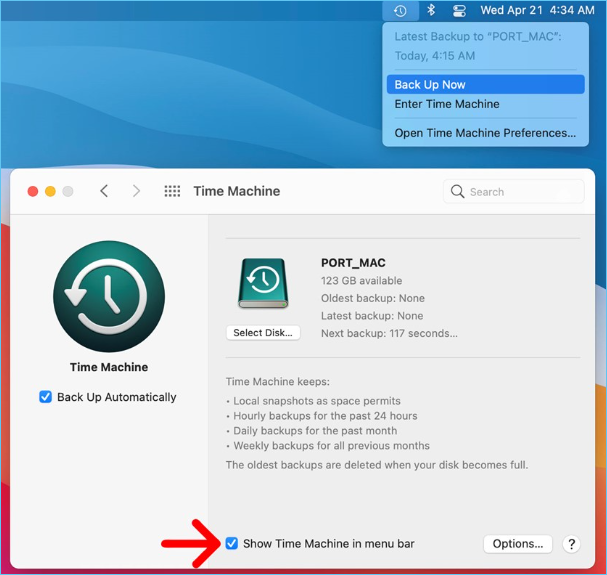
Step 3. To enable automatic backups with Time Machine, check the "Back Up Automatically" box. This will allow Time Machine to automatically create backup files on your designated backup drive. Additionally, you can also choose to have Time Machine appear in the menu bar for easy access.
Step 4. When you complete the setup process, Time Machine will automatically start creating the first backup.
LEARN MORE
If you're curious about Time Machine, click here to learn about how to set up and use it on your Mac.
Ⅲ. How to Restore Time Machine Backup
To restore a Time Machine backup, follow these steps: make sure your Mac is connected to the same network as the external drive or Time Capsule where the backup is stored, locate the Time Machine icon in your dock or go to System Preferences > Time Machine > Select a backup disk, select the date and time from which you want to restore the files, and Time Machine will begin the restore process. You can also restore individual files or folders by navigating to the specific location in the Time Machine window and selecting the desired items.
Time Machine allows for two types of restore: a full system restore and a file/folder restore.
Full System Restore: If you want to restore your Mac to its previous state with the same files and settings, you can use the "Restore from this backup" feature. This will erase your Mac and reinstall macOS, but with the backed-up files and settings. For more detailed steps, you can check Apple's support page.
File/Folder Restore: To selectively choose which files or folders to restore from your backups, follow these steps:
Step 1. Connect the backup disk to your Mac, then open Time Machine and select the backup drive to start the backup process.
Step 2. To restore a file or folder, find the date when you last modified or created it, and click on the corresponding date in the timeline. This will take you to a list of all the files and folders you modified or created on that date.

Step 3. To preview a file, select it and press the Space bar.
Step 4. To restore a file, select it and click the Restore button.
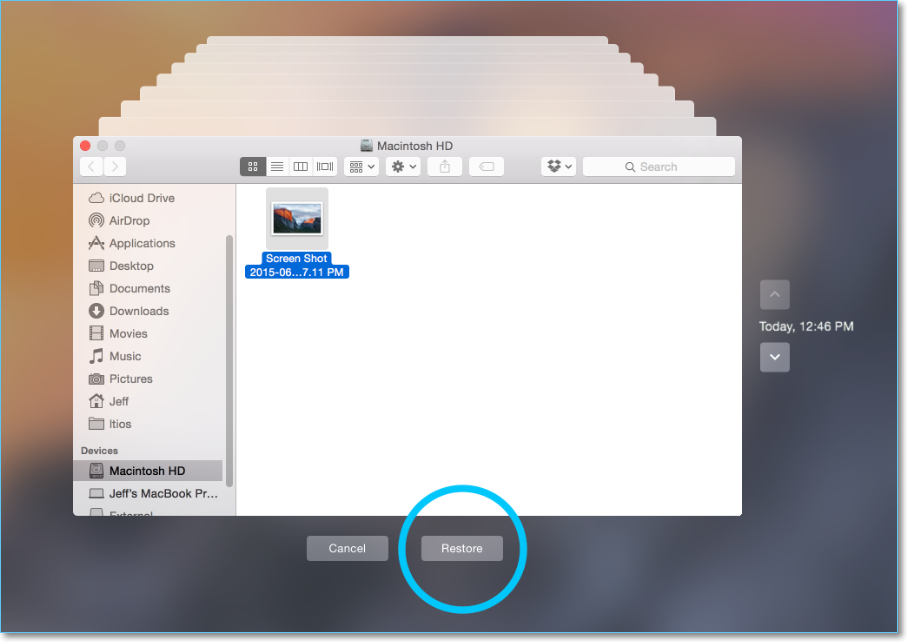
Step 5. When you finish restoring files, press Command-Q to quit Time Machine.
LEARN MORE
If you want to restore files or folders from a Time Machine backup, you can follow the detailed steps provided. Alternatively, for other methods to restore Time Machine backup, you can visit the given link to learn more about how to restore from Time Machine.
Ⅳ. Backup File Lost? Recover Deleted Time Machine Backup
You might lose Time Machine backup files in two situations: accidentally deleting them or formatting the backup drive. In either case, if you want to recover deleted Time Machine backups, you'll need to use third-party data recovery software for help.
To recover deleted Time Machine backup, you can use Deep Data Recovery for Mac as an example. This software can help you recover deleted data from various sources, including Time Machine backups.
Deep Data Recovery for Mac
- Recover lost or deleted files from Mac internal and external drives using data recovery software. This includes USB drives, Thunderbolt drives, and Time Machine backup drives.
- You can recover deleted files from emptied Trash, formatted memory cards, flash drives, digital cameras, and camcorders using data recovery software. This software scans the device for recoverable files and allows you to preview and select the files you want to recover.
- A smart scanning mechanism on Mac ensures that every possible lost file is found quickly and efficiently, allowing users to recover their data with ease and speed.
To recover deleted files, download the software from the button below, connect your Time Machine disk to your Mac, and follow the step-by-step guide to restore your lost files.
Step 1. Download and Install Data Recovery Wizard for Mac
Download the Deep Data Recovery installation package for Mac, which requires macOS 10.9 or later. The download time varies based on your bandwidth speed. Once downloaded, find the "MAC_DRW_Trial_RssM.dmg" file, double-click it, and drag the Qiling icon to the Application folder to install it.

Step 2. Locate the Data Loss Drive
To initiate the recovery process, Deep Data Recovery needs to know the location of the lost data. This can be a specific file, folder, or even an entire drive.
Deep Data Recovery for Mac allows recovering data from both internal and external devices, including various file systems such as HFS+, APFS, SSD, HDD, FAT, and NTFS. On the software interface, connect your external device to your Mac (if necessary) and select the target drive to scan, with internal and external devices listed separately. Click the "Scan" button to initiate the scanning process, which should be done one drive at a time.

Step 3. [Quick + Deep] Scan for Deleted Files
After clicking "Scan", Deep Data Recovery initiates a Quick Scan of the target drive, which can recover files that are likely to be recovered or recently deleted. Upon completion, the software automatically starts a Deep Scan, thoroughly searching the entire drive at a binary level to find all lost data. The duration of this process varies depending on the drive and data size, taking anywhere from tens of minutes to several hours to complete.
You don't have to wait until the scanning process is complete to start recovering deleted files - you can start recovery as soon as the software finds them. Additionally, you can save the scan record to your Mac for future scanning.

Step 4. Select and Recover Your Files
To recover deleted files on a Mac, locate the files you want to recover by filtering the file type, searching the file name, or checking the file path. Once you've found the files, select them and click the Recover button. You can also choose multiple files, right-click on them, and select to recover them to your local Mac or to your cloud drive, and then save them to a new destination.
LEARN MORE
The Time Machine disk, intended for backup purposes, can still experience data loss during its use. For a more detailed understanding of recovering Time Machine backups, please refer to the linked article.
Ⅴ. Problem #1. Time Machine Won't Complete First Backup
Users have reported issues with Time Machine, including being stuck creating the first backup, with error messages like "Time Machine couldn't complete the initial backup" or being stuck on "preparing backup".
There is more than one way to help you solve a problem. Some are basic solutions, and some require more user expertise. Here we only introduce the easiest three methods. You can follow them to fix this problem.
Method 1. Cancel Backup and Try Again
Cancel and restart the backup process. To resolve a pending Time Machine backup process, stop the current backup by clicking the "x" icon, then restart Time Machine and initiate a new backup by clicking "Back up Now". This should allow the backup process to complete successfully.
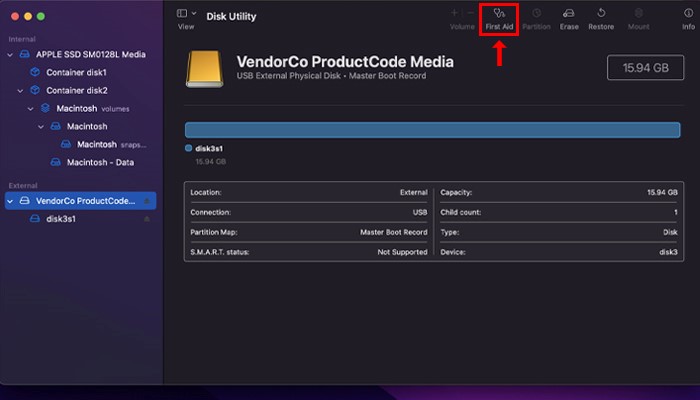
Method 2. Use First Aid to Fix the Backup Drive
Disk Utility is another macOS utility. If you're a Mac user, you can use a tool called First Aid to manage internal and external drives. However, if Time Machine can't complete a backup, it might be due to a damaged backup drive, and using First Aid can help you troubleshoot the issue.
Step 1. Launch Disk Utility on Mac.
Step 2. Select the Time Machine backup disk from the list of available drives on the left side of the window. This will allow you to access and manage your backups.
Step 3. If your Mac's backup drive is not functioning properly, you can try using the built-in First Aid tool to repair it. To do this, click on the "Disk Utility" option from the Utilities folder in the Applications folder, then select the backup drive from the list on the left side of the Disk Utility window.
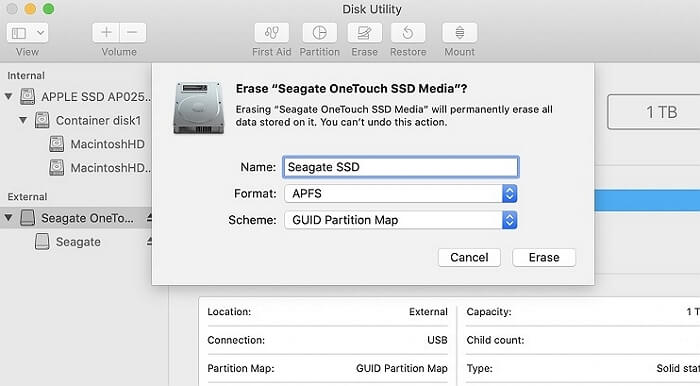
Method 3. Format Time Machine Drive to APFS
If your drive has the wrong format, try formatting it to APFS, which is the macOS-recommended file format, and then attempt to create a Time Machine backup again.
Step 1. Connect your backup drive to the Mac, and launch Disk Utility from the Utilities folder in Applications, or use Spotlight to search for it.
Step 2. Select the target drive, and click Erase on the top.
Step 3. Choose to format the drive to APFS.
Which One to Choose? ExFAT or Mac OS Extended?
On macOS, users have four compatible file system formats to choose from: FAT, ExFAT, APFS, and Mac OS Extended. While some users may struggle to decide between ExFAT and Mac OS Extended due to a lack of understanding about their respective advantages and disadvantages, this article aims to provide clarity on the matter.

LEARN MORE
If Time Machine won't complete the first backup, there are more than three methods to fix the issue. If these methods don't work, you can click to learn more about how to fix Time Machine won't finish the first backup.
Ⅵ. Problem #2. Repair Time Machine Backup: Failed, Corrupted, Missing
Time Machine backup issues are often caused by failed, corrupted, or missing backups. Fortunately, each type of issue has a solution. To repair a failed Time Machine backup, you can check the content to find the necessary steps to resolve the problem.
1. How to Fix Backup Failed
- Check Time Machine System Requirements
- Check the Mac Network Connection
- Check if your Mac is up to date
2. How to Fix Backup Corrupted
If your Time Machine backup is corrupted, the simplest solution is to create a new backup, which will save you time and effort in repairing the corrupted file. As long as your backed-up content is safe, you can simply restart the Time Machine and create a new backup.
3. How to Fix Time Machine Backup is Missing
If you've accidentally deleted a Time Machine backup file from a disk, you can try using data recovery software to scan the backup disk and see if it can recover the lost file.
Deep Data Recovery for Mac is a Mac-exclusive tool to restore data. If you need to recover lost data, you can refer to the guide in Part Ⅳ to see how to use data recovery software.
LEARN MORE
Unfortunately, repairing a Time Machine backup can be more complicated than expected. While the solutions provided here are a good starting point, there's more to explore. For a more comprehensive understanding, click here to learn about repairing Time Machine backups.
Ⅶ. Problem #3. Time Machine Restore Button Greyed Out
A user from Apple's discussion community reported that when they tried to restore a Time Machine backup, the restore button was greyed out, preventing them from proceeding. If you're experiencing the same issue, this guide will help you troubleshoot and resolve the problem.
The restore button of Time Machine might be greyed out due to several reasons. It could be because the backup disk is not properly connected, or the disk is corrupted. Additionally, if the disk is not recognized by Time Machine, the restore button will also be greyed out.
- The Time Machine backup drive was formatted
- Your previous created backup was incomplete
- Your Mac has detected the backup was corrupted
Here are two practical solutions to fix the problem of not being able to enter Time Machine:
Solution 1. To enter Time Machine, open the Finder on your Mac and click on "Enter Time Machine".
Solution 2. This solution is to force restore Time Machine from boot.
1. To restart your Mac, press the power button to turn it off, then press the power button again to turn it back on. Press and hold the Command + R keys simultaneously until you see the Apple logo on the screen.
2. Release the keys, then enter macOS Utilities and choose "Restore From Time machine Backup" to see if you can restore your computer now.
LEARN MORE
For the case of Time Machine restore button greyed out, you should also know that there are other possible causes and solutions, such as checking the backup disk for errors, ensuring that the backup disk is properly connected, and troubleshooting any issues with the Time Machine software itself. A detailed article on Time Machine restore failed provides more information on these and other potential solutions.
Related Articles
- File Repair| How to Repair Corrupted File (PST, PDF, Photo, etc.)
- macOS Update Ultimate Guide: How to Update OS on All Models of Mac
- Email Recovery for Gmail, Yahoo, Outlook, Hotmail
- Fix Hard Disk Not Detected/Recognized on Windows 10
- Fixed: Windows 10 Freezes While Copying Files, No Data Loss
If your Windows PC freezes or hangs when copying files from one hard drive to another, there are reliable methods available to help resolve the issue. - Fix Command Cannot Be Performed Because a Dialog Box is Open
To resolve the error message “Command cannot be performed because a dialog box is open” when running an older version of Microsoft Word on Windows 10, follow these steps: click “OK” on the error message, then close any open dialog boxes in Word. This should allow you to continue using the software without further issues.