How to Remove Folders and Files from Quick Access Windows 10/11
Windows Quick Access allows for quick and easy access to frequently used files and folders, making it an essential feature for many users.
You can quickly return to your recently accessed files and folders with Quick Access in Windows File Explorer. However, the Quick Access option is disabled by default, but even if it's enabled, you can remove folders or files from it using various methods, which we'll outline in this guide.
What Is Quick Access
The Quick Access Toolbar is automatically shown on the far left of the File Explorer title bar, where it can be easily accessed by opening a File Explorer window and looking at the top of the window.
Important: The Quick Access Toolbar should not be confused with the Quick access location from File Explorer's Navigation window, which is a different feature that allows users to quickly access frequently used folders.
How to Remove Files or Folders from Quick Access in Windows 10/11
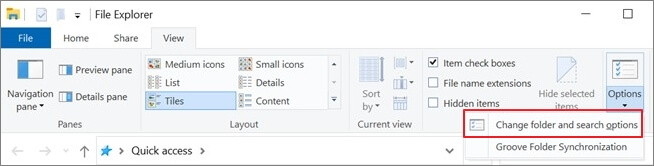
To disable the recently used files and folders in Quick Access in Windows 10, go to File Explorer, click on the "View" tab, and uncheck the boxes next to "Quick access" and "Frequent places" in the Show/hide section. This will remove the recently used files and folders from the Quick Access section, but keep in mind that this will also disable the ability to pin files and folders to Quick Access.
Step 1.To resolve the issue, you can open the File Explorer Options in your Control Panel and choose the appropriate option. This will allow you to customize the settings for File Explorer, which may resolve the problem.
Step 2.To change the Explorer settings, simply launch Explorer, go to the "View" tab, and click on the "Options" dropdown menu from the View tab.
Step 3. To change the folder and search options, select the desired option from the drop-down menu.
Step 4. The window that appears next will have two checkboxes at the bottom of the page, allowing you to toggle the display of recent files and folders.
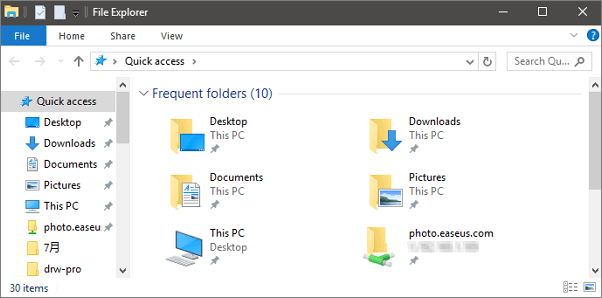
The Quick Access feature in Windows 10 allows frequently used files and folders to be displayed at the top of the File Explorer window, making it easier to access them. However, unlike Windows 10's Recent Items feature, the Quick Access feature only shows items that have been used repeatedly over time, and not just recently. This means that only products that have been used repeatedly over some time will appear in the Quick Access section, and not just items that were recently opened.
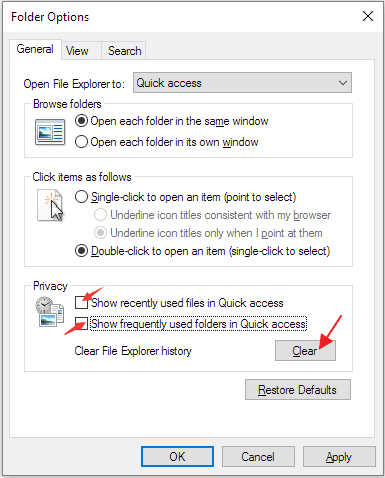
Step 5. Users can choose to show recently used files and folders in their Quick access section of File Explorer, or delete the history of their File Explorer sessions, by unchecking the appropriate boxes.
(Note: This will wipe the slate clean in Quick Access, allowing for more current and relevant things to surface in the list of items).
How to Remove Quick Access from File Explorer Entirely
If you want to remove Quick Access from File Explorer entirely, here's a method to get rid of it.
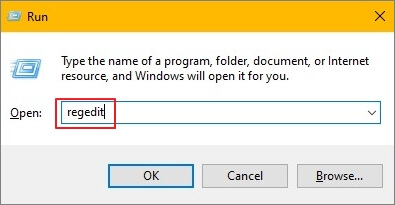
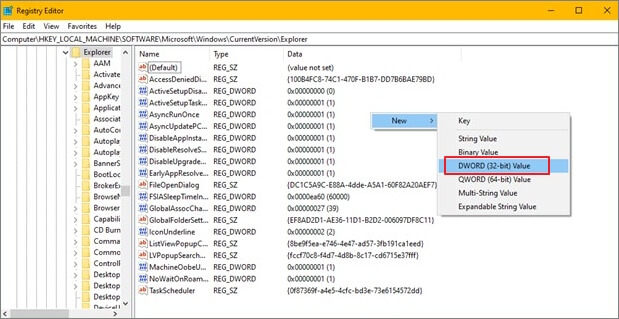
Step 1. To open the Registry Editor, press the Windows Key + R simultaneously, type "regedit" in the Run menu, and press OK.
Step 2. To access the registry key, go to HKEY_LOCAL_MACHINE, then Software, then Microsoft, then Windows, then CurrentVersion, then Explorer. This path allows you to navigate to the specific registry key where the settings for Windows Explorer are stored.
Step 3. To disable the Quick Access menu, right-click anywhere on the screen, select the "New" option, then choose "DWORD (32-bit) Value". Change the name of this new value to "HubMode" and set its value to 1. This will remove the Quick Access menu from your system.
Can't Remove Folder from Quick Access, How to Fix
If you're unable to remove folders or files from Quick Access using the above methods, try troubleshooting by checking if the files or folders are still in the same location, ensuring the Quick Access cache is cleared, and verifying that the files or folders are not system files or protected by Windows Defender. If none of these steps resolve the issue, you may need to reset Windows Explorer or reinstall Windows.
Method 1. Reset the Quick Access Recent Items List
To reset the quick access recent items list, go to Settings, click on System, and then click on the "Storage" tab. From there, click on "This PC" and right-click on the "Quick Access" folder, selecting "Properties" and then clicking the "Clear" button to reset the list.
Step 1. Launch the File Explorer program.
Step 2. Right-click on the "Quick Access" star symbol to bring up the context menu.
Step 3. Select "Options" from the drop-down menu.
Step 4. To clear the screen, use the "Clear" button.
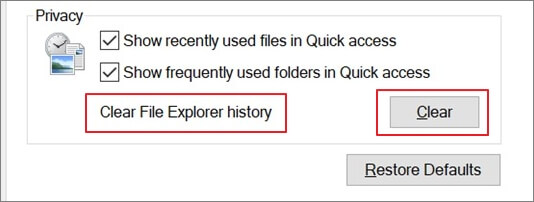
This feature will remove all recent folders from Quick Access, while preserving any folders that were added manually.
Method 2. Delete Your Temporary Files
To delete temporary files in Windows 10/11, follow these steps: Go to the "Settings" app, then click on "System," followed by "Storage." On the next page, click on "This PC" and then select the drive you want to clean up.
Step 1. To access the Temp folder, go to the Windows "Temp folder" location, which is typically found in the C:\Windows\Temp directory, and open the folder in File Explorer to view its contents.
Step 2. Delete all unnecessary files from the Temp folder.
Step 3. If a dialog titled "Folder" in Use appears, select the option to "Skip" to delete the specified temporary files.
Step 4. To permanently erase temporary files in Windows 10, use the Recycle Bin. Simply drag the files to the Recycle Bin, right-click on the bin, and select "Empty Recycle Bin" to delete them completely.
Method 3. Create a New Folder in the Old Location and Remove It from Quick Access
When moving a folder from the Quick Access bar to a different location, it may become stuck and clicking on it will result in an error message. This occurs because the folder's path has changed, disrupting its connection to the Quick Access bar.
To resolve the issue, create a new folder in the exact location where the file used to reside, with the same name as the original. Then, you can unpin the file from Quick Access and permanently remove it. This should resolve the problem.
How to Recover Permanently Deleted Folders/Files on Windows 10
If you've experienced a data loss incident, a file recovery software like Qiling Data Wizard Recovery for Windows might be needed to reverse the consequences. This software is our top pick for Windows users.
Deep Data Recovery is a data recovery tool that uses complex algorithms to scan storage media for lost data, even after it has been erased and reassembles it for recovery.
Key Features
- Recover lost files with ease by utilizing a reliable recovery tool. This software can efficiently retrieve deleted photos, documents, audio files, music, and emails, giving you a second chance at accessing your important data.
- Data recovery is possible from various storage devices, including formatted hard disks, empty trash bins, memory cards, flash drives, digital cameras, and camcorders.
- Data recovery software provides support for data recovery in various conditions, including accidental deletion, formatting, hard drive corruption, virus attacks, and system crashes.
- After data recovery, Deep Data Recovery can also repair corrupted files, including broken JPEGs, damaged documents, and corrupted videos, helping restore them to their original state.
Step 1. Select file types and click "Next" to start
Launch Deep Data Recovery, select the desired file types, and click "Next" to initiate the recovery process.

Step 2. Select a folder to scan for lost files
To recover a lost folder, select "Specify a location" and choose "Select Folder". Then, click "Browse" to select the location where the folder was originally saved, and click "OK" to initiate the scan.

Step 3. Find and preview found files in the lost folder
If you remember the folder name, type it into the search box to quickly find the lost files. This will allow you to locate the folder and then double-click on it to preview the scanned files. Alternatively, you can use the Filter feature to search for a specific type of file.

Step 4. Recover and save the lost folder
To recover your data, select the folder and files you need, click "Recover", and choose a secure location on your PC to save the recovered data.
Concluding Words
Our comprehensive guide on how to remove a folder from Quick Access has explained all the possible methods to troubleshoot. If you lose data due to an operation error or technical problem, Qiling data recovery software can be your savior and restore all your lost files and folders. Do give it a try!
Related Articles
- How to Recover Overwritten Files in Windows 10/8/7 Easily
- How to Recover Corrupted Files from a USB Flash Drive
- Recover Deleted or Lost AppData Folder and Files in Windows 11, 10, 8, 7
- ISO Recovery: Recover Deleted ISO Files with ISO Recovery Software
- Guide to Recover Deleted Files with System Restore in Windows 10, 11
You can recover deleted files with System Restore, and for further assistance, you can also use another data recovery tool to recover deleted files in Windows 10/11. - How to Recover Hidden Files in USB using CMD [Full Guide]
How to recover hidden files in USB using CMD? Here is a stepwise guide. Also, we shows you alternative ways to unhide files hidden by viruses and find lost USB data.